

| BMW Garage | BMW Meets | Register | Today's Posts | Search |
|
|
|
 SUPPORT ZPOST BY DOING YOUR TIRERACK SHOPPING FROM THIS BANNER, THANKS! |
|||||||||
Post Reply |
|
|
Thread Tools | Search this Thread |
| 11-24-2011, 09:38 PM | #1 |
|
Enlisted Member
 6
Rep 31
Posts |
Vanos Repair
OK, so yesterday I did the vanos repair on my 2003 2.5 Z4 by replacing the seals with the ones available from Beisan. I'm not going to go into all the details about why or really even how. I figure by now and if you are reading this you already know.
Here is a link to the great instructions provided by Beisan. http://www.beisansystems.com/procedu..._procedure.htm What I did want to point out were a few things that I think are unique to the Z4 and that I did not find specific reference to before I started. I want to thank Shipkiller for helping me avoid a problem with the removal by giving me a head's up a troublesome bolt. Below are some pics and notes.  I found it necessary to remove the lower rad hose, not just the electrical connector. So have some coolant on hand.  Getting the piston caps off is very tight work and having some bent needle nose pliers really is necessary.  Per Shipkiller and my own experience it is necessary to remove 3 threads off the bolt circled. If you do not the vanos will not clear. It is still incredibly tight but it does come off after this small modification.  My vanos. This is off a 2003 2.5 with 131,xxx miles.  Vanos in pieces.  Original intake piston and seals. These were in fairly poor condition.  Profile of an original o-ring with 131,xxx miles. The rest was just the reverse. Beisan does a great job of walking you through this and if you take note of the exceptions above it is a straight forward job that takes every bit of 4.5 hours to complete. For me this also included replacing the valve cover gasket. Hope this helps, Donovan |
| 11-24-2011, 09:49 PM | #2 |
|
Major
 23
Rep 1,034
Posts |
I probably should do this to my car, but that pile of parts is pretty intimidating.
__________________
Straightaways are for fast cars, Corners are for fast drivers.
|
|
Appreciate
0
|
| 11-25-2011, 01:20 AM | #3 |
|
Colonel
 
1211
Rep 2,931
Posts
Drives: Anything
Join Date: Apr 2010
Location: SoCal
|
Good job at attempting this! Did you have any of the vanos failing symptoms or was this a proactive preventative repair?
|
|
Appreciate
0
|
| 11-25-2011, 02:07 PM | #4 | |
|
Enlisted Member
6
Rep 31
Posts |
Quote:
Now I do notice a difference after the change. More low end power around town and I swear it seems to rev smoother. I will have to wait a few weeks to measure gas mileage, but I will do this and report back. So far I've only done about 40 miles in town so the seals still have a ways to go before they are fully bedded in. Cheers, Donovan |
|
|
Appreciate
0
|
| 11-29-2011, 11:15 AM | #5 |
|
Enlisted Member
6
Rep 31
Posts |
OK, one last update to this. I have noticed that the cold start surging I had experienced is gone.
Additionally I've traveled 450+ miles since the seal replacement and 150+ of those were city miles. My gas mileage changed from an average of 27.22 mpg to an average of 30.41 mpg. That is spread over city and hwy miles. The hwy miles are mostly at 3500-3700 rpm about 75-80 mph. Donovan |
|
Appreciate
0
|
| 11-29-2011, 02:46 PM | #6 | |
|
is a Texan
49
Rep 387
Posts |
Great work! I'm guessing the removal of the unit might be made possible if the radiator was out (versus trimming down the circled bolt)?
Quote:
__________________
- Jake  |
|
|
Appreciate
0
|
| 11-29-2011, 07:33 PM | #7 |
|
Colonel
190
Rep 2,138
Posts
Drives: Me
Join Date: Oct 2007
Location: Virginia Beach
|
It is not the radiator that is the issue, it is the supporting cross bulkhead.
When I did my own in 2008 (on the Roadster), the Vano hydraulic assembly came right out. There are production variances so the engine placement will be a little different on each car. I have done four of these 'repairs'. Two came right out, two needed some help. One person jacked up there engine for the clearance. One loosened the front cross structure. |
|
Appreciate
0
|
| 06-21-2013, 04:48 AM | #8 |
|
Registered
0
Rep 4
Posts |
recommend that you read the information about the repair kits for BMW vanos online
www.vanos-bmw.com   |
|
Appreciate
0
|
| 06-21-2013, 11:21 AM | #9 |
|
#buildnotbought
12620
Rep 5,278
Posts |
And there is a more elegant way to remove the vanos unit from the block than grind off the threads òr loosening the front subframe and bending it by (lots and lots of) force.
First of all the front vanos will not clear the threaded studs coming out of the block. It's obstructed by the front subframe before it can clear the studs (see the red arrows): 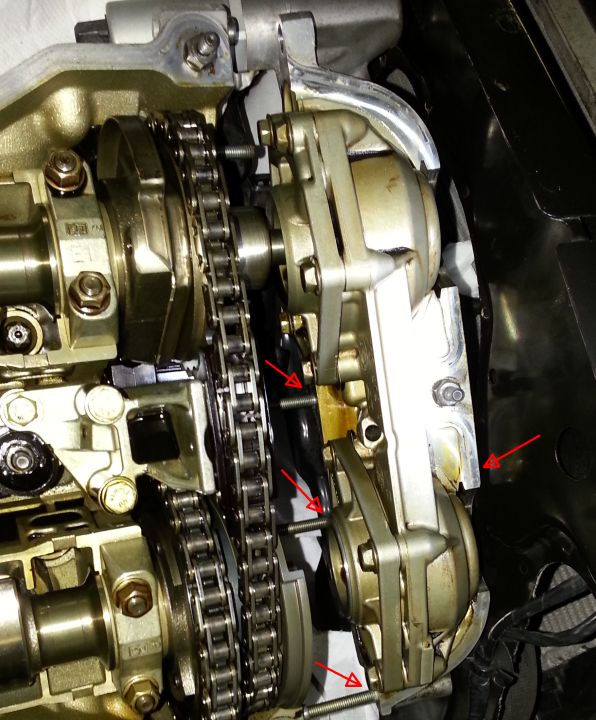 First of all you remove the inlet vanos relais (32mm spanner): 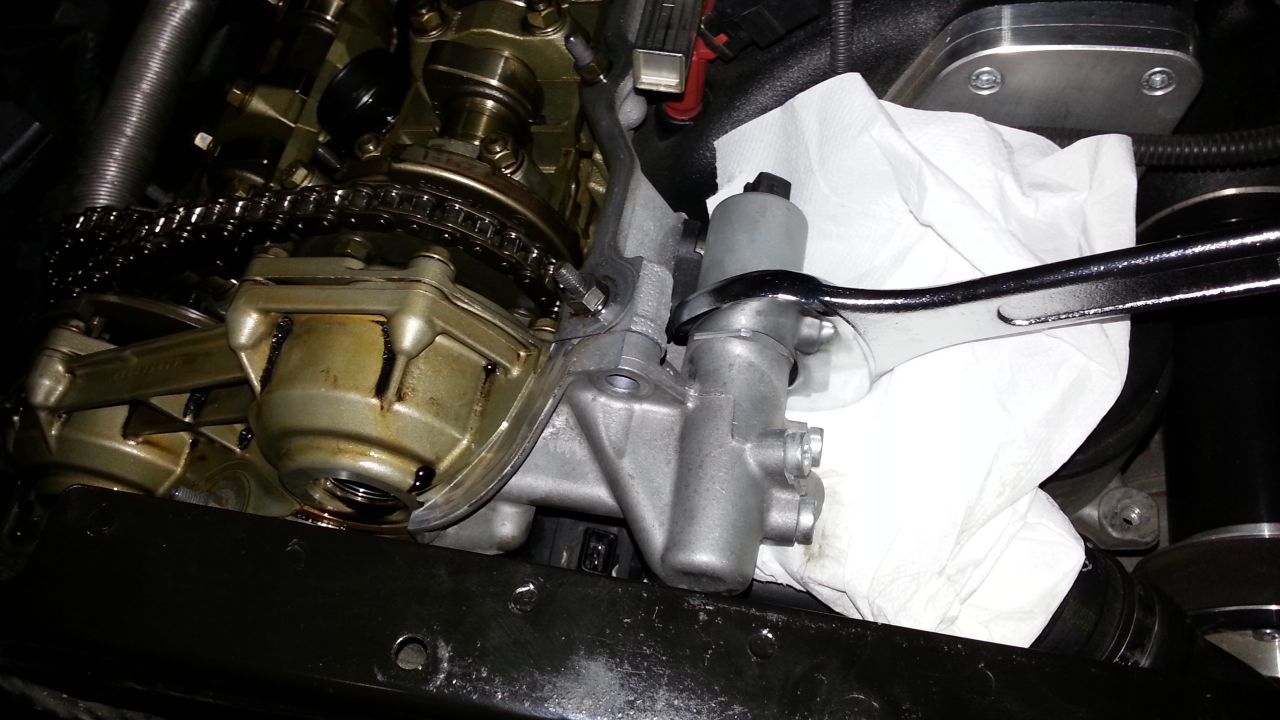 After that, you remove the front engine mounts (you can obviously do this first before removing the vanos relais  ): ):First loosen/remove the nuts from the engine mounts (from the top and below). Jack up the engine for about 1" (with a transmission jack if the car sit's on a car lift), by putting a block of wood under the sump and placing the jack on the block of wood (otherwise you damage the sump). Maybe an engine hoist or a large jack can be used if your car stands on wheel stands. Then remove the engine mounts and carefully lower the engine on the lower subframe/steering rack. (If you're anxious, you can place a thin rubber mat between those, but my engine was OK) When the engine is lowered, there is just enough space to clear the subframe on 2 threaded studs by tilting the vanos unit: 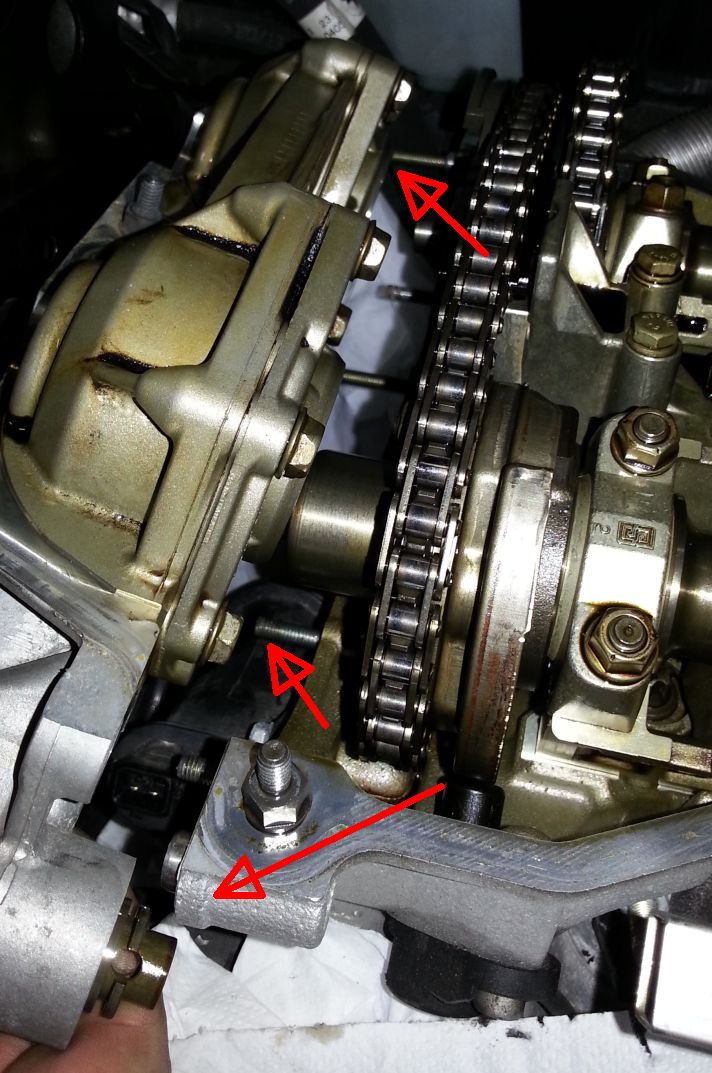 Then you can rotate the vanos unit (lifting up the side where you removed the relais) and the vanos clears the front subframe. All done without permanent damage to any of the components. I have thought about removing the studs in the block, but there is very little room to get two nuts on the threads and the threads are thin (m5) so damage is a risk. So I came up with this procedure. Here you can see the bump in the subframe that prevents the vanos from clearing: If you do the vanos you can also do the anti rattle. I had no rattle or vanos problems (I was installing schrick cams, so I did the vanos as a precaution (that is recommended when installing cams)), but there is alway's lots of play on the vanos bearings. The anti rattle kit fixes that very nicely: Be shure not to get any oil from the vanos on the multi belts underneath
__________________
Z4 3.0i | ESS TS2+ supercharger | Quaife ATB LSD | Brembo/BMW performance BBK front/rear | Schrick FI cams | Schmiedmann headers+cats | Powerflex/strongflex PU bushings | Vibra-technics engine mounts | H&R anti rollbars | KW V3 coilovers/KW camber plates | Sachs race engineering clutch | tons of custom sh#t
|
|
Appreciate
0
|
| 06-27-2013, 08:09 AM | #10 |
|
New Member
6
Rep 11
Posts |
Guidok - Thank you for posting this! Great idea and I've had a lot of trouble finding details/directions with any images included.
Where did you get your anti-rattle/parts from? I was looking at the vanos-bmw site posted by Alexmsk77, but I wasn't sure if there were other providers or a best source? ...I just want to make sure I'm buying the best possible replacement parts |
|
Appreciate
0
|
| 06-27-2013, 08:49 AM | #11 |
|
Colonel
190
Rep 2,138
Posts
Drives: Me
Join Date: Oct 2007
Location: Virginia Beach
|
Each car will be different. I had two cars that I could pull the vanos right out. I had one car that I had to do the contortionist trick, and two that we cut the threads. You can jack the engine up also if you want to go that far.
Because the nuts on the vanos are non-nylock nuts, you need to keep a minimum of three threads exposed. Cutting off three threads still leaves you with five threads exposed. It's not a elegant solution but it does work and saves time. |
|
Appreciate
0
|
| 06-27-2013, 10:50 AM | #12 | ||
|
#buildnotbought
12620
Rep 5,278
Posts |
Quote:
You need a socket set with 2 extensions to get the top engine mount nuts (from above). And even then it is a tight fit, the vanos just clears the threads. Cutting off the threads is probably just as much work, and leaves damage obviously. Partly loosening the front subframe on top did not do the trick for me (I removed the top 4 bolts and 2 lower nuts); I was not able to bend it even the slightest bit (maybe 1mm or so). It is a pretty sturdy subframe bolted multiple times to the rest of the chassis. If you don't have a carlift you must use axle stands or something like that, and it gets less enjoyable removing stuff on your back under the car. So my advice is rent an auto lift for a few bucks at a diy garage (if you don't have one yourself) or something like that (I don't know if diy garages exist in the US) This procedure is nessecary for all m54 pre facelift z4's. I don't know if the vanos clears with the facelift models (/m s54 and n54 engines), but all pre fl m54 z4's have the same dimensions afaik. Quote:
As for anti rattle kits: beisan is probably the only one that makes/supplies these. So if you think about installing the anti rattle you may save on p&p. That http://www.vanos-bmw.com is situated in russia?!? I think http://www.beisansystems.com/ is more practical . They are the best known supplier for this repair.The diy guides on their site are good. Be shure that if you do the anti rattle kit, you will need the plastic vice grips and an impact wrench. Another tip: when you remove the vanos you will need a new (metal) vanos gasket (bmw 11361433817), some liquid gasket (bmw subscribes Threebond 1104, which is different than the normal blue silicon based liquid gasket. This stuff looks more like a latex based substance and is very sticky compared to the silicon based stuff), and probably a new set of cilinder head gaskets (bmw 11120030496). Especially the gaskets around the ignition coils/spark plugs will be hardened by the oil/high temps. And if you decide to refurb your aluminium vanos housing by glass beadblasting (mine was pretty corroded; always rainy around here...) be sure to install the exhaust vanos relais before you mount the vanos unit to the engine (it is a pain to install that one after as I noticed....) the intake side relais you have to install afterwards but that is no problem. This is my vanos before/after: before (all internal parts masked of course) 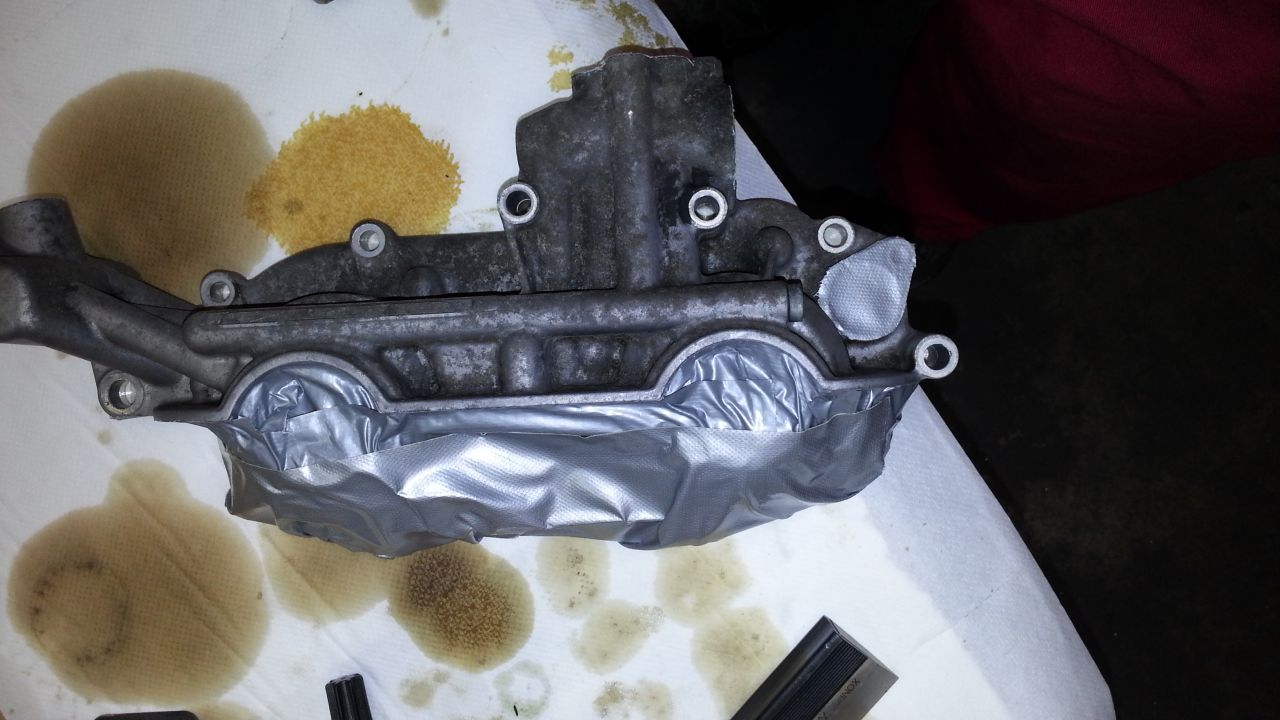 After sandblasting (glass beads) 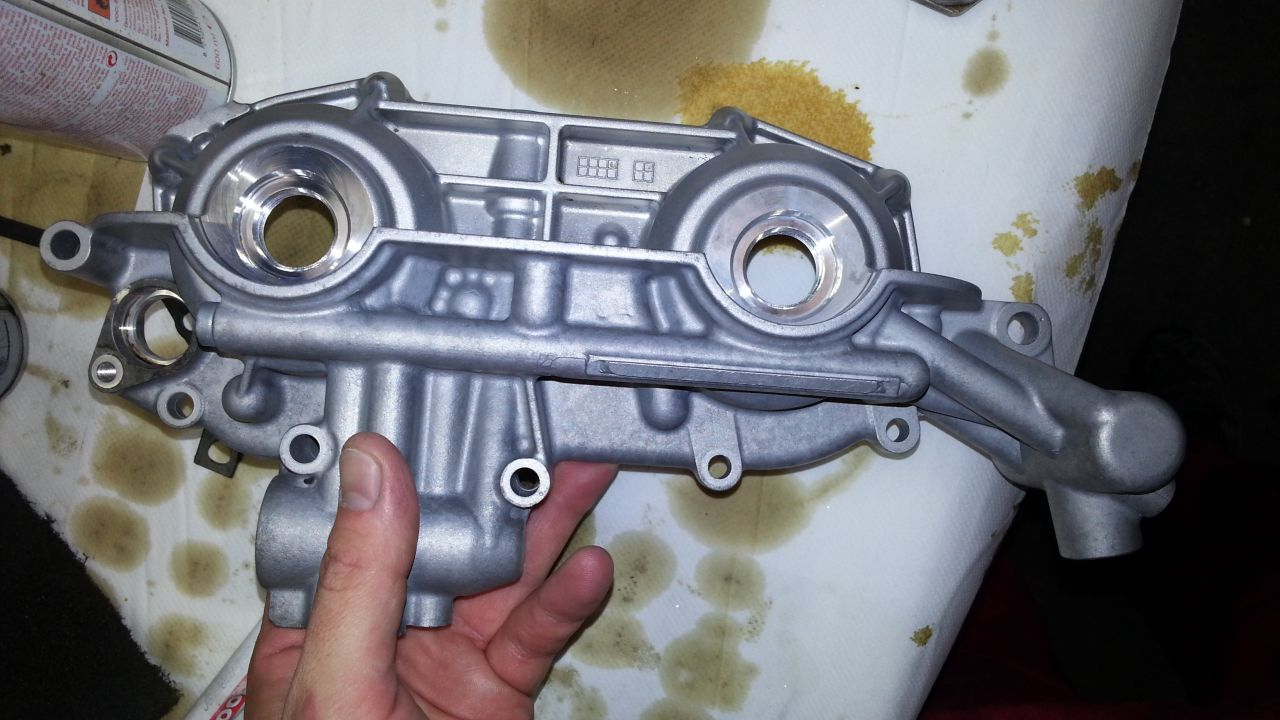
__________________
Z4 3.0i | ESS TS2+ supercharger | Quaife ATB LSD | Brembo/BMW performance BBK front/rear | Schrick FI cams | Schmiedmann headers+cats | Powerflex/strongflex PU bushings | Vibra-technics engine mounts | H&R anti rollbars | KW V3 coilovers/KW camber plates | Sachs race engineering clutch | tons of custom sh#t
Last edited by GuidoK; 06-27-2013 at 11:12 AM.. |
||
|
Appreciate
0
|
| 07-01-2013, 08:16 PM | #13 |
|
New Member
6
Rep 11
Posts |
Thank you again for the great info!
I'll check out beisansystems as well. Do you think I can get away with just keeping my existing head gasket, or should I replace it as well just to be safe? It's got about 12k on it currently... I had the whole top of the engine apart last year fixing a number of small oil leaks - kicking myself now for not thinking about doing the Vanos while I was at it (sigh). Also, although the corrosion isn't as bad on mine (yet), but that sandblast job is amazing. Looks brand new  |
|
Appreciate
1
steffenme1103.00 |
| 07-01-2013, 08:22 PM | #14 |
|
#buildnotbought
12620
Rep 5,278
Posts |
Oil leaks on a m54 with only 12k? Or has it done 12k since that last fix?
If the rubber gaskets have been replaced a year ago, then they will probably still be soft.
__________________
Z4 3.0i | ESS TS2+ supercharger | Quaife ATB LSD | Brembo/BMW performance BBK front/rear | Schrick FI cams | Schmiedmann headers+cats | Powerflex/strongflex PU bushings | Vibra-technics engine mounts | H&R anti rollbars | KW V3 coilovers/KW camber plates | Sachs race engineering clutch | tons of custom sh#t
|
|
Appreciate
0
|
| 07-22-2013, 04:36 PM | #15 |
|
Lieutenant

43
Rep 407
Posts |
Just removed my vanos and installed new cams. Holy crap was it an annoying process to get the Vanos off!!! Didn't need to cut any threads off thanks to Guidok's advice. Waiting on a rebuilt unit from Dr Vanos. The cams are zhp cams so I figured I'd avoid the potential rattle and buy a rebuilt unit from Dr Vanos.
|
|
Appreciate
0
|
| 01-14-2016, 04:47 PM | #16 |
|
New Member
0
Rep 10
Posts |
jack the engine really high helps
unbolt the engine mount and jack really high. No clearance issue now, but hope there is no side effects from this.
Last edited by chhimp; 01-14-2016 at 05:12 PM.. |
|
Appreciate
0
|
| 01-15-2016, 04:34 PM | #17 |
|
My other car is on Mars
639
Rep 3,124
Posts |
Not sure about the 3.0, but on the ///M you also want to take the nuts off the bottoms of the trans mounts so the trans can come up with the engine.
__________________
Warning: May contain traces of nuts.
|
|
Appreciate
0
|
| 01-16-2016, 08:14 AM | #18 |
|
BMW CCA Member
29
Rep 90
Posts
Drives: '19 BMW X3 30i-'11 BMW 128i
Join Date: Oct 2009
Location: Music City area
|
I'm glad (maybe?) that this thread came up. I hadn't seen it earlier when searching for VANOS repair. I am going to attempt to repair mine this weekend. My valve cover gasket is in need of replacing, and with 80k miles on the car, I'm sure the VANOS could benefit from a rebuild. Hopefully removal will go smoothly.
|
|
Appreciate
0
|
| 01-16-2016, 10:13 PM | #19 | |
|
New Member
0
Rep 10
Posts |
Quote:
|
|
|
Appreciate
0
|
| 01-17-2016, 02:01 AM | #20 |
|
#buildnotbought
12620
Rep 5,278
Posts |
Why jack up the engine so high when you can just have it rest on the subframe and then the vanos will clear too?
 With jacking up the engine really high you risc damaging the gear selector mechanism, insulation and maybe even heatshielding&exhaust. Indeed you do need a set of anglenose pliers (most guides will tell you), but imho that should be a standard piece in a toolcollection. My policy sometimes is: buy lots of cheap tools (or reasonably cheaP), so you have them. For ones that don't do the job really well or break/wear, you can alway's buy a top quality one. Or if you have money enough, buy everything top quality. But it's always better to have a specific tool in low quality than not having it at all
__________________
Z4 3.0i | ESS TS2+ supercharger | Quaife ATB LSD | Brembo/BMW performance BBK front/rear | Schrick FI cams | Schmiedmann headers+cats | Powerflex/strongflex PU bushings | Vibra-technics engine mounts | H&R anti rollbars | KW V3 coilovers/KW camber plates | Sachs race engineering clutch | tons of custom sh#t
Last edited by GuidoK; 01-17-2016 at 02:08 AM.. |
|
Appreciate
0
|
| 01-17-2016, 11:38 PM | #21 | |
|
New Member
0
Rep 10
Posts |
Quote:
I will totally need angled nose pliers in the future. I spent 1 hour and 3 cuts on my fingers with regular pliers until I decided to use my bench vise and cut the pliers with my dremel saw w/ metal cutting blade. Thanks for your pictures and write up, it was very helpful with this vanos repair/maintenance.  |
|
|
Appreciate
0
|
| 03-03-2016, 12:50 AM | #22 |
|
Lieutenant
107
Rep 429
Posts |
My son and I did my Vanos a month or so ago. I read the various tips/techniques after the first time we tried to do the job and ran into the clearance issue with the front bulkhead. This time we removed the 2 bolts on either side/ top of the front cross brace plus backed off the bolt on the inside/engine side of the cross brace that is under those two bolts about 1/4 inch. When we removed the Vanos I just used a long pry bar to flex the cross brace slightly forward and the Vanos slid nicely off.
Total time to prep the cross brace for the Vanos removal...less that 3 minutes and 3 minutes to replace/ tighten down all 6 bolts after replacing the Vanos. Since we were there, we also did the water pump as well. We raised the driver side motor mount 3 cm (remove top bolt on the motor mount)...as per the TIS. Placed a low style hydraulic trolley lift with a block of wood across the oil pan and gently raised the engine until the motor mount bracket is just about to clear the bolt.....This rotates the engine up and slightly sideways allowing the water pump shaft to clear the cross frame bracket. Again a less than a 10 minute bolt/raise/lower/torque evolution.
__________________
Sent from my smart phone...
|
|
Appreciate
0
|
Post Reply |
| Bookmarks |
|
|


