| BMW Garage | BMW Meets | Register | Today's Posts | Search |
|
|
|
 SUPPORT ZPOST BY DOING YOUR TIRERACK SHOPPING FROM THIS BANNER, THANKS! |
|||||||||
Post Reply |
|
|
Thread Tools | Search this Thread |
| 11-17-2012, 08:04 PM | #1 |
|
Lieutenant
 
29
Rep 415
Posts
Drives: 2005 z4 3.0
Join Date: Jun 2012
Location: Vancouver
|
Visual How-To: Replacing Spark Plugs
I searched for a Z4-specific how-to on replacing spark plugs but couldn't find one, so after reading several threads on various other BMW forums for other engines I decided to give it a go and record the procedure. I'm new to DIY maintenance so please point out any errors or omissions I may have made. This is just a set of directions, you embark on this venture at your own risk and I'm not responsible if something goes wrong on your endeavour.
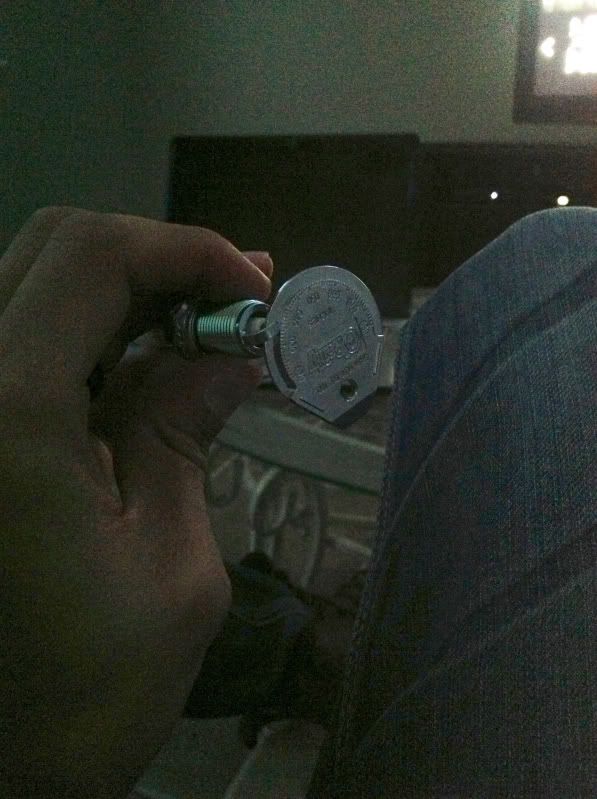
Tools required, see photo: # 1 - 6 x new spark plugs. I bought Bosch Platinum +4 (part # 18-3750-6) from Canadian Tire $17 for 2. # 2 - small flat bladed screwdriver for removing engine cover plugs. # 3 - ratchet, mine's a 3'8" drive # 4 - 10mm socket for engine cover nuts (plus adapter for ratchet if needed) # 5 - 5/8" spark plug socket (not just a regular 5/8" socket, explained later) # 6 - drive extension # 7 - finger driver - optional - saves having to remove struts bars # 8 - anti seize compound - highly recommend you use some # 9 - calipers - optional - just to check diameters # 10 - torque wrench - optional - covered later Step 1: remove the engine cover Pop the hood and peer in at the wonder of germanic engineering that lies beneath. Once you've recovered from the resulting emotional upwelling, we start by removing the engine cover. I have installed a strut bar on my car so I have to remove it first, if you have one do the same, if not skip to the next picture. We only have to remove the cover on the left side of the engine. We'll be removing two nuts hidden under little plugs and we'll also have to remove the oil cap temporarily. There are two small covers that need to be pried off, circled in red above. Use the small flat blade screwdriver to gently pry the cover off: Next you'll need the 10mm socket to unscrew the nuts that are behind the previously removed covers. Keep unscrewing these all the way and pull the nuts out of the hole they sit in. Do this for both of the plugs and nuts. Next unscrew the oil cap and set it aside. You can now lift off the engine cover and place it somewhere where it won't get scratched. There are 4 little rubber pads attached to the edge of the cover, make sure you don't loose them. Replace the oil cap before moving on. Step 2 - Remove the Ignition Coils You'll now be able to see the 6 injection coils. Each coil needs to be unplugged first. The plastic cap at the top of each coil swings upwards and ejects the plug from the connector. See this TIS page for more (or less) info. The coils just pull out but they are quite stiff, so pull hard and don't hit yourself in the face when they come loose. Start at one end and work your way to the other end. I layed the coils out on a piece of card numbered from 1 to 6 so I could keep track of any potential issues as I pulled them out, and to be able to put each one back where it came from. It shouldn't make any difference but I always do things that way. Step 3 - pull the old plugs out If you look down into the chamber the coils came out of, you'll see the end of the spark plug. The reason you use a spark plug socket and not a just a regular socket is two-fold. The socket has a little rubber liner at the back which grabs the end of the plug allowing you to pull (or insert) it into a deep chamber such as this. The spark plug socket is also long preventing damage to the spark plug itself. Use your drive extender to reach the plug with the socket and push it down on the plug. You'll feel it engage. Lefty loosy (counter-clockwise) to take it out. I won't get into a discussion here about inspecting the end of the old plug and what you can learn from it. All six plugs and ignition coils laid out in the order they came out. Before moving on, it's a good idea to verify that the new plugs are indeed the same thread size as the old ones, just in case you bought the wrong ones. This is where you use the calipers to check diameter on both threads. Old plug on left, new on right. If they match, I then check the thread pitch by placing one over the other and making sure the threads match fully, which they do. If either of these, diameter OR pitch don't match, STOP, you've got the wrong plugs. You'll only destroy something very expensive if you try to continue. Step 4 - Put new plugs in I use anti seize compound on the threads to prevent problems getting the plugs out next time. The previous plug changer didn't do this on my car and I was lucky to not have anything seized. Anti-seize compound is available in stick form and in paint-on form. The guys at work call the stuff "cancer" (I know, I know, bad taste), once you get some on you, it spreads everywhere. The stick style is much more manageable and less likely to make a mess. Rub (or paint) some on around the thread in several spots. Go sparingly, it goes a long way, provided you spread it around well enough. With the stick kind you'll want to wipe it into the threads so you don't have bits falling off everywhere. You're now ready to start putting the plugs back in. Starting at one end of the block, we'll put the new plugs in. Use the socket and drive extender, but don't use the ratchet to start with. Do it by hand. Carefully insert the plug into the socket and lower it down into the engine chamber until it rests on the top thread. Rotate the plug gently counter-clockwise until you feel a slight step. This helps ensure you don't cross-thread the plug into the block. Now you can start tightening it clockwise until it is hand tight. Everyone has different hand strength so this is where the torque wrench comes in. If you're comfortable gauging the torque you apply then continue without the torque wrench. I have a pretty good feel of what the recommended torque of 21 ft.lbs feels like, partly because my ratchet is 12" and I know how much 21 lbs feels like and I do stuff like this at work quite often. There's a widely accepted method of tightening the plug hand-tight and then doing half a turn with the ratchet. Some manufacturers even put these instructions on the packaging apparently. If unsure, use a torque wrench or torque limiting bar. One note - when you put the plug back in and are ready to pull your ratchet out, it may disconnect at the socket if that connection isn't the locking ball type. At first I was a little worried, thinking I'd have to pull the socket out with needle nose pliers, but you can just pull the whole lot out in one go if you twist the extension slightly as you pull up. Took me a couple tries to figure it out. Step 5 - Replace the Ignition Coils In the above picture you can see where I've already replaced the ignition coil on one of the plugs. Just make sure you seat the rubber skirt the right way around and get it all the way down. It kinda clicks into place. Then reconnect the cables. Make sure the connector is flipped all the way up before inserting the cable plug. push it into place and snap the connector shut. We're nearly there... Step 6 - Put the engine cover back on This is the exact reverse of the removal. I put anti seize compound on the studs just because. Don't forget to remove the oil cap and to then replace it. Step 7 - pat yourself on the back and admire your handiwork Now put the money that you saved on labour into your beer or your mod fund  Let me know if I missed anything
__________________
 2005 Z4 3.0 steptronic | TiSilver on Black | sport & premium package | 108s | Msport seats | wind deflector OMP strut bar | blacked out emblems | de-french-fried | sound gen | DIY aux input | custom speedo logos | stubby antenna | polished exhaust tips |
| 11-18-2012, 07:06 AM | #2 |
|
Second Lieutenant
13
Rep 280
Posts |
Good write up.
I use a short piece of hose to start the sparkplugs, slip it over the ceramic, and start by hand this way, one less chance for xthreading. |
|
Appreciate
0
|
| 11-18-2012, 07:30 AM | #3 |
|
Colonel
 
190
Rep 2,138
Posts
Drives: Me
Join Date: Oct 2007
Location: Virginia Beach
|
This is a purely personal thing, but the official BMW procedures specify NO anti-seize on the spark plugs.
|
|
Appreciate
0
|
| 11-18-2012, 04:20 PM | #4 |
|
Lieutenant General

2445
Rep 11,667
Posts |
^anti-seize can also lead to over torquing (lubricant)
__________________
'21 M2C Hockenheim Silver
'18 718 Cayman S Lava Orange (sold) '13 E92 M3 Santorini Blue (sold) '07 Z4 M Coupe Alpine White (sold) |
|
Appreciate
0
|
| 11-18-2012, 04:26 PM | #5 |
|
Lieutenant
29
Rep 415
Posts
Drives: 2005 z4 3.0
Join Date: Jun 2012
Location: Vancouver
|
never thought of that, guess that's why the torque wrench was invented
__________________
2005 Z4 3.0 steptronic | TiSilver on Black | sport & premium package | 108s | Msport seats | wind deflector OMP strut bar | blacked out emblems | de-french-fried | sound gen | DIY aux input | custom speedo logos | stubby antenna | polished exhaust tips |
|
Appreciate
0
|
| 11-18-2012, 04:48 PM | #6 | |
|
Brigadier General
463
Rep 4,531
Posts |
Quote:
If you have anti-seize on your threads, and say you torque to 20 ft-lbs (or whatever) it will NOT be 20 ft-lbs...they will become over-torqued. |
|
|
Appreciate
0
|
| 11-18-2012, 06:01 PM | #7 | |
|
Lieutenant
29
Rep 415
Posts
Drives: 2005 z4 3.0
Join Date: Jun 2012
Location: Vancouver
|
Quote:
Just saying, not trying to offend 
__________________
2005 Z4 3.0 steptronic | TiSilver on Black | sport & premium package | 108s | Msport seats | wind deflector OMP strut bar | blacked out emblems | de-french-fried | sound gen | DIY aux input | custom speedo logos | stubby antenna | polished exhaust tips |
|
|
Appreciate
0
|
| 11-18-2012, 06:20 PM | #8 |
|
Colonel
190
Rep 2,138
Posts
Drives: Me
Join Date: Oct 2007
Location: Virginia Beach
|
The mechanical engineer in me says you are not correct on that point. Any type of lubricant will change the clamping torque. I recommend doing some reading up on this point. ARP has some good articles on this topic.
The electrical engineer in my says, I would never use a standard type of anti-seize on the threads of a spark plug. A non-copper based anti-seize has the ability to attenuate the spark because the lubricant can become a dielectric for the ground path if too much is used or does not have any electrical properties.... along with the potential of hardening if it does not have any high-temp properties.. The ground path is the cylinder head..... |
|
Appreciate
0
|
| 11-18-2012, 06:31 PM | #9 | |
|
Lieutenant
29
Rep 415
Posts
Drives: 2005 z4 3.0
Join Date: Jun 2012
Location: Vancouver
|
Quote:
Hadn't thought about the electrical properties of the compound itself though. The one I used is spec'd for spark plug threads so I'll assume it would be ok ( i hope i don't regret this assumption down the line though) Anyhow I was just trying to help out by documenting my procedure and hadn't even thought about the seemingly trivial application of anti seize. Seems I maybe should add a note in my how-to about it so that someone can make their own decision rather than follow my potentially flawed advice.
__________________
2005 Z4 3.0 steptronic | TiSilver on Black | sport & premium package | 108s | Msport seats | wind deflector OMP strut bar | blacked out emblems | de-french-fried | sound gen | DIY aux input | custom speedo logos | stubby antenna | polished exhaust tips |
|
|
Appreciate
0
|
| 11-18-2012, 06:36 PM | #10 | |
|
Brigadier General
463
Rep 4,531
Posts |
Quote:
When applying torque to a dry bolt more friction is created than applying torque to a wet bolt with oil or other automotive fluids on the threads. With less friction (wet threads), the bolt will stretch more before a torque wench will click. Because friction is such a big factor in bolt torque, it is important to know the difference between applying torque to a dry bolt and a wet bolt. Using oil, anti-seize or other types of thread lubricant is a common practice, but an understanding that wet threads require less torque than dry threads because of friction is very important. |
|
|
Appreciate
1
bosstones1226.00 |
| 11-18-2012, 06:40 PM | #11 | |
|
Lieutenant
29
Rep 415
Posts
Drives: 2005 z4 3.0
Join Date: Jun 2012
Location: Vancouver
|
Quote:
__________________
2005 Z4 3.0 steptronic | TiSilver on Black | sport & premium package | 108s | Msport seats | wind deflector OMP strut bar | blacked out emblems | de-french-fried | sound gen | DIY aux input | custom speedo logos | stubby antenna | polished exhaust tips |
|
|
Appreciate
0
|
| 11-18-2012, 06:46 PM | #12 | |
|
Brigadier General
463
Rep 4,531
Posts |
Quote:
 |
|
|
Appreciate
0
|
| 11-18-2012, 06:48 PM | #13 | |
|
Lieutenant
29
Rep 415
Posts
Drives: 2005 z4 3.0
Join Date: Jun 2012
Location: Vancouver
|
Quote:
__________________
2005 Z4 3.0 steptronic | TiSilver on Black | sport & premium package | 108s | Msport seats | wind deflector OMP strut bar | blacked out emblems | de-french-fried | sound gen | DIY aux input | custom speedo logos | stubby antenna | polished exhaust tips |
|
|
Appreciate
0
|
| 11-18-2012, 08:16 PM | #14 |
|
First Lieutenant
25
Rep 325
Posts |
I am not mechanically inclined but every now and then I think..."if someone posted really explicit instructions AND really detailed pics, I could do some of this!"
Your post was great. I may give this a shot in the spring. Thanks! |
|
Appreciate
0
|
| 11-22-2012, 11:32 AM | #15 | |
|
Enlisted Member

4
Rep 33
Posts |
Quote:
|
|
|
Appreciate
0
|
| 11-22-2012, 11:33 AM | #16 | |
|
Enlisted Member
4
Rep 33
Posts |
Quote:
|
|
|
Appreciate
0
|
| 11-23-2012, 01:22 PM | #17 |
|
Second Lieutenant
22
Rep 251
Posts |
Excellent write up.... I never thought of working on my cars until I joined here and saw how many people work on their cars and save a bunch of $$$.
The first thing I paid for when I bought my Z4M was to remove the CVD. I paid $200 for that.... now I pretty much do all my work by reading and learning from all of you.... so every time I get under the car - I feel like punching my self for not trying to remove the CVD my self. I could've saved that money for the Mod-foundation Thank you for sharing!!!! |
|
Appreciate
1
Kanstulman12.50 |
| 11-24-2012, 09:51 AM | #18 |
|
Colonel
493
Rep 2,784
Posts
Drives: ESS/G-Power Z4M, VF Z4, 996tt
Join Date: Sep 2009
Location: Los Angeles
|
Thank you very much for the writeup! I only have two additions:
1. Be VERY careful not to over-tighten the bolts on the engine cover. They snap easily. 2. A torque wrench is absolutely necessary for a beginner. They are only $30-50 and will be required for other DIY items. Aluminum heads are soft, and you don't want to risk over-tightening. Then there's the factor of feeling more skilled and mechanic-like for using one Beginners- they are very easy to use; don't be dissuaded!The discussion on anti-seize is good, as I did not use any the last time I changed spark plugs. Overall great job, and I'm sure many on the forum appreciate a step-by-step DIY guide. Spark plugs were the first maintenance item I tackled solely with forum guidance.
__________________
|
|
Appreciate
0
|
| 01-07-2013, 06:28 PM | #19 |
|
silver bullet
20
Rep 148
Posts |
So when I went to go buy the spark plugs they told me to make sure each one measured 32 using this. Is that correct?
 Oh and is it ok if they look different at the end? 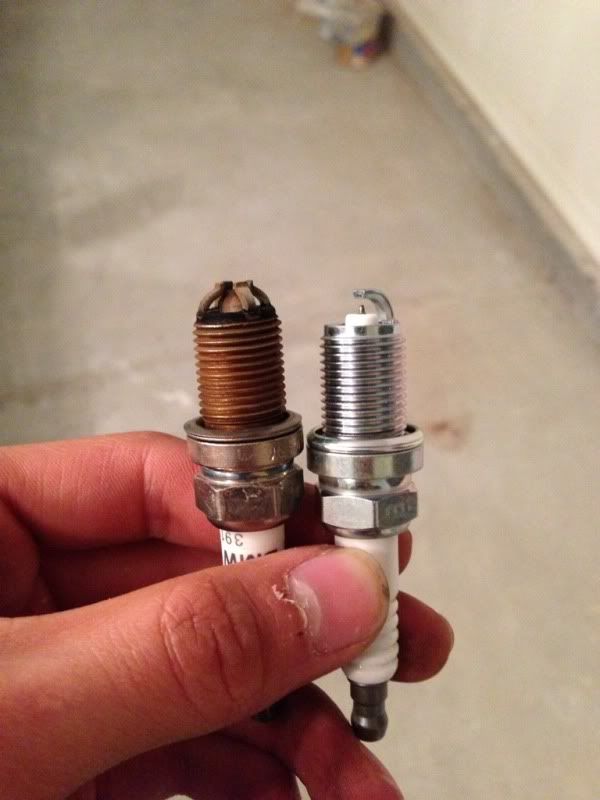
__________________
 |
|
Appreciate
0
|
| 01-08-2013, 04:51 PM | #20 |
|
New Member
0
Rep 9
Posts |
@angelsz4,
With your single ground sparkplug the gap is adjustable and 0.032 inches is probable the manufacturer's recommendation for your engine. Sparkplug manufactures base their recommendations after extensive testing so even if it's not OEM it works fine. I like the single ground myself but can't claim any more power or fuel economy. Another tightening option is to follow the sometimes included packaging info that shows tightening 1/4 to 1/2 turn beyond finger tight. This works fine for NEW plugs but ONLY before the gasket gets compressed. If I decide to reuse a sparkplug then always with a torque wrench as posted above. Last edited by Pete C; 01-08-2013 at 05:31 PM.. Reason: tightening update |
|
Appreciate
0
|
| 01-08-2013, 05:34 PM | #21 | |
|
silver bullet
20
Rep 148
Posts |
Quote:
__________________
|
|
|
Appreciate
0
|
Post Reply |
| Bookmarks |
|
|