

| BMW Garage | BMW Meets | Register | Today's Posts | Search |
|
|
|
 SUPPORT ZPOST BY DOING YOUR TIRERACK SHOPPING FROM THIS BANNER, THANKS! |
|||||||||
Post Reply |
|
|
Thread Tools | Search this Thread |
| 12-10-2011, 12:01 PM | #1 |
|
First Lieutenant
 27
Rep 341
Posts |
Blacked Out Mufflers & Remove/Powder Coat Exhaust Tips DIY
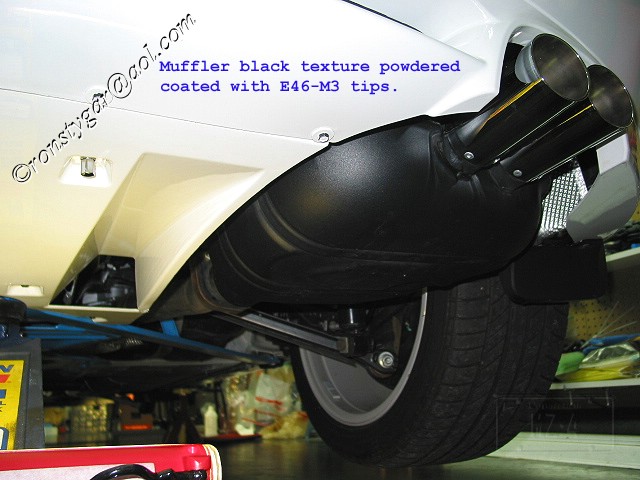
While I was dealing with the aftermath of the Attack of the Teutonic Mice (http://www.zpost.com/forums/showthre...ighlight=mouse), I figured it was a good time to paint the mufflerswhich we all know are kinda distracting hanging there under the rear bumper like a big pair of stainless steel cajones. And, Ive been wanting to powder coat the exhaust tips black, to go along with the rest of the blacked-out trim and badges on the car. None of this is rocket science, but I came across a couple things that might be helpful to someone wanting to do the same.
Regarding removing the mufflers and, quite importantly, adjusting them when reinstalled, consult this great DIY by crfine88thanks to him for the excellent info: http://www.zpost.com/forums/showthre...ust+diy+stands Once the mufflers are off, you need to drill out the three rivets holding each tip onto the muffler. Note that one of these rivets is on the top of the tip, and so you have to either drop the muffler or remove the bumper to get at it. Dropping the muffler is probably the easier of the two. A few months ago, I asked my body shop guy to drill out the rivets and pull the tips off while he had the bumper off. He reported that they drilled out the rivets on one of the tips, but were unable to get the tip off, even with a slide hammer. They assumed that they were pressed on tightly, and/or had corroded inside, and werent going to come off. So, they gave up. Im more persistent, however, and easily found the problem: They only drilled out the head of the rivet, but left the shaft inside and this had the tip locked on. To get the tips off, first squirt a little PB Blaster or the like in between the tips and the muffler outlets a day or two before. Then drill out the head of the rivet, and using a punch to tap the rivet out (I actually used a nail set). You should see a clean hole, consistent in diameter, through both the tip and the outer layer of the muffler outlet. Note that the muffler outlet has two layers, and the hole is only in the outer oneso, you cant see all the way through to the interior of the pipe. You should be able to insert a punch at least a quarter inch into the holeif it barely goes in, some of the rivets still there. Once youre sure the rivets are completely gone, you may be able to twist and pull the tip off. If not, use a blunt chisel and hammer to GENTLY tap the rear edge of the tip to dislodge it. Take your time, and move around to different points on the tip. The tips are two layers, and the muffler outlet has two layers, and they interlock when installed. You can see the construction in this pic: Next clean the mufflers thoroughly with a scrub brush and 3M pads and a degreaser like Simple Green, so that you get good paint adherence and finish. You may need to use a solvent if you have tar on them, and possibly do some light sanding. A ladder makes for a convenient way to hang the muffler for paintinguse some sturdy wire as those OE mufflers arent light. I painted the mufflers with hi-temp, semi-gloss spray paint intended for barbecue grills. Follow good, basic spray painting techniquedont start/stop the spray on the part, and apply several light coats, with 5-10 minutes in between, rather than a heavy coat that will run or orange peel. I cleaned up my tips with solvent and a 3M Pad, and took them to the local powder coater. Youll want the shop doing the coating to mask the interior of the tips, where they mate with the muffler, as you dont want excess material in there that will make getting the tips back on the muffler difficult. And, talk with the shop about where/how they will attach the ground wire to the tips. They evidently attached (soldered, by the looks of it) the wire to mine at the exit end of the tips, and each has a tiny flaw in the coating where it was grounded. While I admire their diligence in getting a good ground, necessary for good, even powder adherence and finish, it seems like they could have attached it on the interior of tip to avoid the flaw. It wasnt bad enough to warrant having them re-done, though someone more anal might think differently. To reinstall the tips, clean the muffler outlet with some sandpaper, line the holes up and tap the tip on with a rubber mallet. Install new rivetswhich theoretically should be stainless steel. I couldnt find stainless, and so used aluminum. There will probably be some resultant corrosion at some point, but Ill just keep an eye on it. Note that I already had the mufflers back on the car at this point, and so only installed the two rivets on the bottom of each tip. Theyre on tight and dont rattle, so Im just leaving the third, top rivet out for now. Adjust the mufflers and/or bumper as necessary using crfine88s instructions. Here are the results: And, now everything matches, even the dog!
__________________
 |
| 12-10-2011, 12:20 PM | #2 |
|
Lieutenant
45
Rep 556
Posts
Drives: 2003 ESS TS1 Z4
Join Date: May 2011
Location: Muskegon, Mi
|
Nice!
|
|
Appreciate
0
|
| 12-10-2011, 12:53 PM | #5 | |||
|
First Lieutenant
27
Rep 341
Posts |
Quote:
Quote:
Quote:
And, I think it's not working with the wheels, but I'm old school and believe wheels need to be silver. Not really sure what to do from here--I'm on sort for a bit on it.
__________________
|
|||
|
Appreciate
0
|
| 12-10-2011, 02:42 PM | #7 |
|
Colonel
 
190
Rep 2,138
Posts
Drives: Me
Join Date: Oct 2007
Location: Virginia Beach
|
Hound from Hell...
I can just read his mind: "What the Hell are you doing moron. Lying in the ground is MY job" |
|
Appreciate
0
|
| 12-10-2011, 04:22 PM | #8 |
|
Captain
116
Rep 855
Posts |
Doing this to my mufflers and having C6 exhaust tips welded on over Christmas.
__________________
2014 335i M Sport
 2010 328i M Sport 2007 Z4MC #1019/1815 (Sold) 1997 M3 (Sold) 1991 325i |
|
Appreciate
0
|
| 12-13-2011, 07:55 AM | #10 |
|
Major
 

185
Rep 1,040
Posts |
I contemplated doing this as well but ended up getting an exhaust. Only thing I would've done differently is leaving the tips chrome instead of blacked out. Eitherway it looks good
 |
|
Appreciate
0
|
| 12-13-2011, 08:57 AM | #11 |
|
Brigadier General

388
Rep 4,320
Posts
Drives: '07 Z4 M Coupe
Join Date: May 2006
Location: Metro-Detroit
|
looks good, and great post - I just think it would have been a good time to do an aftermarket system

__________________
 |
|
Appreciate
0
|
| 12-13-2011, 09:06 AM | #12 |
|
Major
58
Rep 1,224
Posts |
I like the blacked out tips. Good DIY.
__________________
If you can't take the time to teach a kid something good, someone will take the time to teach them something bad.
|
|
Appreciate
0
|
| 12-13-2011, 09:07 AM | #13 |
|
Lieutenant General
2387
Rep 12,635
Posts
Drives: Z4 M, X5, GX460
Join Date: Apr 2008
Location: CT
iTrader: (100)
Garage List E86 Z4 M [10.00]
F15 X5 xDrive35i [9.17] F10 550i (Retired) [9.17] F25 X3 xDrive35i (R ... [9.43] E82 135is (Retired) [9.53] E85 Z4 M (Retired) [9.41] E90 328i xDrive (Re ... [9.25] E86 Z4 3.0si (Retired) [8.93] |
Wow, not only does it look good but like you said you don't notice the saggy balls effect lol.
__________________
Follow
|
|
Appreciate
0
|
| 12-18-2011, 12:50 AM | #14 |
|
Captain
116
Rep 855
Posts |
Painted my mufflers earlier tonight. Waiting for them to dry while I work on the car all night. Trans mounts are in, trunk is dynamatted, and H&R coilovers are almost done. So excited haha

__________________
2014 335i M Sport
2010 328i M Sport 2007 Z4MC #1019/1815 (Sold) 1997 M3 (Sold) 1991 325i |
|
Appreciate
0
|
| 12-18-2011, 06:57 AM | #15 | |
|
First Lieutenant
27
Rep 341
Posts |
Quote:
__________________
|
|
|
Appreciate
0
|
| 12-18-2011, 01:07 PM | #16 |
|
Captain
116
Rep 855
Posts |
I will try and take some pics today. God it looks way better with the black mufflers. Cant wait to have the C6 tips welded on tomorrow and the windshield tinted
__________________
2014 335i M Sport
2010 328i M Sport 2007 Z4MC #1019/1815 (Sold) 1997 M3 (Sold) 1991 325i |
|
Appreciate
0
|
| 12-21-2011, 04:06 PM | #17 |
|
Captain
116
Rep 855
Posts |
Well the windshield tint looks great but the c6 tips were a bust the spacing between the outlets on the factory mufflers is too close together and they won't fit so im saving them for when I do exhaust
__________________
2014 335i M Sport
2010 328i M Sport 2007 Z4MC #1019/1815 (Sold) 1997 M3 (Sold) 1991 325i |
|
Appreciate
0
|
| 01-21-2012, 12:16 PM | #18 |
|
Lieutenant

25
Rep 446
Posts
Drives: 2013 335is
Join Date: Nov 2009
Location: South Georgia
|
I agree with your comment about blacked out wheels, on some cars looks bad, most of the time it's just to much.
I do like the black out mufflers. Try a thin silver ring at the end of the tip for a accent. About 1/4 of inch from the end deep. Get a little tin foil to wrap around it to give you the general idea and take a picture, that might help you decide if you like that idea. Happy Motoring.
__________________
 2013 335is E93 2018 X5 35d BMWCCA / ZSCCA Member |
|
Appreciate
0
|
| 01-21-2012, 11:06 PM | #19 | |
|
Lieutenant
9
Rep 421
Posts |
Tips
Quote:
 |
|
|
Appreciate
0
|
| 06-12-2012, 12:26 AM | #22 |
|
Colonel
1213
Rep 2,932
Posts
Drives: Anything
Join Date: Apr 2010
Location: SoCal
|
OP...thank you for putting together this great DIY. I followed most of the instructions (minus the powercoated tips) and the results are unbelievable. While I had the Supersprint mufflers on the car, I took advantage of the situation and painted the OE mufflers. I used matte black instead of semi-gloss because I wanted to hide these "sacks" as much as possible. I had initially planned to use engine paint, which is a higher temperature paint, but found out that those required priming. Didn't want to go the extra steps required to prime it, I went with the matte "grills" high heat paint instead.
The end result is night and day. You don't even noticed the "sacks" anymore when standing behind it. Now...just wondering how durable this paint would hold up  |
|
Appreciate
0
|
Post Reply |
| Bookmarks |
|
|


