

| BMW Garage | BMW Meets | Register | Search | Today's Posts | Mark Forums Read |
|
|
|
 SUPPORT ZPOST BY DOING YOUR TIRERACK SHOPPING FROM THIS BANNER, THANKS! |
|||||||||
Post Reply |
|
|
Thread Tools | Search this Thread |
| 09-10-2013, 08:43 PM | #1 |
|
instagram 997turbotom
296
Rep 7,381
Posts |
Windshield weather strip replacement DIY
This starts to crack after a few years. Takes about 10-15 minutes, anyone can do it.
Parts: Part number 51317017021 ~$30 Clear silicone gasket sealer ~$5 Plastic trip remover $10 It looks like 3 pieces on the car, but it is actually all one piece. 1. Pull off old piece, and clean out the grooves with a brush, and use a razor to clean the windshield area 2. Put a line of silicone in the gap. Some people use "goop"? 3. Starting with one of the corners, carefully insert the new weatherstrip and push it forward to fit into the groove. 4. Use a plastic trim removal tool, or really anything that has a thin rigid end, but will not cut rubber. Place into the groove of the new weatherstrip (on sides of windshield) and press it apart, thereby locking it into position. This will make more sense when you're actually doing it 5. Drink a beer pic1: old weather strip around windshield pic2: old strip removed, silicone laid down pic3: scraping away left overs pic4: positioning weather stripping with plastic trip tool on sides of winshield pic5: pushing weather strip towards front of car, to seal top of windshield
__________________
 |
| 09-11-2013, 12:06 AM | #2 |
|
My other car is on Mars

639
Rep 3,124
Posts |
I did this, and the tray under the wiper arms, about 1-1/2 years ago.
Spent most of my time cleaning up the rubber confetti. DON'T step in it! It smushes into your driveway and won't come out. There was no evidence of any sealer or glue on mine, so I didn't use any putting it back in. There was a big discussion a while back on what to use, that I thought was moot. It's more cosmetic trim than a seal. The windshield seal is a separate item. It snaps into the groove nice and tight, so little danger of it flying off.
__________________
Warning: May contain traces of nuts.
|
|
Appreciate
0
|
| 09-11-2013, 03:38 PM | #3 | |
|
instagram 997turbotom
296
Rep 7,381
Posts |
Quote:
__________________
|
|
|
Appreciate
0
|
| 09-11-2013, 03:41 PM | #4 |
|
Lieutenant General
 
2444
Rep 11,667
Posts |
have mine sitting in the garage, old one is off & ready to go
I was surprised at the cost for this 
__________________
'21 M2C Hockenheim Silver
'18 718 Cayman S Lava Orange (sold) '13 E92 M3 Santorini Blue (sold) '07 Z4 M Coupe Alpine White (sold) |
|
Appreciate
0
|
| 09-11-2013, 06:47 PM | #5 |
|
Second Lieutenant

5
Rep 234
Posts |
Replaced mine too. After replacing, mine "whistled" in the wind, so I out some black gasket silicone under it along the top. Sides are very snug, but the top has a lot more play. At least for me. I added this without removing it again and it seems fine now.
Not really a whistle just a drag sound. Like sticking your hand up. Noticeable at 50, loud at 90. Very noticeable sinc the car is generally quiet even while topless. |
|
Appreciate
0
|
| 09-11-2013, 11:00 PM | #6 |
|
Colonel

1211
Rep 2,929
Posts
Drives: Anything
Join Date: Apr 2010
Location: SoCal
|
Thanks for the DIY. So the strip doesn't come with self-adhesive? And the silicon is really only optional?
|
|
Appreciate
0
|
| 09-12-2013, 11:31 AM | #7 |
|
My other car is on Mars
639
Rep 3,124
Posts |
Nope. Sorta snaps in place.
Sealers/glues are optional. "Season to taste", but remember that you may want to replace it again some day. I think they have about a 5 year life span here in SoCal.
__________________
Warning: May contain traces of nuts.
|
|
Appreciate
0
|
| 09-12-2013, 03:39 PM | #8 |
|
Colonel
1211
Rep 2,929
Posts
Drives: Anything
Join Date: Apr 2010
Location: SoCal
|
Thanks...if that's the case, I may leave out the sealer/glue when I get to doing this.
|
|
Appreciate
0
|
| 09-12-2013, 08:04 PM | #9 | |
|
instagram 997turbotom
296
Rep 7,381
Posts |
Quote:
__________________
|
|
|
Appreciate
0
|
| 09-12-2013, 08:04 PM | #10 | |
|
instagram 997turbotom
296
Rep 7,381
Posts |
Quote:
__________________
|
|
|
Appreciate
0
|
| 09-12-2013, 09:22 PM | #11 | |
|
Colonel
1211
Rep 2,929
Posts
Drives: Anything
Join Date: Apr 2010
Location: SoCal
|
Quote:
 |
|
|
Appreciate
0
|
| 09-13-2013, 12:37 AM | #12 |
|
My other car is on Mars
639
Rep 3,124
Posts |
Once you install it and see how easy it is, you'll wonder why you ever worried.
Takes < 5 minutes to pop it in there. If it's not tight or has a gap, pop it back out and add some sealant. You're over thinking it.
__________________
Warning: May contain traces of nuts.
|
|
Appreciate
0
|
| 09-29-2013, 02:56 PM | #13 |
|
I1, I won
8
Rep 97
Posts |
just ordered my trim, debating the tray under the wipers #51717017022
since I too am in SoCal in the hot hills above Pasadena, I am thinking do trim, but not the tray unless you guys think I should or it becomes brittle.
__________________
+-============[tSc]==============-+
http://www.TestShoot.com |
|
Appreciate
0
|
| 09-30-2013, 11:00 AM | #14 |
|
My other car is on Mars
639
Rep 3,124
Posts |
Wait until the upper edge starts to fall apart.
It's mostly cosmetic, so you don't have to preemptively replace it.
__________________
Warning: May contain traces of nuts.
|
|
Appreciate
0
|
| 10-07-2013, 01:06 PM | #15 |
|
Private First Class

14
Rep 155
Posts |
I did this last weekend. Obviously, they did not use any sealer from factory. But I noticed that some butyl is used to seal the glass to the frame. So correct. This is purely for cosmetic part.
I also noticed that there are notches at the center of rubber strip and on the car. So you match these notches to center the strip when you install it. Very easy to do. |
|
Appreciate
2
Kazansky12.50 |
| 11-02-2013, 06:13 PM | #16 |
|
I1, I won
8
Rep 97
Posts |
did them both today, tray and trim. SUCKED. fingers are raw.
the trim was like melted chocolate, tough to dig out the trim that is stuck behind the windshield. ALSO used my CCard to push the trim in to place.
__________________
+-============[tSc]==============-+
http://www.TestShoot.com |
|
Appreciate
0
|
| 11-02-2013, 08:14 PM | #17 |
|
Captain

76
Rep 987
Posts |
If your weather strip is not cracked but looking a bit ugly/faded from previous wax jobs.... get a rag and some WD40 and scrub it. It will bring the natural darker color back.
__________________
 CSL headers*Euro cats*Arqray exhaust*DKF hangers*Evolve Tune*Genuine CSL rims*10mm Macht Schnell front spacers*modified Hamann bumper*Tekarbon 2X2 CF spoiler*Turner CF grills*AS SSK*KWV3*OEM Strut bar*Rogue RSM*Polyurethane anti-roll bar bushings*Deka ETX30L battery*Nav Video module*front & rear cameras*Ipod module*stubby antenna*R-Dash LED license lights*LED Ziza interior lights |
|
Appreciate
0
|
| 11-03-2013, 09:59 PM | #18 |
|
I1, I won
8
Rep 97
Posts |
wd40 looks good for a bit, but will accelerate cracking over time. it is not the best thing for rubber/plastic.
__________________
+-============[tSc]==============-+
http://www.TestShoot.com |
|
Appreciate
0
|
| 11-03-2013, 10:07 PM | #19 |
|
My other car is on Mars
639
Rep 3,124
Posts |
__________________
Warning: May contain traces of nuts.
|
|
Appreciate
0
|
| 02-27-2014, 11:54 AM | #21 |
|
Private

30
Rep 99
Posts |
SOOOO I attempted this last night and it was a miserable failure.
I've changed my own tront control arms, brakes, suspension on this car myself so i figured this should be the easiest thing, but after yanking out the old cracked strip, I just could NOT squeeze the new one back in. I tried putting grease and soapy water, but nothing would make it seat correctly on the top. (sides were easy) I ended up taking my car to a autoglass shop and even they had a very difficult time putting it in. The top line is not 100% flush, so they used some silicone to bond it and used tape that I'm leaving on to promote sticking, but one corners is slightly popping out. Did anyone else have this issue?
__________________
 |
|
Appreciate
0
|
| 02-27-2014, 01:24 PM | #22 | |
|
Captain

39
Rep 711
Posts |
Quote:
I only have around 30k miles on my Z4 but unless it's raining, the top is down. All the rubber around the windshield was dry. I also did the door seals, all the seals on the soft top, the seals in the trunk. My seals under the hood were ok but overall, the car was thirsty as hell. A lot of rubber on these cars. Stuff is great. It has no smell and the bottle lasts forever. Especially seeing how much difficulty is involved in replacing weather strips in this thread, this is something everyone should be doing. 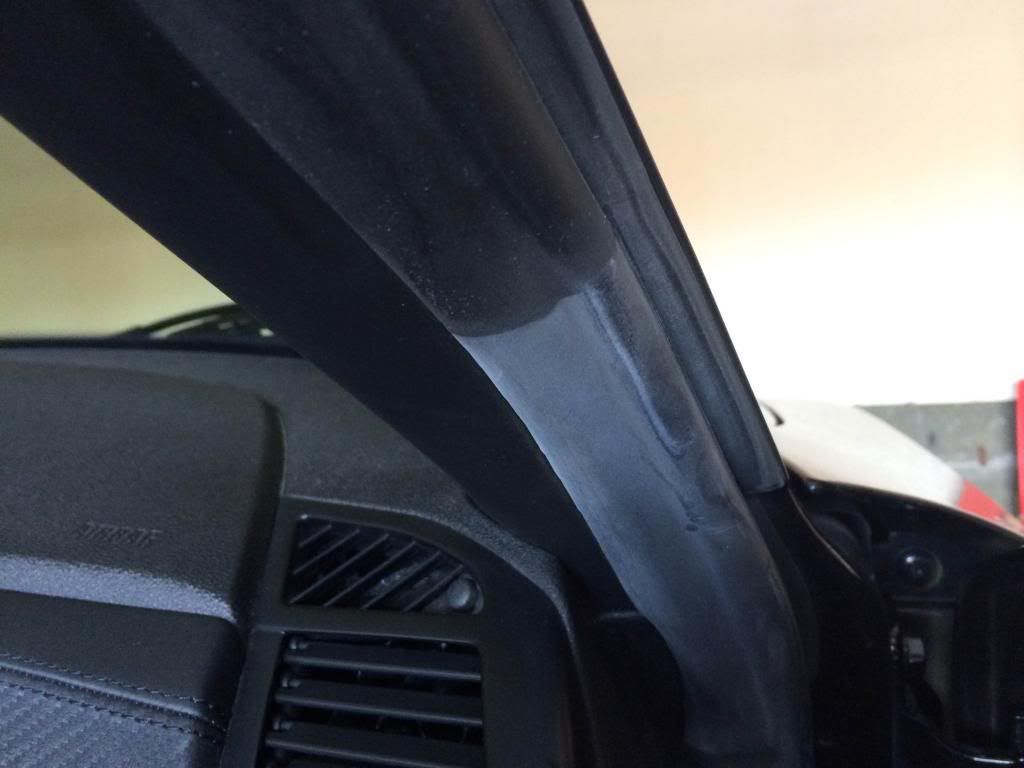
__________________
 |Evolve Airbox - Euro Headers - Strömung Exhaust - H&R Coils - 19" BBS CH-R| Last edited by Devious21; 02-27-2014 at 01:35 PM.. |
|
|
Appreciate
0
|
Post Reply |
| Bookmarks |
| Thread Tools | Search this Thread |
|
|


