| BMW Garage | BMW Meets | Register | Today's Posts | Search |
|
|
|
 SUPPORT ZPOST BY DOING YOUR TIRERACK SHOPPING FROM THIS BANNER, THANKS! |
|||||||||
Post Reply |
|
|
Thread Tools | Search this Thread |
| 04-06-2013, 03:43 PM | #1 |
|
Lieutenant General
 
2444
Rep 11,667
Posts |
DIY - Fangs repair & reflectors fill
I've had this on my to do list ever since I got the Coupe.
I finally got it done.  This started out as a simple fangs fix. I had zero luck tying to find someone local to plastic weld the reflector openings, so decided to do them as well. Overall its pretty straight forward body work, except for the materials. You have to use products specifically designed for flexible poly bumpers The products... - bumper repair epoxy there are many different brands and packaging that this comes in.  Since I was doing a little more extensive work, I picked up similar product from a body shop supply. - support mesh for the reflector fill, you need to provide support across the opening. for this I found some aluminum mesh. The one I found was actually flat plate aluminum that had been punched into a mesh. For this you will have to dig up what ever is available local to you. The FANGS - The first step is to just clean them up &sand down the surrounding paint. - second is to rough up the area to be filled. This is a very important step as the rough surface give the epoxy more to bond & lock onto. - clean the surface & then start building up the repair area with epoxy. - depending on your choice of bumper epoxy, check the working time. the one I used was about 2 minutes. - mix small amounts that you can use right away and dont try to fill it all in one pass. - build it up in layers, sanding between each coat. A few of my fang pics... ..unfortunately I didn't think to take any 'before' pics. My damage was mainly at the corner and edge. pic1 This is actually after the 2nd fill. You can see that the lines are not fully restored, but the basic shape is getting there. This product sands very easily but the first coats are easier to shape down with a course file. (you will need a file wire brush to keep it clean) 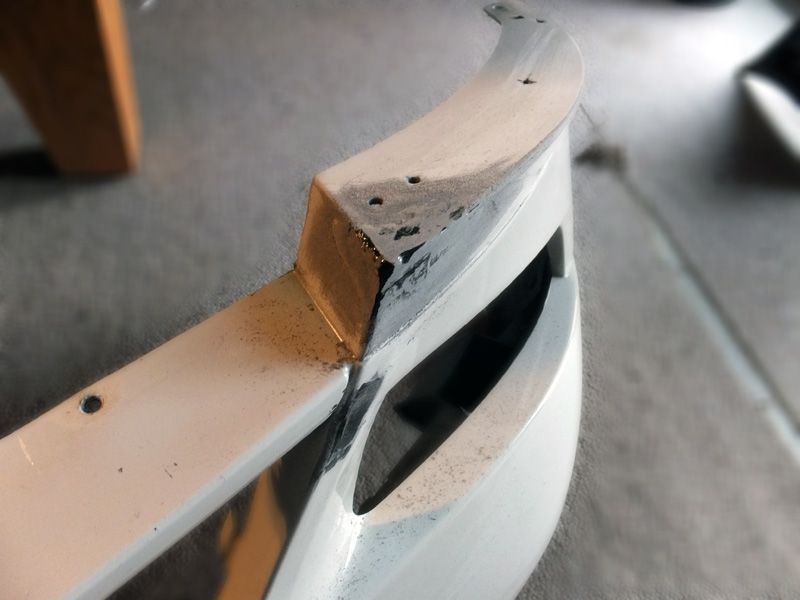 pic2 Lines are pretty well restored, just needs final fill & blending. 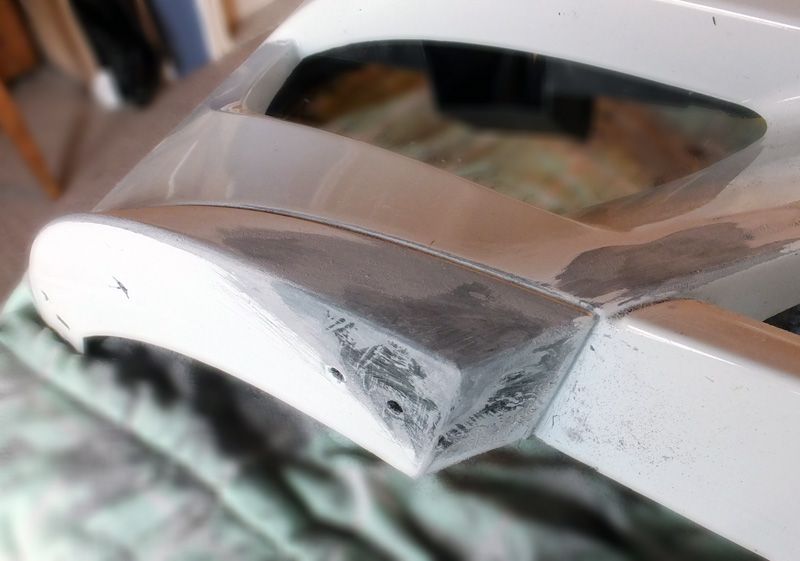 pic3 Almost ready for paint 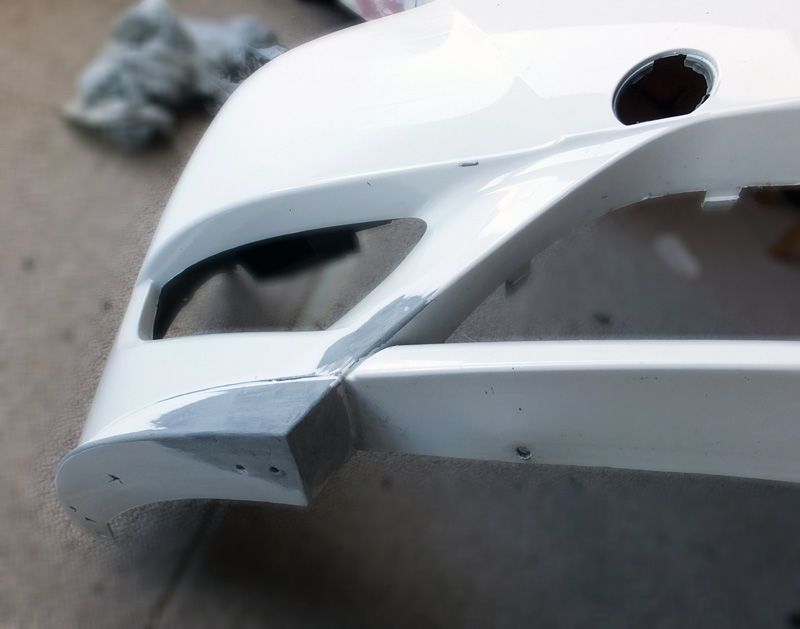 pic4 Just back from the paint shop. (both fangs had the same damage) 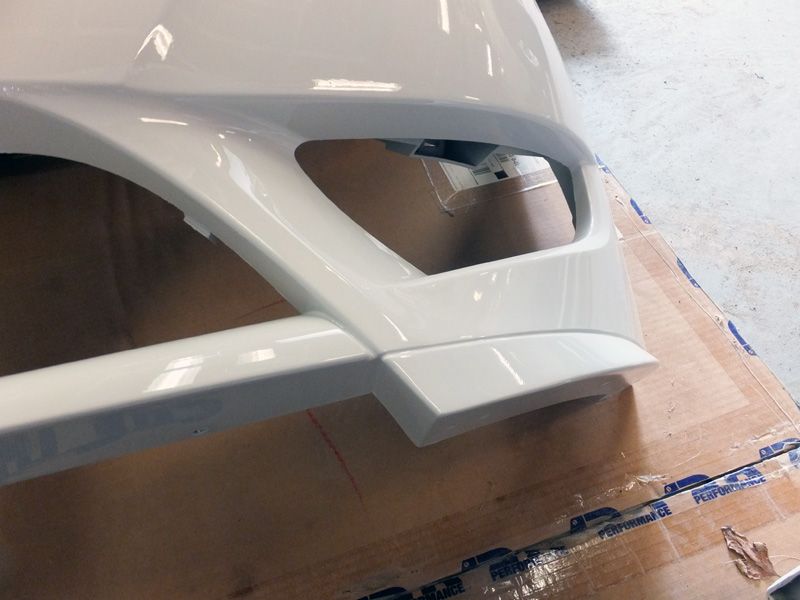
__________________
'21 M2C Hockenheim Silver
'18 718 Cayman S Lava Orange (sold) '13 E92 M3 Santorini Blue (sold) '07 Z4 M Coupe Alpine White (sold) Last edited by inTgr8r; 05-01-2019 at 09:46 AM.. |
| 04-06-2013, 03:43 PM | #2 |
|
Lieutenant General
2444
Rep 11,667
Posts |
Fill in those openings....
A bigger challenge to the fangs was filling in the reflector and squirter openings.
Not really more difficult, just a bigger job. The first step was to cut back some of the plastic behind the openings. You have have to support across the opening, and you have to provide a good amount of surface area for the epoxy to adhere to. pic1 In this pic you can see how some of the plastic was cut back and also see how the surface is roughed up. After the plastic was cleaned with acetone & sanded with course paper, the surface was roughed up with a rasp file. 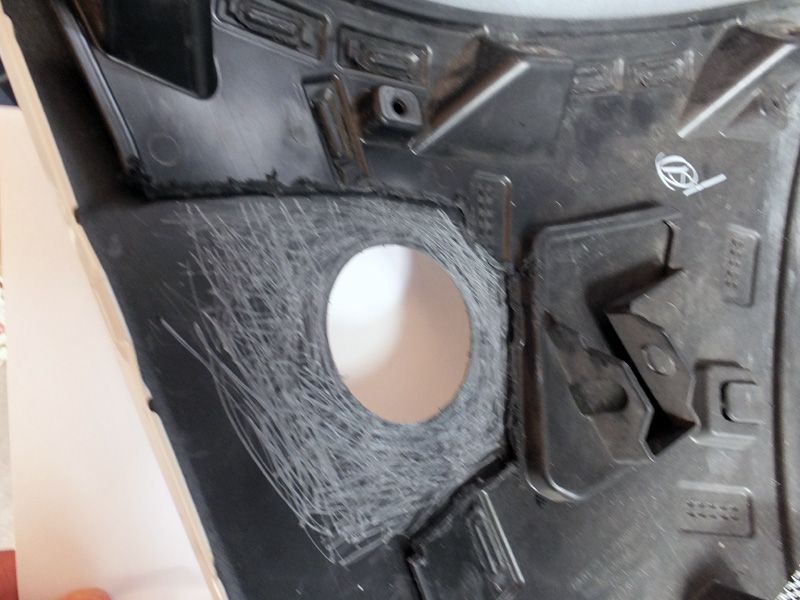 pic2 This is the aluminum support mesh laid roughly in place. This mesh gets embedded in the epoxy. 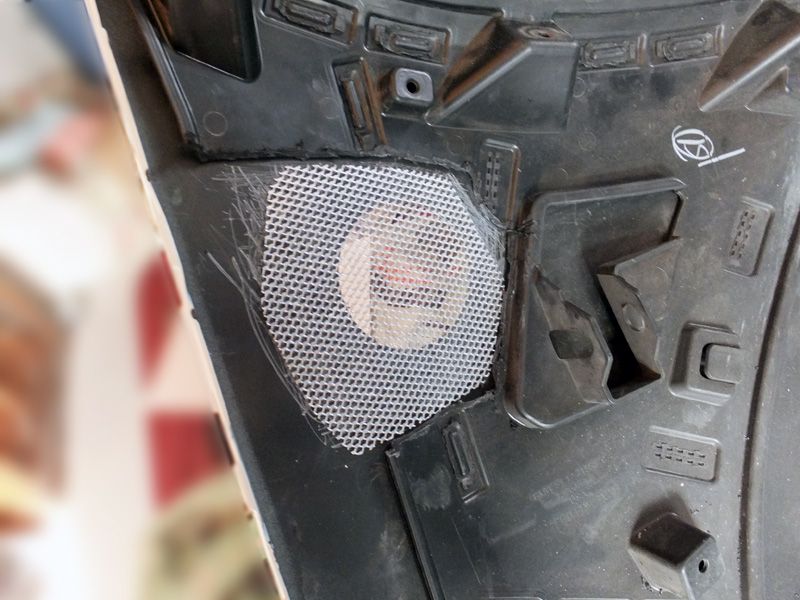 pic3 Similar pic to above showing plastic cut back & mesh for squirter openings. 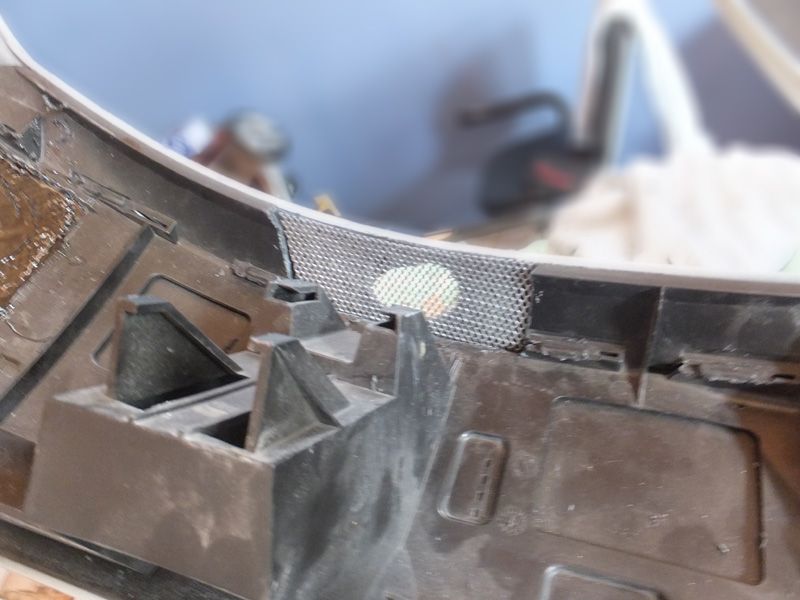 pic4 This the support mesh bonded in place. -spread the epoxy on the bumper surface; press the mesh down into the epoxy; then trowel on more epoxy to cover. 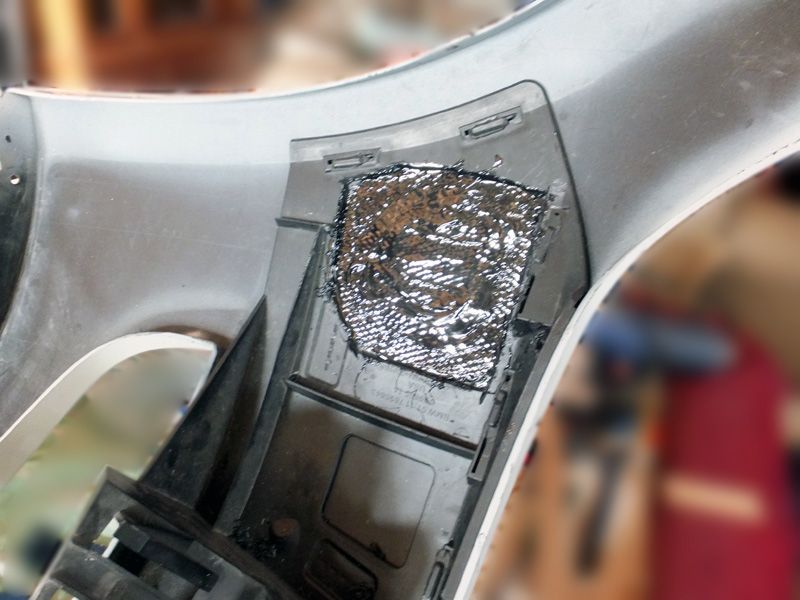 pic5 This is the front side showing a donor piece cut to fill the opening. - NOTE how the edges are feathered back on both the opening and on the bumper fill piece. I used a half round rasp for this. This is a really important step in getting a strong bond. 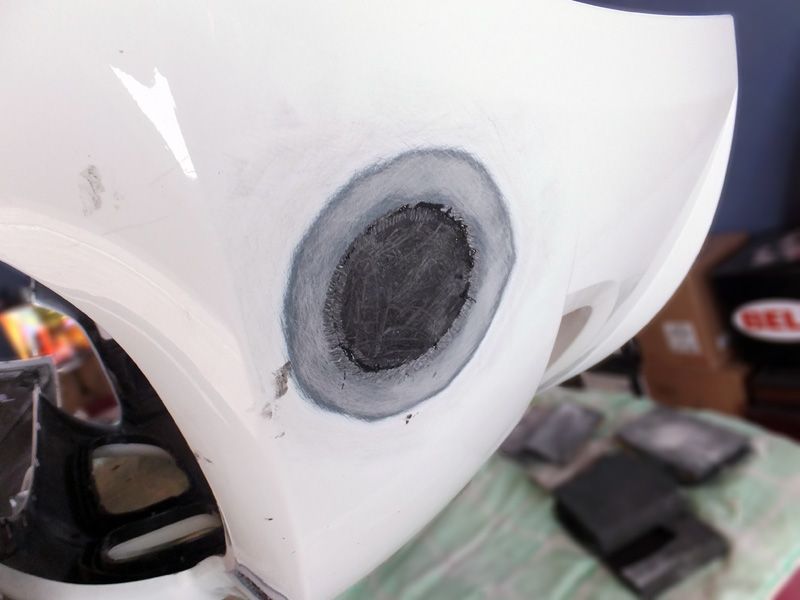 pic6 This is the first rough fill coat. Don't try to be too fancy, just make sure that its worked into that feathered edge joint. You don't want any trapped air bubbles at this stage. 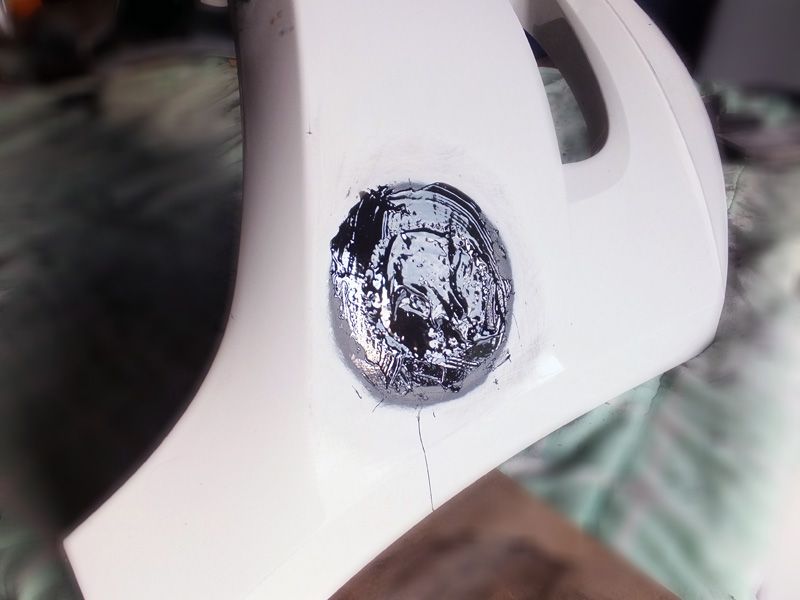 pic7 The second pass.. still some more to fill. (rear bumper) 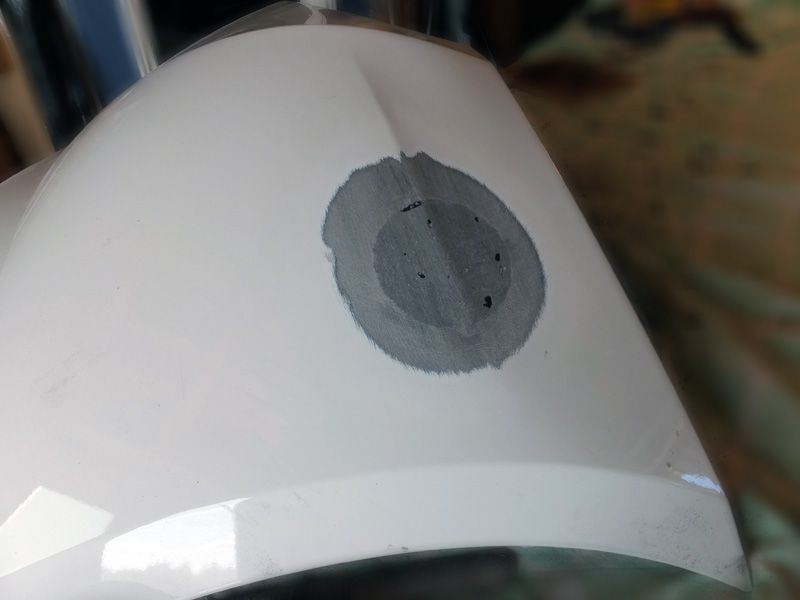 pic8 Almost ready for paint; final blend pass still needed.  pic9; 10 Back from paint.... 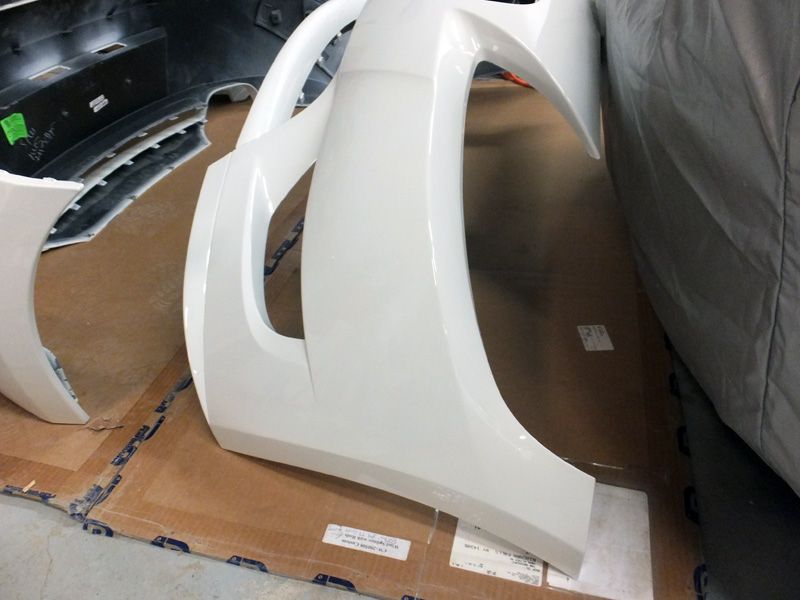 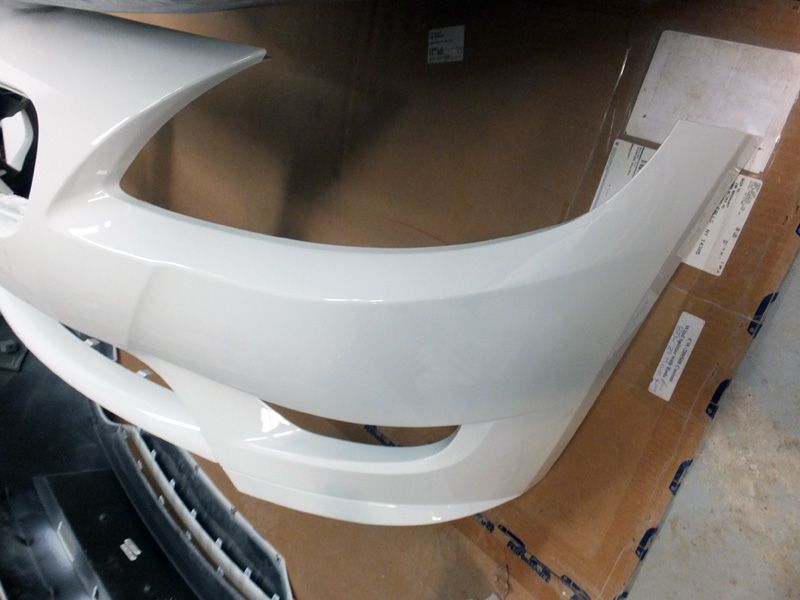
__________________
'21 M2C Hockenheim Silver
'18 718 Cayman S Lava Orange (sold) '13 E92 M3 Santorini Blue (sold) '07 Z4 M Coupe Alpine White (sold) Last edited by inTgr8r; 04-06-2013 at 05:18 PM.. |
|
Appreciate
4
Shutterspeed80.00 Azeka1286.50 |
| 04-06-2013, 05:15 PM | #4 |
|
M = Midlife Crisis
67
Rep 2,006
Posts |
Great Job!
__________________
2006 Z4MC - #LL93158
SS Race Cans, RE X Pipe, DKF Sec 1, Fabspeed Headers, OE STB, AS Shifter, Dave Z CDV, GC Coil Overs, Stoptech lines, Hawk DTC Pads, RE Clutch Stop, RE Transmission Mounts, Vibra-Technics Engine Mounts, Poly FCAB & RTAB, LeatherZ M Shift Boot, Tekarbon Rear Spoiler, CF Grills, Advan RS DGM |
|
Appreciate
0
|
| 04-06-2013, 08:50 PM | #5 |
|
Captain
 788
Rep 911
Posts
Drives: 2020 X3 M40i
Join Date: Mar 2013
Location: MN
|
Very nice. Thx for write up. I plan to do this next winter. Similar damage on fangs; want to delete reflectors. Pictures are really helpful.
Your result looks great! |
|
Appreciate
0
|
| 04-06-2013, 09:24 PM | #7 |
|
Dog Listener

711
Rep 7,850
Posts |
Yup. Looks incredible. DIY is wonderful.
I'm going to have Krissi do hers then mine. She works with resin and epoxy all the time--perfect match for her skills. Probably next fall. |
|
Appreciate
0
|
| 04-07-2013, 08:57 AM | #8 | ||||
|
Lieutenant General
2444
Rep 11,667
Posts |
Quote:
...just wish this weather would warm up more for us. Quote:
it's a pretty straight forward DIY. Quote:
Quote:
This will be a great DIY for her. 
__________________
'21 M2C Hockenheim Silver
'18 718 Cayman S Lava Orange (sold) '13 E92 M3 Santorini Blue (sold) '07 Z4 M Coupe Alpine White (sold) |
||||
|
Appreciate
0
|
| 04-07-2013, 01:05 PM | #9 |
|
Private
 7
Rep 51
Posts |
Just had this done as well, very happy with the results. I was considering doing some of the prep myself but heck of a mess to clean up in my apartment
 |
|
Appreciate
0
|
| 04-07-2013, 01:19 PM | #10 |
|
Captain
32
Rep 782
Posts |
I have to get my bumpers and hood repainted and my fangs fixed, so since I am there will have them do the delets as well.
__________________
2011 30i
[SIGPIC]/SIGPIC] |
|
Appreciate
0
|
| 04-07-2013, 01:38 PM | #11 | |
|
M = Midlife Crisis
67
Rep 2,006
Posts |
Quote:

__________________
2006 Z4MC - #LL93158
SS Race Cans, RE X Pipe, DKF Sec 1, Fabspeed Headers, OE STB, AS Shifter, Dave Z CDV, GC Coil Overs, Stoptech lines, Hawk DTC Pads, RE Clutch Stop, RE Transmission Mounts, Vibra-Technics Engine Mounts, Poly FCAB & RTAB, LeatherZ M Shift Boot, Tekarbon Rear Spoiler, CF Grills, Advan RS DGM |
|
|
Appreciate
0
|
| 04-08-2013, 08:21 AM | #13 |
|
Lieutenant
9
Rep 452
Posts |
Great job! Notice that you also filled the headlamp nozzles.
__________________
Vibra Technics engine mounts / Rogue trans mounts / Stoptech brakes / original owner
|
|
Appreciate
0
|
| 06-11-2013, 07:21 PM | #14 |
|
Private
6
Rep 65
Posts
Drives: 08 3.0si Artic White with Red
Join Date: Jun 2013
Location: Whitby Ontario Canada
|
Thanks so much for this DIY. I have an M Bumper downstairs waiting the exact same repairs.
Getting info on bumper repairs has been a bit of a chore. Most suppliers of the repair kits are not very knowledgeable of confidence inspiring. A couple of questions.. Your donor material to fill in the reflector ports..Did you use the plastic that you trimmed from the washer supports ? On installing the bumper. Im going from a facelift to the M Bumper. I have studied the parts list and except for some sticker shock (2 brake ducts, 2 support brackets, and a tow hook cover priced out at $285 plus 13% tax ) I have been warned by a couple of Zedders that I also need a metal support / bracket for the lower bumper. Actually it was called 'the metal thing" ... Can anyone comment on these concerns ... Cheers jafxdwg |
|
Appreciate
0
|
| 06-11-2013, 09:19 PM | #15 |
|
Lieutenant General
2444
Rep 11,667
Posts |
Filler pieces were from a scrap piece of bumper I had from another car.
__________________
'21 M2C Hockenheim Silver
'18 718 Cayman S Lava Orange (sold) '13 E92 M3 Santorini Blue (sold) '07 Z4 M Coupe Alpine White (sold) |
|
Appreciate
0
|
| 06-12-2013, 12:59 PM | #16 |
|
Lieutenant Colonel

100
Rep 1,546
Posts |
 OoOoOoOoHh!!! Nicely done! OoOoOoOoHh!!! Nicely done! I'll defnintely have to try this when I get home. Question. I got backed into, slowly but hard enough to dent the piece between the kidneys and chip away the paint. Think this will work for that as well? If I screw it up, I planned on getting a new fascia anyway lol so no worries there.
__________________
|
|
Appreciate
0
|
| 06-12-2013, 01:20 PM | #17 | |
|
Lieutenant General
2444
Rep 11,667
Posts |
Quote:
You can see in pic 2 and 3 the spot above the fang where I had a similar ding to fill.
__________________
'21 M2C Hockenheim Silver
'18 718 Cayman S Lava Orange (sold) '13 E92 M3 Santorini Blue (sold) '07 Z4 M Coupe Alpine White (sold) |
|
|
Appreciate
0
|
| 09-15-2013, 11:44 AM | #18 |
|
Private
6
Rep 65
Posts
Drives: 08 3.0si Artic White with Red
Join Date: Jun 2013
Location: Whitby Ontario Canada
|
Thanks inTgr8r
With your guidance .. My M Bumper    Repaired     Back from the painter !  I couldn't have done this without your help ! Thanks |
|
Appreciate
0
|
| 09-15-2013, 11:53 AM | #19 |
|
Private
6
Rep 65
Posts
Drives: 08 3.0si Artic White with Red
Join Date: Jun 2013
Location: Whitby Ontario Canada
|
I used a donor bumper I retrieved from the dumpster behind the local Ford dealer.
To fill the reflector ports I discovered that the port had two chamfers ..1/2 of the port was bevelled in one direction, the other half in the opposite direction. I cut a filler piece to match and it snapped right into place. I needed two layers of filler to bring the repair up to proper level. The washer ports ..I didn't remove much of the washer support. And I managed to slide repair mesh between the support and the bumper. Contrary to the original pics my bumper had sustained quite a bit of a twist when it was damaged and I felt it needed as much reinforcement as possible. After some discussion I also filled the tow hook port and plan on locating the front lic. plate lower - in front of the grill. A heat gun was invaluable in carefully returning the fangs to original position and destressing twisted areas. Thanks again. |
|
Appreciate
0
|
| 09-15-2013, 12:09 PM | #20 |
|
Private
6
Rep 65
Posts
Drives: 08 3.0si Artic White with Red
Join Date: Jun 2013
Location: Whitby Ontario Canada
|
Other Bumper Mods Im considering ...
Colour matched Brake cooling ducts with fog lights relocated   And colour matched kidney grills with shadow chrome trim   Front plate relocation ?   The jury is still out on the aesthetics of colour matching. The brake ducts were considered because I feel the depth of the port will look better as the same body colour. The kidneys ..Well I have 3 sets of those now. Argent, black and white. So it's an easy fix if I don't like how it looks. |
|
Appreciate
0
|
| 04-09-2014, 11:38 AM | #21 |
|
Enlisted Member

1
Rep 32
Posts |
Hi!
I have a question for the guys who have filled the gaps. Can you tell me if there are cracks appearing on those areas? A friend told me that one problem that might show up is that if you hit the bumper (slowly) those areas will crack quickly. What product (brand) have you used to fuse the plastic parts with the bumper? |
|
Appreciate
0
|
Post Reply |
| Bookmarks |
|
|