

| BMW Garage | BMW Meets | Register | Today's Posts | Search |
|
|
|
 SUPPORT ZPOST BY DOING YOUR TIRERACK SHOPPING FROM THIS BANNER, THANKS! |
|||||||||
Post Reply |
|
|
Thread Tools | Search this Thread |
| 09-03-2017, 03:34 PM | #23 |
|
Major General
 
423
Rep 5,329
Posts |
anyone fitted one of these to a roadster yet??
Not sure if it will work as well visually ......
__________________
Z4MR VT2 - Clubsport build.
Multi award winning Detailing | Wrap | PPF specialists UK based - www.topwrapz.com |
|
Appreciate
0
|
| 10-25-2017, 12:00 PM | #24 |
|
Midlife Crises Racing Silent but Deadly Class
1821
Rep 5,337
Posts
Drives: 2006 MZ4C, 2021 Tesla Model 3
Join Date: Oct 2007
Location: Welcome to Jamaica have a nice day
|
From June to now...It's been 4 months? I'm averaging probably 1.5 scrapes per months. Never the splitter, always the diffuser. It sits MUCH lower than OEM for sure, and even when I'm being careful, pulling out of any sort of inclined driveway require a ton of patience.
The diffuser is a very sturdy piece, and despite the numerous scrapes the bottom of the fins don't seem to have taken on much damage. Some of the powder coat has been scrapped off, so I just take a permanent marker to it and it's good for a short while. But due to the age of the car (11 years) I suspect the plastic carrier piece is now turning brittle. Every time the diffuser scrapes on a driveway it acts like a slow speed impact on the bumper. I think one or more of the tabs on the carrier is busted. 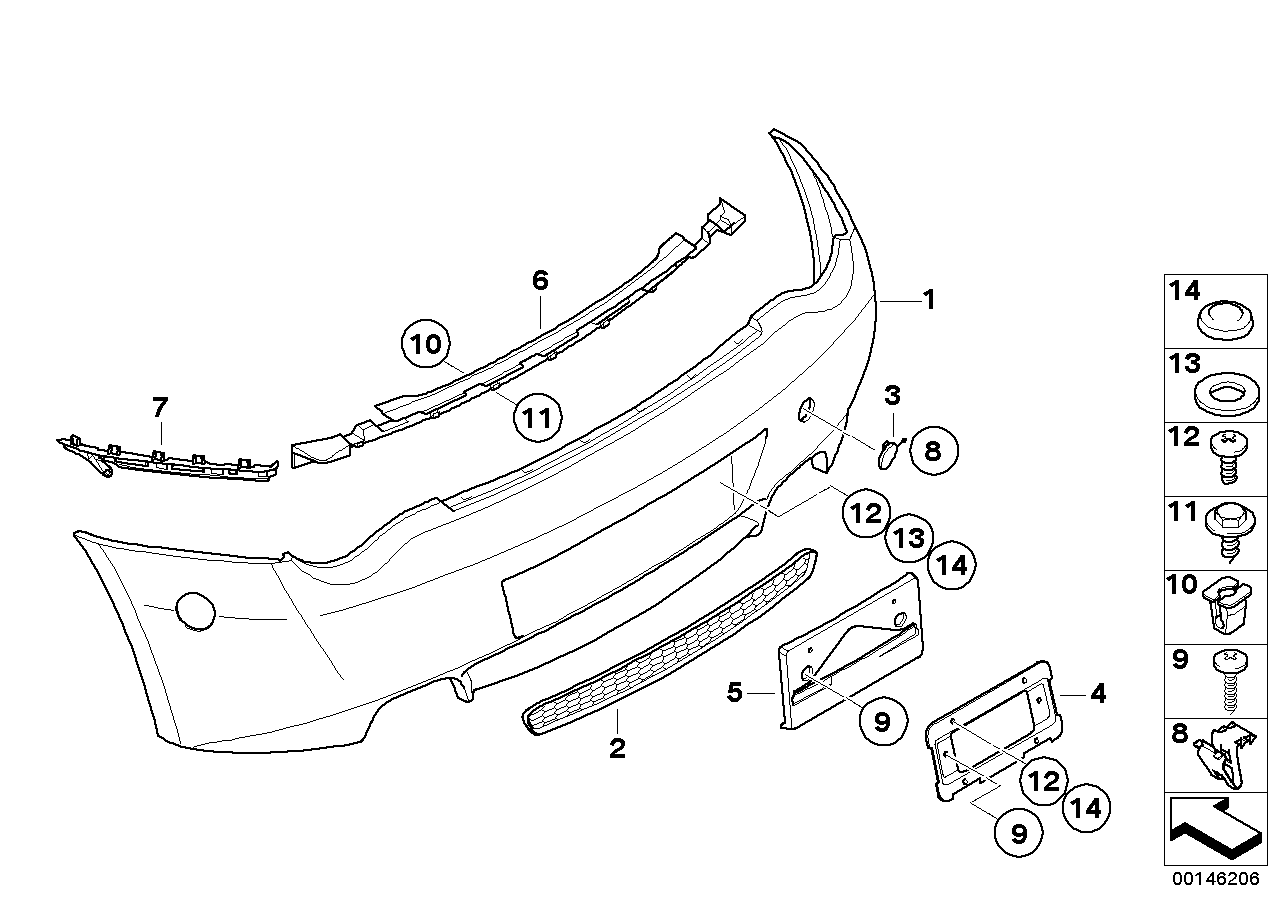 Part number 6 in the diagram. This is what the tabs look like, this is the underside of the trim backet: 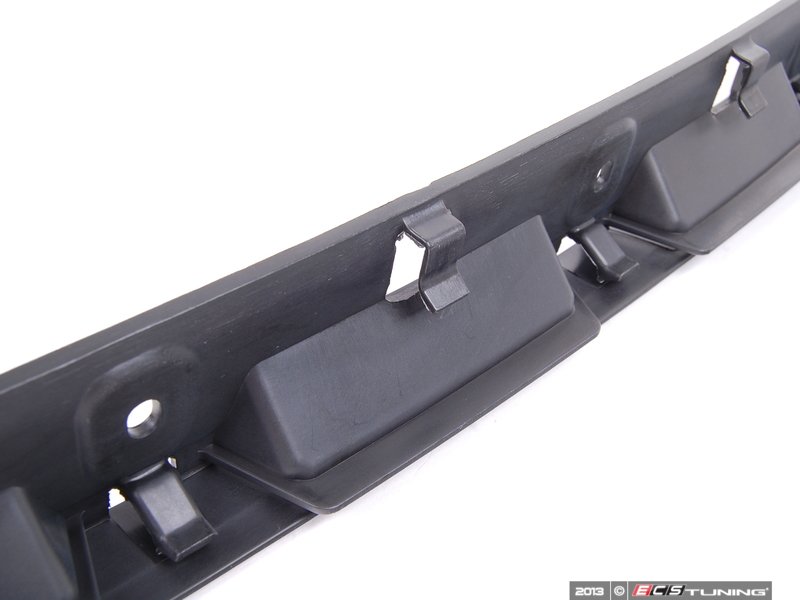 The little tabs on the bottom right hand side "under" a hole for a screw/bolt. There are six of these tabs total, and I suspect more than a few has broken off due to my occasional scraping of the diffuser. Eventually I will have to replace all three of the bumper carriers: 51127158875 Center carrier 51127165177 Left carrier 51127165178 Right carrier For now, I drilled 3 small holes on the carrier through to the bumper to allow for 3 expanding rivets to hold it in place. Excuse the dirty car, waiting for the Skyer spoiler to be installed before I do another thorough cleaning.
__________________
Sitting on a beat-up office chair in front of a 5 year old computer in a basement floor, sipping on stale coffee watching a bunch of meaningless numbers scrolling aimlessly on a dimly lit 19 monitor.
|
|
Appreciate
0
|
| 10-25-2017, 01:08 PM | #25 |
|
Lieutenant General

2435
Rep 11,668
Posts |
FWIW....
There is one corner at our local track (Mosport) that has a huge compression just before turn in and I was scraping big time there. The two outside fins are deeper than the main diffuser fins and they were the ones taking the abuse. I trimmed them to the same depth as the others and now I don't scrape at all.
__________________
'21 M2C Hockenheim Silver
'18 718 Cayman S Lava Orange (sold) '13 E92 M3 Santorini Blue (sold) '07 Z4 M Coupe Alpine White (sold) |
|
Appreciate
0
|
| 10-25-2017, 02:16 PM | #26 | |
|
Midlife Crises Racing Silent but Deadly Class
1821
Rep 5,337
Posts
Drives: 2006 MZ4C, 2021 Tesla Model 3
Join Date: Oct 2007
Location: Welcome to Jamaica have a nice day
|
Quote:
__________________
Sitting on a beat-up office chair in front of a 5 year old computer in a basement floor, sipping on stale coffee watching a bunch of meaningless numbers scrolling aimlessly on a dimly lit 19 monitor.
|
|
|
Appreciate
0
|
| 03-26-2018, 01:22 PM | #27 |
|
Midlife Crises Racing Silent but Deadly Class
1821
Rep 5,337
Posts
Drives: 2006 MZ4C, 2021 Tesla Model 3
Join Date: Oct 2007
Location: Welcome to Jamaica have a nice day
|
So...First track event after all the work I did last winter, and have some INTERESTING results.
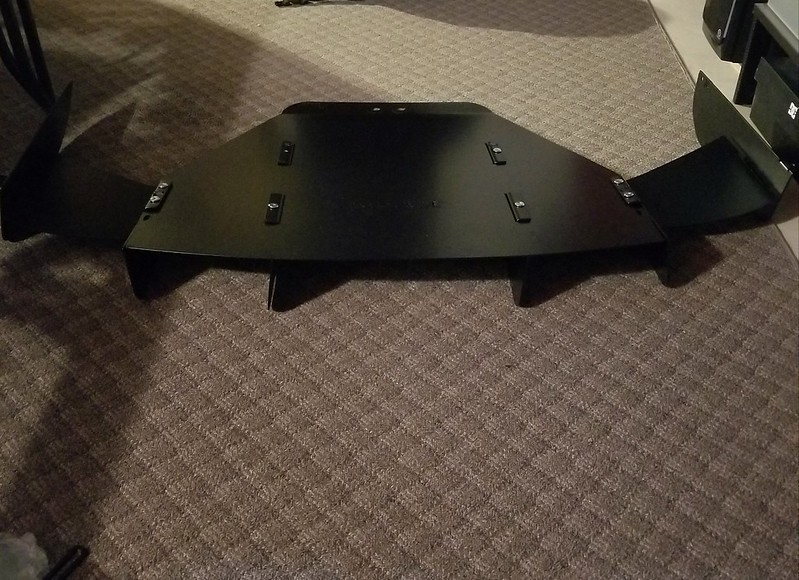
Originally I wasn't expecting a world of difference, but was shocked to find that my average terminal speed going up Magic Mountain just before the braking zone is up a whopping 5 mph. For those of you not familiar with Buttonwillow, Magic Mountain is a hill just after a long high speed sweeper followed by 1 additional "sweep" through (a right at what we called "Riverside", the first sweeper, then another sweeper to the left). Very high speed, averages were at least 80 at entry and 90+ by the exit. 5 whopping MPH can't all be attributed to aero alone, because the suspension was swapped out. But the spring rates were comparable, but the dampers are significantly upgraded (2 way with remote from KW Clubsports compared to the GC damper adjustable Konis). And to be honest I was pussy-footing it around because I wanted to make sure I'm familiar and comfortable with the setup, as indicative of the lap times still about 4 seconds off of my PB in this particular config at BW (1CW). But despite all the factors working against it the one place where AERO would have the most effect on the track, the two high speed sweepers, it appears the splitter, diffuser, and aero all worked to some extent. The highs were in the mid-low 50s during my best run, so I'm not sure if the tires got up to its potential as max speed through some of the slower turns were below my previous track days. Still not definitive proof that the FancyWide diffuser adds performance, but numbers don't lie. At least in conjunction with a splitter it made a difference.
__________________
Sitting on a beat-up office chair in front of a 5 year old computer in a basement floor, sipping on stale coffee watching a bunch of meaningless numbers scrolling aimlessly on a dimly lit 19 monitor.
Last edited by The HACK; 03-26-2018 at 02:29 PM.. |
|
Appreciate
0
|
| 04-16-2018, 09:39 PM | #28 |
|
New Member

87
Rep 10
Posts |
So I recently purchased a Fancy Wide diffuser for my coupe with stock mufflers. I already had plans to shorten the mounting point bringing the whole diffuser underneath the car more, but after reading The Hack's write up about the diffuser not fitting with stock mufflers I knew I'd have to do more cutting and fitting than originally planned. But here is what i came up with.
 2018-04-15_10-41-04 by Josh Cole, on Flickr 2018-04-15_10-41-04 by Josh Cole, on Flickr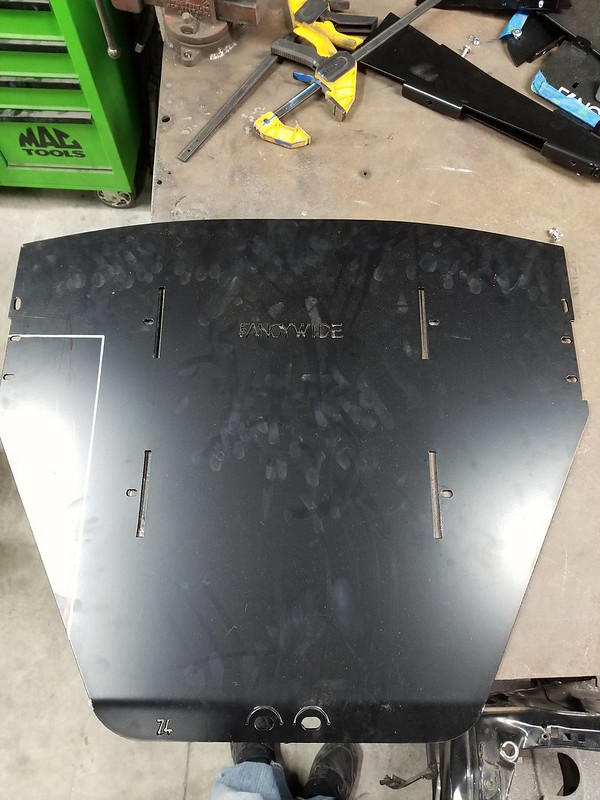 2018-04-15_10-41-31 by Josh Cole, on Flickr 2018-04-15_10-41-31 by Josh Cole, on Flickr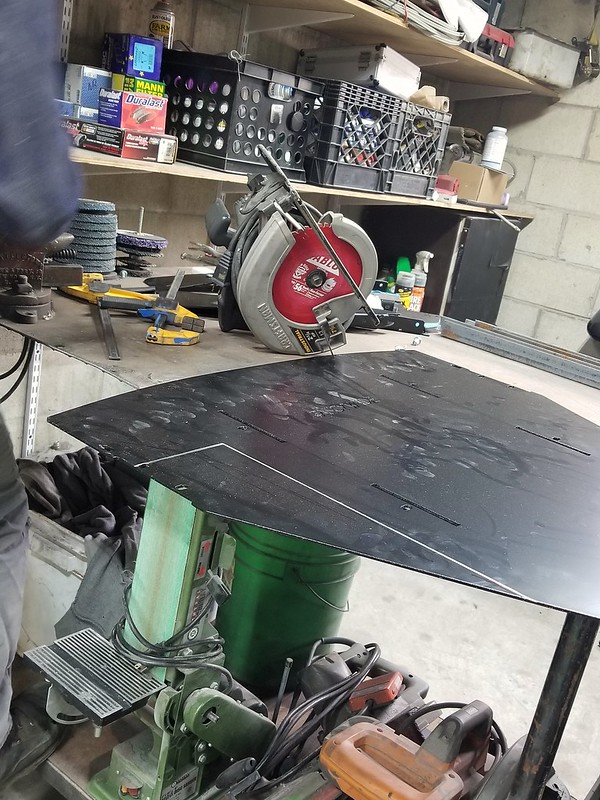 2018-04-15_10-41-44 by Josh Cole, on Flickr 2018-04-15_10-41-44 by Josh Cole, on Flickrcut to fit around the muffler, also marked where to drill the new mounting wholes. I decided that 3 inches shorter was a good placement. 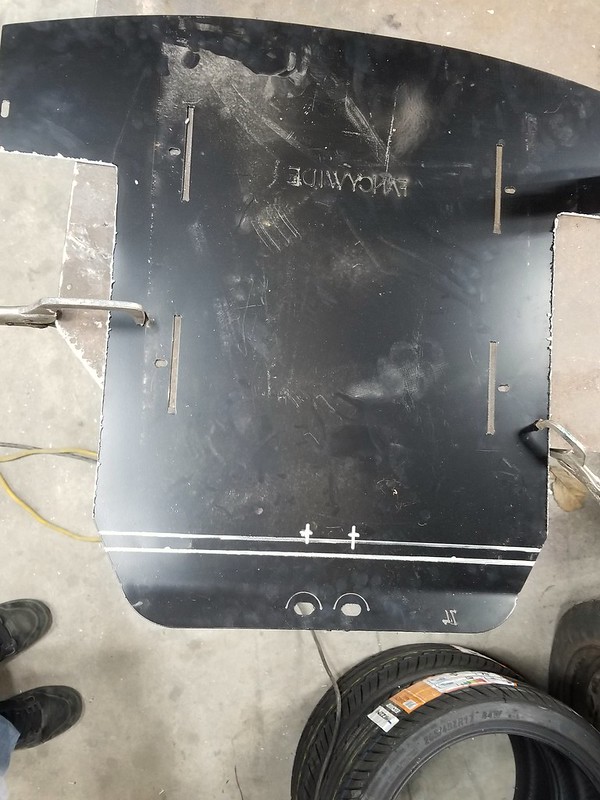 2018-04-15_10-42-02 by Josh Cole, on Flickr 2018-04-15_10-42-02 by Josh Cole, on FlickrWe used this bracket for an extra mounting point. Drilled new holes and used rivnuts to fasten. 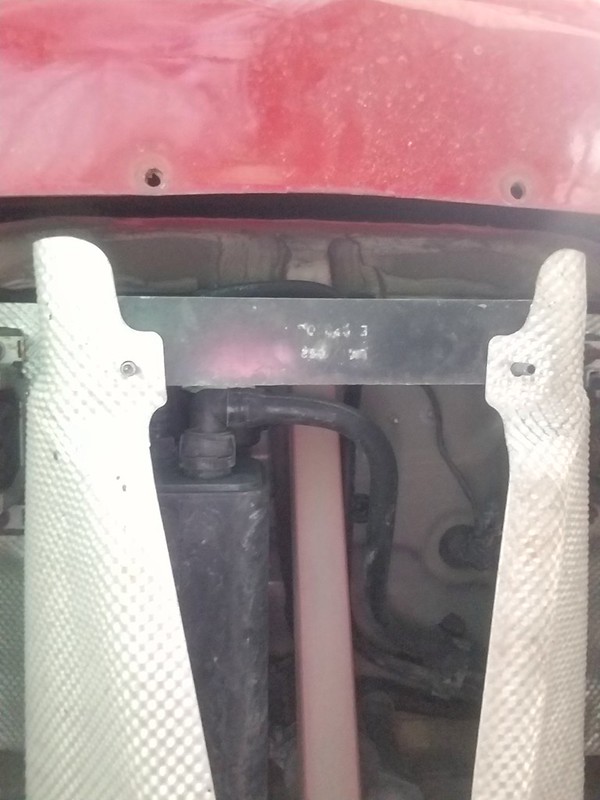 2018-04-15_10-42-49 by Josh Cole, on Flickr 2018-04-15_10-42-49 by Josh Cole, on Flickrcleaned up the cuts to fit around the muffler better. 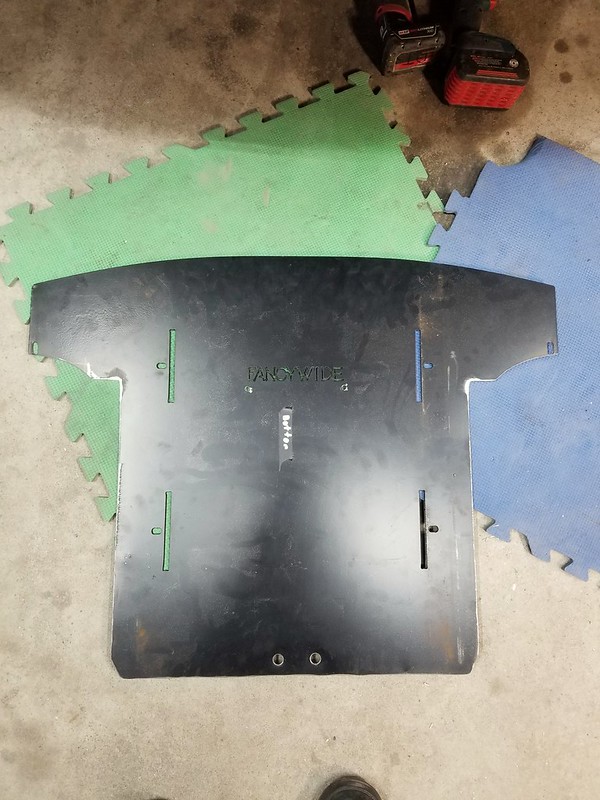 2018-04-15_10-43-29 by Josh Cole, on Flickr 2018-04-15_10-43-29 by Josh Cole, on Flickron to the "fins" so since we shortened the whole diffuser we had to shorten some of the fins for muffler clearance. 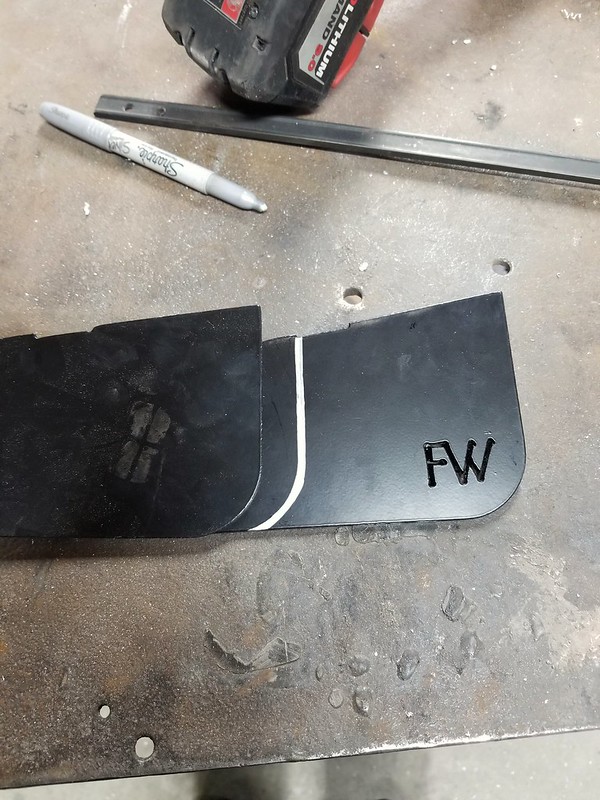 2018-04-15_10-43-39 by Josh Cole, on Flickr 2018-04-15_10-43-39 by Josh Cole, on Flickrwe just traced the curve from the other side so that we would have the same angle. 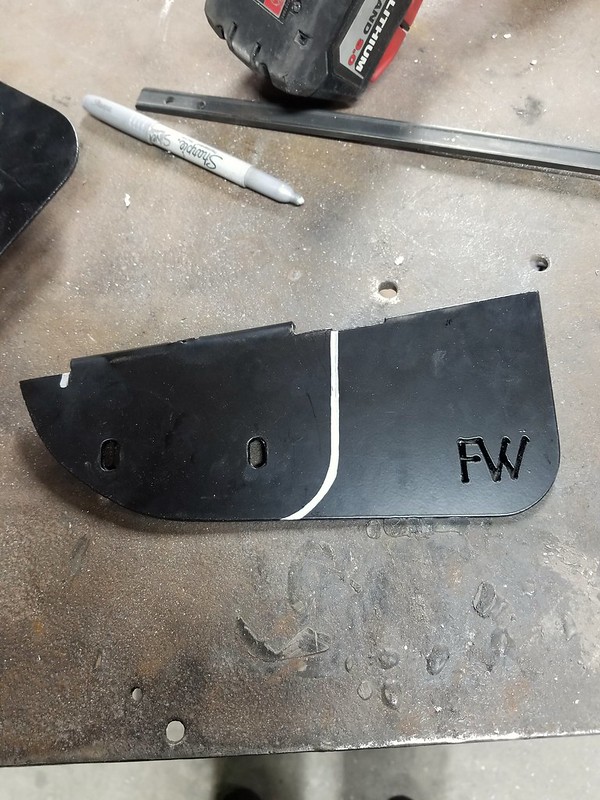 2018-04-15_10-43-52 by Josh Cole, on Flickr 2018-04-15_10-43-52 by Josh Cole, on Flickr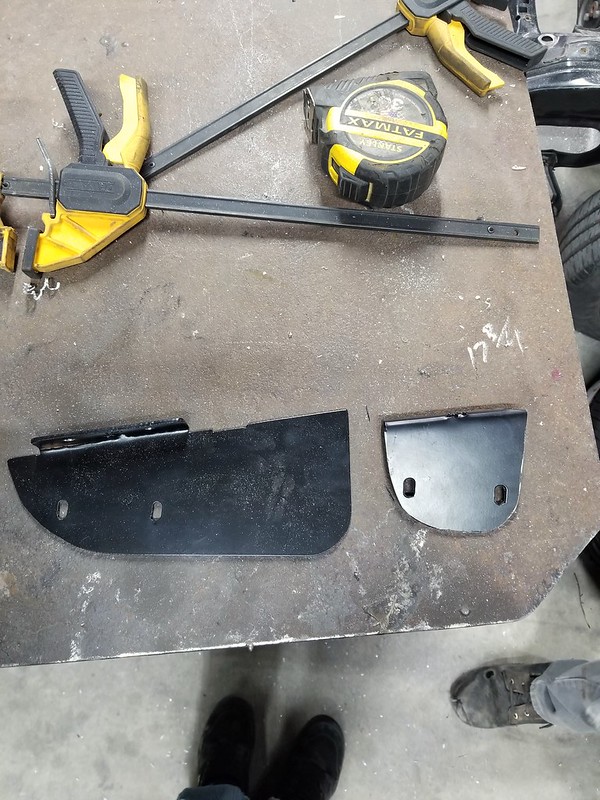 2018-04-15_10-43-59 by Josh Cole, on Flickr 2018-04-15_10-43-59 by Josh Cole, on Flickryou only see the back of this piece so i wasn't too worried about it being this small. At this stage, the functionality is pretty much out the window. But we are primarily going for looks here. as you can see in this picture the piece under the exhaust tips stick out a tad. We later trimmed that down so it was flush (not pictured)  2018-04-15_10-44-08 by Josh Cole, on Flickr 2018-04-15_10-44-08 by Josh Cole, on Flickr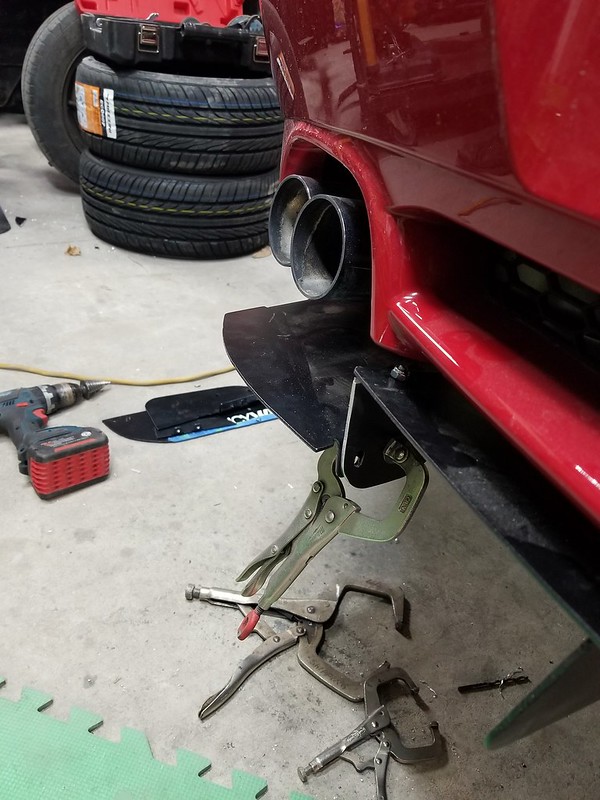 2018-04-15_10-44-31 by Josh Cole, on Flickr 2018-04-15_10-44-31 by Josh Cole, on Flickr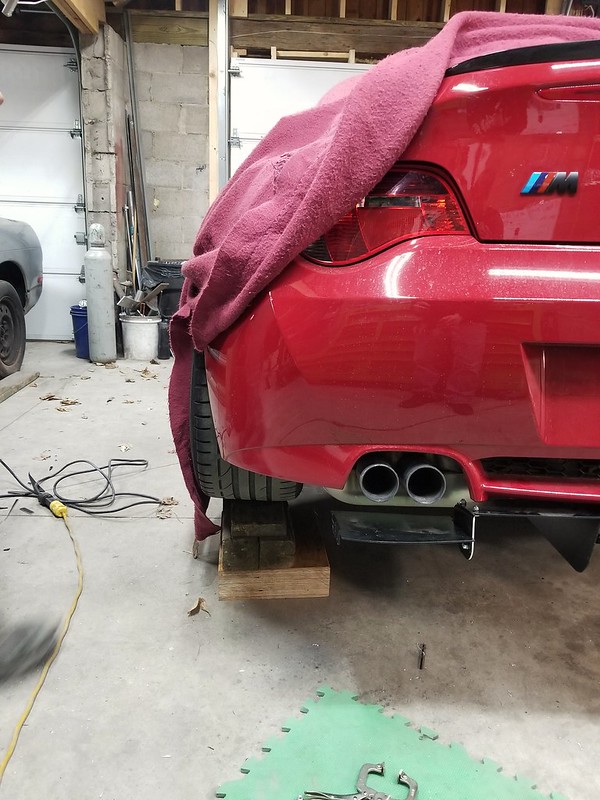 2018-04-15_10-45-05 by Josh Cole, on Flickr 2018-04-15_10-45-05 by Josh Cole, on FlickrSo at this point i stepped out for lunch to feed my "fabricator" aka my brother. I wanted to extend the piece under the exhaust and then shorten the outside fin to clear the muffler. But further thought brought us too bending it, because my idea was to keep the mufflers hidden. 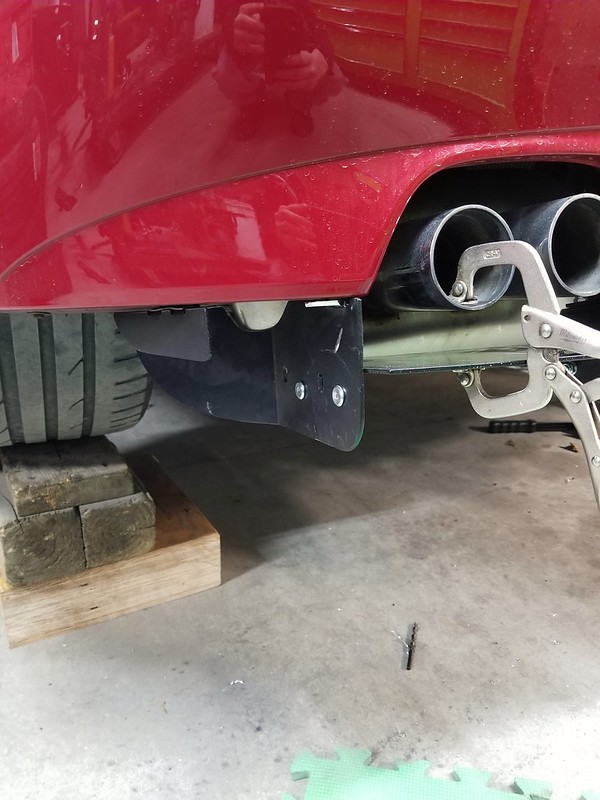 2018-04-15_10-45-15 by Josh Cole, on Flickr 2018-04-15_10-45-15 by Josh Cole, on FlickrThe outside piece covers the bend and the extra cut. So it all kind of blends and is not very noticeable 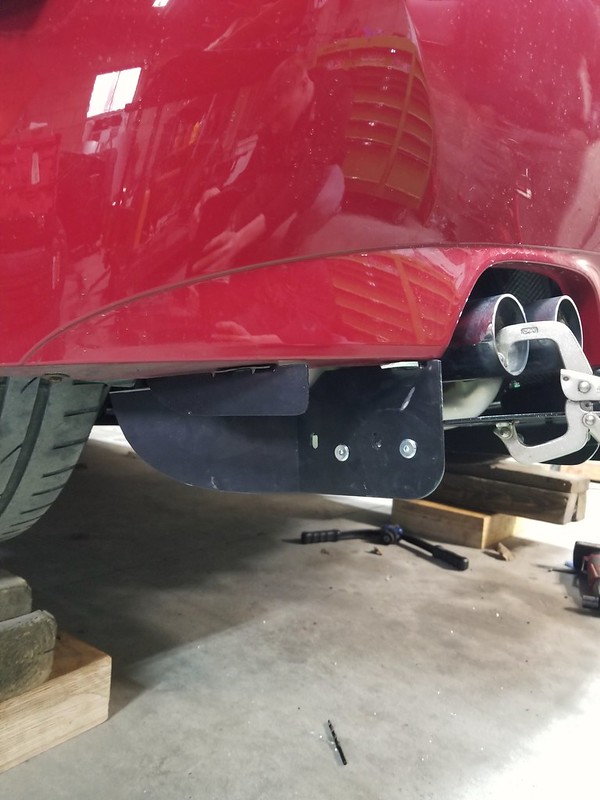 2018-04-15_10-45-26 by Josh Cole, on Flickr 2018-04-15_10-45-26 by Josh Cole, on FlickrFrom this angle you can see the extra cut. But once the car is down, you cant see it. Also painting the muffler black helps. 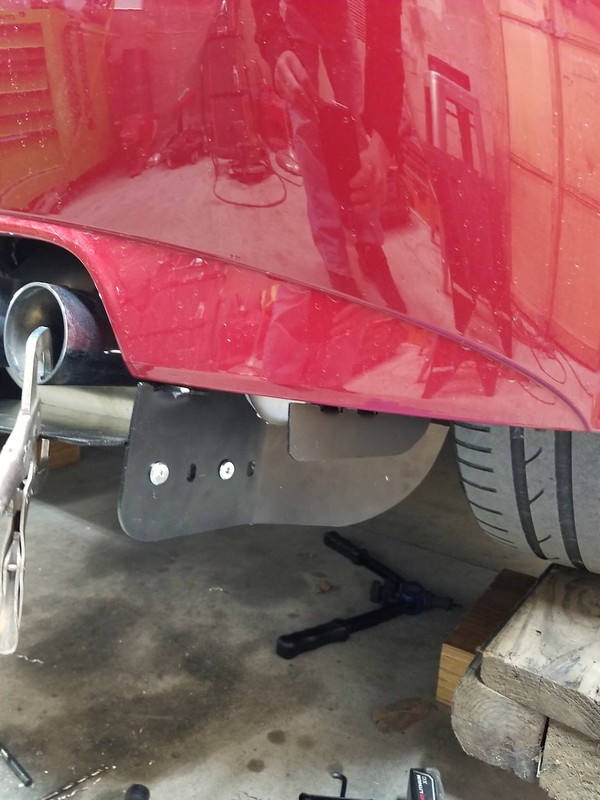 2018-04-15_10-45-35 by Josh Cole, on Flickr 2018-04-15_10-45-35 by Josh Cole, on FlickrAnd this is it all mounted up. I'm glad I slid it back under the car more for a cleaner look. Still deciding on how to finish it yet. I have a few holes to fill in and paint the bolts. But overall happy with it. Took just under 8 hours to fully finish. 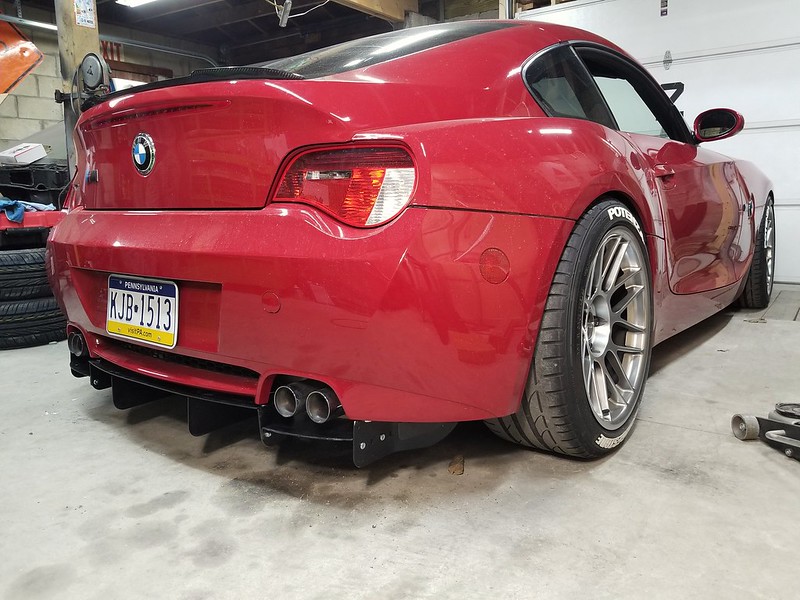 2018-04-15_10-46-34 by Josh Cole, on Flickr 2018-04-15_10-46-34 by Josh Cole, on Flickr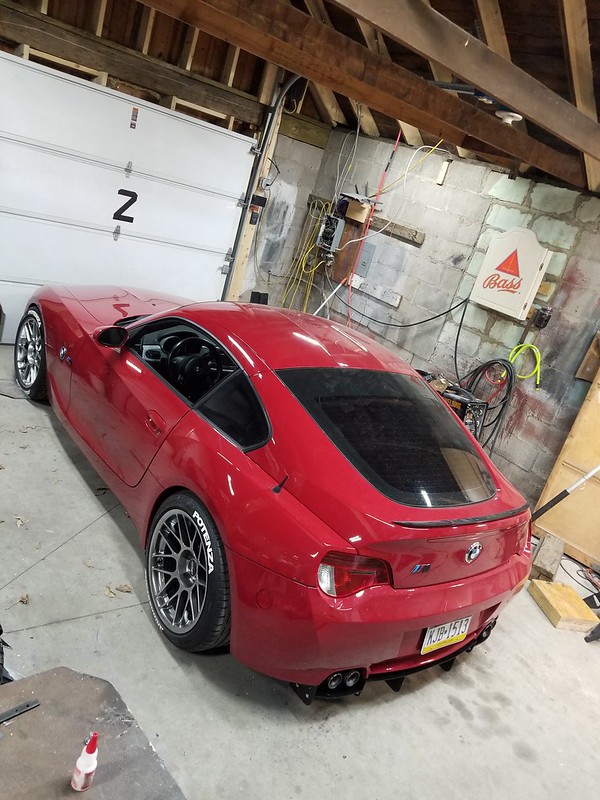 2018-04-15_10-46-46 by Josh Cole, on Flickr 2018-04-15_10-46-46 by Josh Cole, on Flickr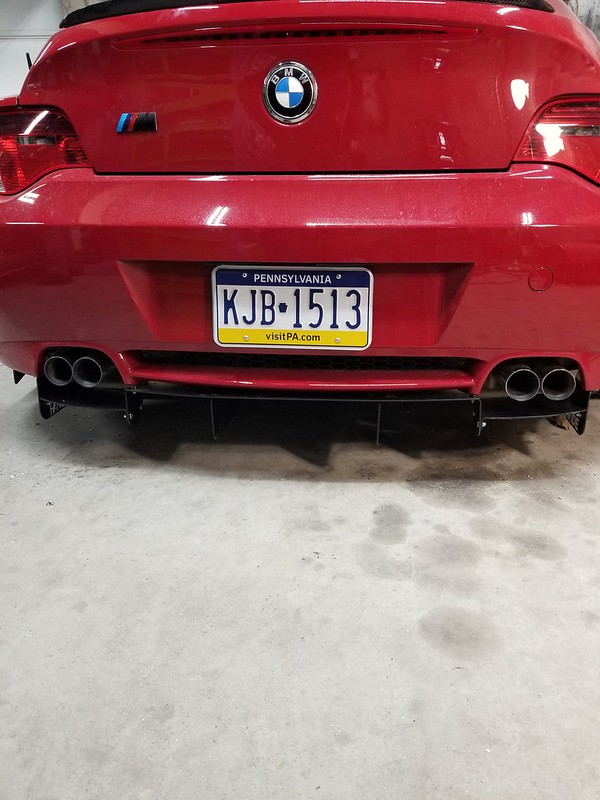 2018-04-15_10-46-25 by Josh Cole, on Flickr 2018-04-15_10-46-25 by Josh Cole, on Flickr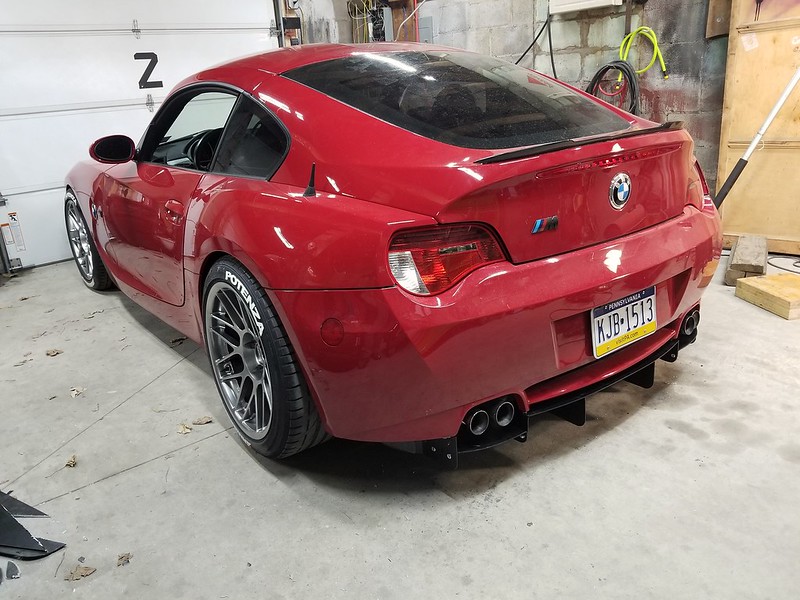 2018-04-15_10-46-16 by Josh Cole, on Flickr 2018-04-15_10-46-16 by Josh Cole, on Flickr |
| 09-13-2018, 07:29 PM | #31 | |
|
Why so serious?
142
Rep 743
Posts |
Quote:
Not a good picture but, here you go. It looks tilted, but it really isn't. Weird.    |
|
|
Appreciate
0
|
| 10-03-2018, 02:02 AM | #32 | |
|
Private First Class
 
64
Rep 113
Posts |
Quote:
__________________
|
|
|
Appreciate
0
|
| 11-26-2020, 06:33 AM | #33 |
|
Private First Class
64
Rep 113
Posts |
Special price for BMW Z4 / Z4M rear diffuser - 336$ USD.
Black Friday has already started! Promo code: BLACK https://fancywide.ru/fancywide-tuning-store/ 20% OFF FOR ALL PRODUCTS. Accept PayPal - Shipping worldwide.  
__________________
|
|
Appreciate
1
Mirko182.00 |
| 12-04-2020, 09:26 PM | #35 |
|
Down Under!!

1624
Rep 4,296
Posts |
must be on purpose... , as probably the rear scrubs at speed (as its so low), so the wing /helps/ it lift the rear a bit.
(i mounted my rear ARB upside down too in a hurry, that was on purpose too, just to see if you guys would catch it...)  Love pick-achoo though, that rocks 
__________________
2007 EuroSpec Z4///MC - Building/Developing Z4 GT3
Powered by  |
|
Appreciate
0
|
| 01-20-2022, 06:32 AM | #37 |
|
Private First Class
64
Rep 113
Posts |
Steven Burke Z4M with Fancywide Diffuser.

__________________
|
|
Appreciate
0
|
Post Reply |
| Bookmarks |
|
|


