

| BMW Garage | BMW Meets | Register | Today's Posts | Search |
|
|
|
 SUPPORT ZPOST BY DOING YOUR TIRERACK SHOPPING FROM THIS BANNER, THANKS! |
|||||||||
Post Reply |
|
|
Thread Tools | Search this Thread |
| 02-27-2024, 09:40 AM | #1 |
|
Enlisted Member
 5
Rep 35
Posts |
Im reinstalling my camshafts and lifters, and the exhaust went on just fine, however the intake cam is giving me some trouble. I do not have the bmw special tool, so Im following this DIY article https://germanautosolutions.com/supp...placement-diy/ and Im not able to get the E6 bearing cap nuts on. For the E4 cap I am able to put light pressure on the cap to get the nuts started, but the E6 doesnt budge when I try that. I wanted to ask if anyone has any tricks/tips for this, I dont really want to break the cam and have to buy a new one lol
Edit: forgot to mention, its the 3.0 m54 |
| 02-27-2024, 09:54 AM | #2 |
|
Enlisted Member
5
Rep 35
Posts |
Update - I was re-reading the instructions and I realized that I turned the crankshaft counter-clockwise instead of clockwise
oops
Update pt. 2 - That was not the issue, I still cant get the E6 bearing cap nuts on. Now I have no idea what the issue could be |
|
Appreciate
0
|
| 02-27-2024, 10:37 AM | #3 |
|
#buildnotbought
10855
Rep 4,893
Posts |
It should be doable.
I did this a long time ago (well over 10 years ago) with my schrick cams, so the exact ins and outs are a bit vague  . .I used a guide on e46fanatics (that guide is not online anymore) and some info from bmw TIS and got the schrick cams installed pretty easily. In my memory it was pretty similar to the guide you're using, I'm certain that it was with rotating the cams a bit to ease off the tension on some of the lifters. I may have a backup of that guide somewhere if I seach deeply in my backups.... The schrick cams obviously have longer and wider lobes, so if it works with the schrick cams, it'll be a breeze with the stock cams 
__________________
Z4 3.0i | ESS TS2+ supercharger | Quaife ATB LSD | Brembo/BMW performance BBK front/rear | Schrick FI cams | Schmiedmann headers+cats | Powerflex/strongflex PU bushings | Vibra-technics engine mounts | H&R anti rollbars | KW V3 coilovers/KW camber plates | Sachs race engineering clutch | tons of custom sh#t
|
|
Appreciate
0
|
| 02-28-2024, 08:57 PM | #4 |
|
Enlisted Member
5
Rep 35
Posts |
I did some more playing around, and noticed that when I look at it from the side, one side is always higher than the other. I tried rotating it to a few different spots, but it just moved the high spot from left to right. Is there some way that I couldve bent it without it breaking? Here is the picture of the high spot:
|
|
Appreciate
0
|
| 02-28-2024, 11:00 PM | #5 |
|
Colonel
 
880
Rep 2,547
Posts
Drives: Z4MC-X3-35i-525i, Corrado G60
Join Date: Nov 2007
Location: MD
|
Camshafts are hardened, therefore brittle and will snap before they bend.
The cam has to push the valves open, overcoming the springs, for those lobes that are pointing downward. You'll need to get creative with a prybar on one of studs on the side of the head putting a nut on it and levering down on the cam between lobes. A helper would make it easier while one person levers the cam down while the other puts the nuts on the caps. You could also start tightening the nuts on some of the caps which should draw the cam downward enough to get nuts started on the other caps. As mentioned, the cam is brittle, so go slow and easy. |
|
Appreciate
1
wigwig4.50 |
| 02-29-2024, 06:42 AM | #6 | |
|
#buildnotbought
10855
Rep 4,893
Posts |
In my memory I didn't have to tighten any nuts to force the cam down.
At 1 stud I remember I just had to push a little bit with my thumb on the bearing cap to get the nut started on the stud.. And that was with schrick cams. And yes, cams are brittle: 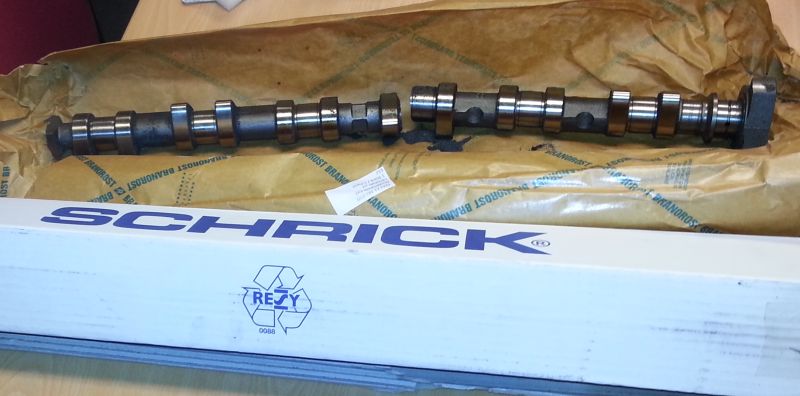 (happened in shipping due to insufficient packeaging, I got a new one for free from the place I bought it from) Quote:
Why if I may ask? The car looks to be in very good shape btw. Garage queen all her life I guess 
__________________
Z4 3.0i | ESS TS2+ supercharger | Quaife ATB LSD | Brembo/BMW performance BBK front/rear | Schrick FI cams | Schmiedmann headers+cats | Powerflex/strongflex PU bushings | Vibra-technics engine mounts | H&R anti rollbars | KW V3 coilovers/KW camber plates | Sachs race engineering clutch | tons of custom sh#t
Last edited by GuidoK; 02-29-2024 at 06:48 AM.. |
|
|
Appreciate
0
|
| 02-29-2024, 06:45 AM | #7 | |
|
Enlisted Member
5
Rep 35
Posts |
Quote:
|
|
|
Appreciate
0
|
| 02-29-2024, 06:52 AM | #8 | |
|
#buildnotbought
10855
Rep 4,893
Posts |
Quote:
most difficult part is getting the vanos off and out past the structure. But I always remove the engine mounts and have the engine rest with the sump on the lower subframe (on a thin rubber mat), so the engine sits ~1" lower and the vanos can clear the substructure. Why replace the head gasket? You had a failure? That's pretty rare on these engines, normally they can run like 500k miles or so...they are bombproof except for some small niggles that can be solved nowadays for cheap (loose aftermarket vanos rings, aftermarket disa flap repair kit etc).
__________________
Z4 3.0i | ESS TS2+ supercharger | Quaife ATB LSD | Brembo/BMW performance BBK front/rear | Schrick FI cams | Schmiedmann headers+cats | Powerflex/strongflex PU bushings | Vibra-technics engine mounts | H&R anti rollbars | KW V3 coilovers/KW camber plates | Sachs race engineering clutch | tons of custom sh#t
|
|
|
Appreciate
0
|
| 02-29-2024, 07:01 AM | #9 | ||
|
Enlisted Member
5
Rep 35
Posts |
Quote:
Quote:
|
||
|
Appreciate
0
|
| 02-29-2024, 07:13 AM | #10 | |
|
#buildnotbought
10855
Rep 4,893
Posts |
Quote:
And do you have a picture of your headgasket? and is the leak visible?
__________________
Z4 3.0i | ESS TS2+ supercharger | Quaife ATB LSD | Brembo/BMW performance BBK front/rear | Schrick FI cams | Schmiedmann headers+cats | Powerflex/strongflex PU bushings | Vibra-technics engine mounts | H&R anti rollbars | KW V3 coilovers/KW camber plates | Sachs race engineering clutch | tons of custom sh#t
|
|
|
Appreciate
0
|
| 02-29-2024, 07:18 AM | #11 | ||
|
Enlisted Member
5
Rep 35
Posts |
Quote:
Quote:
I couldnt see the leak when I was looking |
||
|
Appreciate
0
|
| 02-29-2024, 07:33 AM | #13 | |
|
Enlisted Member
5
Rep 35
Posts |
Quote:
|
|
|
Appreciate
0
|
| 02-29-2024, 07:29 PM | #14 |
|
Colonel
880
Rep 2,547
Posts
Drives: Z4MC-X3-35i-525i, Corrado G60
Join Date: Nov 2007
Location: MD
|
Is #1 at TDC, because if it is, it looks like the lobes for #1 are point downward therefore trying to push the valves for #1 into the top of the piston
 |
|
Appreciate
0
|
| 02-29-2024, 10:13 PM | #15 | |
|
Captain
 1691
Rep 685
Posts |
Quote:
|
|
|
Appreciate
0
|
| 03-01-2024, 02:50 AM | #16 | |
|
New Member
3
Rep 11
Posts |
Quote:
Just keep the cam straight as you install. You might be able to tighten the rear cam bearings a bit, working fwd, repeat, until you can start the nuts on the fwd bearing. You could rotate the cam some so cyl 1 isnt pushing the valves open, but be wary when lining things back up to not hit the valves with the pistons. |
|
|
Appreciate
0
|
| 03-01-2024, 04:45 AM | #17 | |
|
#buildnotbought
10855
Rep 4,893
Posts |
Quote:
And if one of those plastic parts will spring a leak (on the m54, the expansion tank is the most likely culprit), there's a coolant level sensor that will give a bright yellow light on the dash. If you blow a head gasket because of that, the culprit isn't a broken plastic part, it's stupidity, continueing driving on despite the warning light. The reason why the headgasket is so durable on the m54, is because it's a semi closed deck (most modern engines are open deck), and both the block and head are the same material, so they have the same thermal expansion coefficient. And obviously an aluminium block has better controllable cooling, together with the ecu controlled thermostat. It should be good for 500k miles or potentially even more... That this one blew is probably a very rare fluke. (even 75k miles is pretty low for blowing the expansion tank, a known issue, and then the driver also had to ignore the warning light) Also how clean his cylinder head is, to me is a sign of never been overly hot and has nicely been taken care of.
__________________
Z4 3.0i | ESS TS2+ supercharger | Quaife ATB LSD | Brembo/BMW performance BBK front/rear | Schrick FI cams | Schmiedmann headers+cats | Powerflex/strongflex PU bushings | Vibra-technics engine mounts | H&R anti rollbars | KW V3 coilovers/KW camber plates | Sachs race engineering clutch | tons of custom sh#t
Last edited by GuidoK; 03-01-2024 at 04:55 AM.. |
|
|
Appreciate
0
|
| 03-01-2024, 05:02 AM | #18 | |
|
#buildnotbought
10855
Rep 4,893
Posts |
Quote:
The cam with the triangle shape at the front is intake, the one with the round front shape (and it's slightly shorter due to the dual chain wheels) is the exhaust side
__________________
Z4 3.0i | ESS TS2+ supercharger | Quaife ATB LSD | Brembo/BMW performance BBK front/rear | Schrick FI cams | Schmiedmann headers+cats | Powerflex/strongflex PU bushings | Vibra-technics engine mounts | H&R anti rollbars | KW V3 coilovers/KW camber plates | Sachs race engineering clutch | tons of custom sh#t
|
|
|
Appreciate
0
|
| 03-01-2024, 06:57 AM | #19 | |
|
Captain
952
Rep 781
Posts |
Quote:
It is called walking the the cam down, starting closest to the nut that won't go on, tighten the nuts on either side just a half a turn. Work your way out to any nut that has tension, half a turn only, work your way back to the problem nut and there should be enough threads showing now to spin the nut on. Once all the nuts are on you want to level the cam slowly then walk it down 1/2 turn per nut until she is sitting in the cradles . Not everyone can afford a special cam tool for every different twin cam head so this technique is used in shops everyday and it works perfectly. Did I mention 1/2 a turn at a time?
__________________
 2008 E86 M coupe 2008 E86 M coupe |
|
|
Appreciate
0
|
| 03-01-2024, 07:34 AM | #20 | |
|
#buildnotbought
10855
Rep 4,893
Posts |
Quote:
I don't think so... So then it's not even a matter of able to afford.
__________________
Z4 3.0i | ESS TS2+ supercharger | Quaife ATB LSD | Brembo/BMW performance BBK front/rear | Schrick FI cams | Schmiedmann headers+cats | Powerflex/strongflex PU bushings | Vibra-technics engine mounts | H&R anti rollbars | KW V3 coilovers/KW camber plates | Sachs race engineering clutch | tons of custom sh#t
|
|
|
Appreciate
0
|
Post Reply |
| Bookmarks |
|
|


