

| BMW Garage | BMW Meets | Register | Today's Posts | Search |
|
|
|
 SUPPORT ZPOST BY DOING YOUR TIRERACK SHOPPING FROM THIS BANNER, THANKS! |
|||||||||
Post Reply |
|
|
Thread Tools | Search this Thread |
| 08-11-2012, 09:41 AM | #134 |
|
Major General
 
423
Rep 5,328
Posts |
update on this please, has anyone made contact with RE to let them know these need to recall this product and sort the issues, if i was one of the many members that paid in advance for this part right now id be very concerned......
oe bar FTW.... perfect fitment, wont lie however if they can sort the fitment issues i can see this being an awesome piece, as it is now however...... poorly made piece imo....
__________________
Z4MR VT2 - Clubsport build.
Multi award winning Detailing | Wrap | PPF specialists UK based - www.topwrapz.com |
|
Appreciate
0
|
| 08-11-2012, 11:08 AM | #135 |
|
Colonel
 
1135
Rep 2,866
Posts
Drives: Anything
Join Date: Apr 2010
Location: SoCal
|
Guys
You need to realized that this may NOT be a poorly made piece. This will happen for any one-piece bar that have so many alignment holes (points) unless it's a custom made piece for that ONE particular car. There are just so many variables that can go wrong to cause it not to fit properly: 1. Build tolerances in the car. 2. Car dimensions change over time. 3. Different ages in cars. etc... This is why most bars out there, including OE, uses a 3-piece design to alleviate this fitment issue. I'm sorry to say that if you want this stronger one-piece bar, it must be custom fitted. Last edited by XMetal; 08-11-2012 at 11:14 AM.. |
|
Appreciate
0
|
| 08-11-2012, 11:48 AM | #136 | |
|
Major General
423
Rep 5,328
Posts |
Quote:
IMO this is a production error, most bars are three piece so the centre can be removed for servicing afaik, thus not having to keep disturbing the one time use nuts on the towers.
__________________
Z4MR VT2 - Clubsport build.
Multi award winning Detailing | Wrap | PPF specialists UK based - www.topwrapz.com |
|
|
Appreciate
0
|
| 08-11-2012, 12:38 PM | #137 |
|
Colonel
1135
Rep 2,866
Posts
Drives: Anything
Join Date: Apr 2010
Location: SoCal
|
This exactly support my theory. If you re-read my previous post, what I said was that the probability of the bar NOT fitting is much greater than a simple a drop-in for this 1-piece bar. If I recalled, this bar was only test fitted on 1 or 2 cars prior to production. The Mason bar (which I believed this piece is based on) required custom fitting and was built to specs on each individual car.
|
|
Appreciate
0
|
| 08-11-2012, 12:53 PM | #138 |
|
Banned
56
Rep 1,739
Posts
Drives: 2008 Z4MC
Join Date: Aug 2010
Location: Seattle, Vancouver
|
So what if it needs custom fitting? Are the complainers such nancies that they can't take any extra time with the piece? Hell, they didn't even order one.
Personally I think the extra time with a dremel will be well-served over the OE bar. I'd also wait to reserve judgement until the unit makes the rounds a bit more. |
|
Appreciate
0
|
| 08-11-2012, 12:56 PM | #139 | |
|
Major
 378
Rep 1,001
Posts
Drives: 2007 Z4 M Coupe 2012 e93 M3
Join Date: Sep 2008
Location: Bay Area, CA
|
Quote:
|
|
|
Appreciate
0
|
| 08-11-2012, 02:24 PM | #140 | |
|
Lieutenant General
2285
Rep 12,565
Posts
Drives: Z4 M, X5, GX460
Join Date: Apr 2008
Location: CT
iTrader: (99)
Garage List F15 X5 xDrive35i [8.75]
E86 Z4 M [10.00] F10 550i (Retired) [9.17] F25 X3 xDrive35i (R ... [9.43] E82 135is (Retired) [9.50] E85 Z4 M (Retired) [9.41] E90 328i xDrive (Re ... [9.25] E86 Z4 3.0si (Retired) [9.24] |
Quote:
And I'm not sure how much better served this is over the oe bar.
__________________
Follow
|
|
|
Appreciate
0
|
| 08-11-2012, 03:36 PM | #141 | |
|
Lieutenant
 9
Rep 421
Posts |
Quote:
Z4 BMW Design Strut fits nice. Look at the thread and see how close in the hole. Nut goes through the hole. It doesn't move. 2.75 pound. 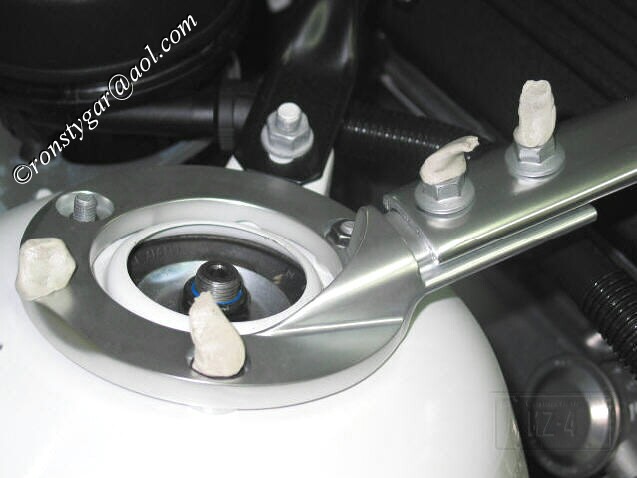  |
|
|
Appreciate
0
|
| 08-12-2012, 02:21 AM | #142 | ||
|
Major General
423
Rep 5,328
Posts |
Quote:
__________________
Z4MR VT2 - Clubsport build.
Multi award winning Detailing | Wrap | PPF specialists UK based - www.topwrapz.com |
||
|
Appreciate
0
|
| 08-12-2012, 03:16 AM | #143 |
|
Dog Listener
703
Rep 7,850
Posts |
I spent 10 minutes today playing around with fitting mine, and the alignment appears to be completely askew. More than in Pyo's photos, and not something that could be fixed by making the slots a bit longer. It's several mm off front to back, and the firewall tabs are off by several mm front to back as well.
I'm not keen on getting out the power tools and basically risking making a huge mess of something when the manufacturer can (rightfully so) claim I destroyed it if after "adjusting" it. I'm not afraid of a few adjustments, have hacksaw, files, and Dremel--and happily use them when it makes sense to do so, and the outcome is assured. I'll work a bit on it again tomorrow. If I still see the same issues I'm going to contact Rogue on Monday, with photos, and discuss options. It may be that it requires custom fitting as some have suggested. However, nothing in the instructions provided, or on the website, or in the GB, etc., or in the instructions provided with the product, indicate "fitment cannot be assured, major modifications or custom fitting may be required." I see the point some of you guys are making, about a one piece needing to be fitted and modified, It's a good point. But the thing is, the vendor should have appropriately set expectations with their customers and stated that up front if that is indeed the case here. And, if that's the case with this bar, some of us probably would have passed on buying. Setting customer expectations and being upfront is customer service and satisfaction 101. |
|
Appreciate
0
|
| 08-12-2012, 06:07 AM | #144 | |
|
Captain
433
Rep 753
Posts |
Quote:
But when I lifted the front end to lower the struts/studs to a point where they were just below the surface of the holes, the brace lined up on all 6 holes. BUT, they did not line up exactly to the same oval profile on all six. Once I lowered the car slowly to get the nuts the studs lined up all the way to the inside (max negative camber setting). I was able to get all 8 in (6 nuts and 2 large firewall brace bolts), the brace looks great and it def stiffens up the front end. But I am not a happy camper to lose the adjustability at the top ... I plan to take one Turner washer out from under the car to reduce the camber some to account for the top. You guys should def call Rogue on Monday and give Ben feedback as well. I spoke to them on Friday after my install on Thu night to let them know that the install was impossible if I followed the supplied instructions. |
|
|
Appreciate
0
|
| 08-12-2012, 09:10 AM | #145 | |
|
Major General
423
Rep 5,328
Posts |
Quote:
__________________
Z4MR VT2 - Clubsport build.
Multi award winning Detailing | Wrap | PPF specialists UK based - www.topwrapz.com |
|
|
Appreciate
0
|
| 08-12-2012, 09:21 AM | #146 | |
|
Lieutenant General

2432
Rep 11,667
Posts |
Quote:
M2C Not withstanding fabrication issues..... The above install technique should help immensely. It stands to reason that if the home position is flat on the towers then it will be very difficult to drop over the studs because of the angles. bringing the strut studs up from the bottom with the bar flat on the towers should make it easier to line up. A PITA to have to do it this way, but since its a one piece bar.......
__________________
'21 M2C Hockenheim Silver
'18 718 Cayman S Lava Orange (sold) '13 E92 M3 Santorini Blue (sold) '07 Z4 M Coupe Alpine White (sold) |
|
|
Appreciate
0
|
| 08-12-2012, 10:19 AM | #147 |
|
Colonel
1135
Rep 2,866
Posts
Drives: Anything
Join Date: Apr 2010
Location: SoCal
|
If the car have to be raised to install it, wouldn't this be pre-loading the bar (albeit slightly)? Is that recommended for a strut tower brace?
Not meant as rubbing salt to the wounds, but it just occurred to me that this looks like it would be a major PITA for you guys to do valve adjustments  |
|
Appreciate
0
|
| 08-12-2012, 10:20 AM | #148 | |||
|
Captain
433
Rep 753
Posts |
Quote:
- The round attachment to the strut towers is flat and covers the almost the entire surface for "mushrooming" protection. This is especially true of folks running aftermarket suspension that tends to be stiffer and some have a smaller strut mount that exert a more concentrated load on the tower. - The round attachment to the strut towers is thin enough to allow for shorter studs on aftermarket suspensions. This was my primary reason to get this as my OE brace will not allow for full thread engagement on the KW studs. - The brace attaches to the firewall braces and creates a nice integrated and triangulated section. - The one piece design will surely be stiffer and not subject to some of the rare failures we have seen on multi-piece braces. - It does look super cool and the power coating is excellent. The biggest downside I see for me and other cars not running camber plates is that it appears to take away the OE camber adjustability. I am running the Turner camber bolt/washer kit with 2 washers between the kingpin and strut so I just finished moving one of the washers out to reduce the negative camber and hopefully account for the brace. Quote:
What I have an issue with is that the install instructions they sent will not work with this brace (at least the one I got and now it appears others too) as-is and I am a bit bummed at losing the adjustability on top as that was how I would let my alignment shop "adjust and equalize" the camber left to right. Overall, I like it despite the cons cited above and plan to keep it on the car. Over the winter I will look into "modifying" the holes a bit so the brace allows for some adjustability as well as is easier to take on/off the car for maintenance work such as plugs, coils, valve adjustments etc. Quote:
 |
|||
|
Appreciate
0
|
| 08-12-2012, 03:13 PM | #149 |
|
Dog Listener
703
Rep 7,850
Posts |
Pal, thank you for your thoughts, experimentation, and insight! (Fiberguy and Pyo, same to you too.) Those past two posts have been most helpful and I think the assessment is spot on. This has has turned into a great discussion!
I'm feeling much better about this; I think this will work, albeit with some hassle. But for a car that's run on the track, or running aftermarket parts, the pros outweigh the cons. The shock tab reinforcement is a great addition, and we've seen that part fail a bit with the stock design. I'm feeling much less frustrated than I was in my late night post. Thank you. Pal, bingo, and thanks for noting the Turner kit Pal. I too am running two camber washers with the studs pushed all the way out. It's my "poor man's camber plate", as it's on my "street setting" now, and I mark and then push them inboard all the way for track (more camber, slight toe-out). This means I need to lock in one setting for the studs and move to camber plates if I want to adjust on the fly. So that's now out. Not a problem. I was planning on buying Vorshlag camber plates anyway. (I doubt I can run the Turner kit with +2 washers, which pushes the strut outward, with the new wider wheels I just bought. Gotta love mods that lead to more mods!  . But when you mod, it's all part of the game.) . But when you mod, it's all part of the game.)XMetal, I would think one would raise the car, attached the brace loosely at the firewall mounting points, bring the studs back up from the bottom, return the car to the ground, align, and then tighten to spec. Wouldn't that eliminate any possible pre-load? The whole idea here is to, as Intr8r said, allow one to line up the bolts with the brace holes from the bottom (remove issues with angles). I hadn't thought about valve adjustments (duh!). Nuts! Oh well, not the end of the world. I have the car aligned every few months anyway (gotta get my own alignment kit), so no big deal. Basically, it looks like the install needs to be done a with a subsequent alignment (and perhaps with a camber plate install). Those w/o plates are going to potentially lose some adjustment potential, and if they're relying on that adjustment potential, either they're going to lose some of it or they're going to need to get out the file and/or Dremel (not something I'd undertake right off the bat--those who did--hats off to you). Like I said earlier, had expectations/instructions been handled better, I don't think any of us would be saying anything here except "it's wonderful", "does what it was designed to do", "perfect addition for a track or aggressive street car". The rewards and pros of this design (things I want and need) are clearly listed by Pal--and as Beedub said there are huge benefits to the design, but "surprises"? No thank you. I'm going to talk to Rogue tomorrow anyway, and get some input from them and see if there's anything they can do to help us out: perhaps an update to those in the GB needs to go out in the form of revised instructions, recommended actions, and etc. |
|
Appreciate
0
|
| 08-12-2012, 05:05 PM | #150 | |
|
Captain
433
Rep 753
Posts |
Quote:
Here are pictures of the RE Brace and how it sits. You can see that on the driver side one hole/stud prevents front to rear movement and the other prevents side movement. I have not tried removing it yet but do plan to before my Glen event on Aug 24/25 in order to remove the black plastic cover over the valve cover so I have access to the coils and plugs at the track in case I need to get to them. I am not looking forward to removing this brace and reinstalling. Passenger side  Driver side 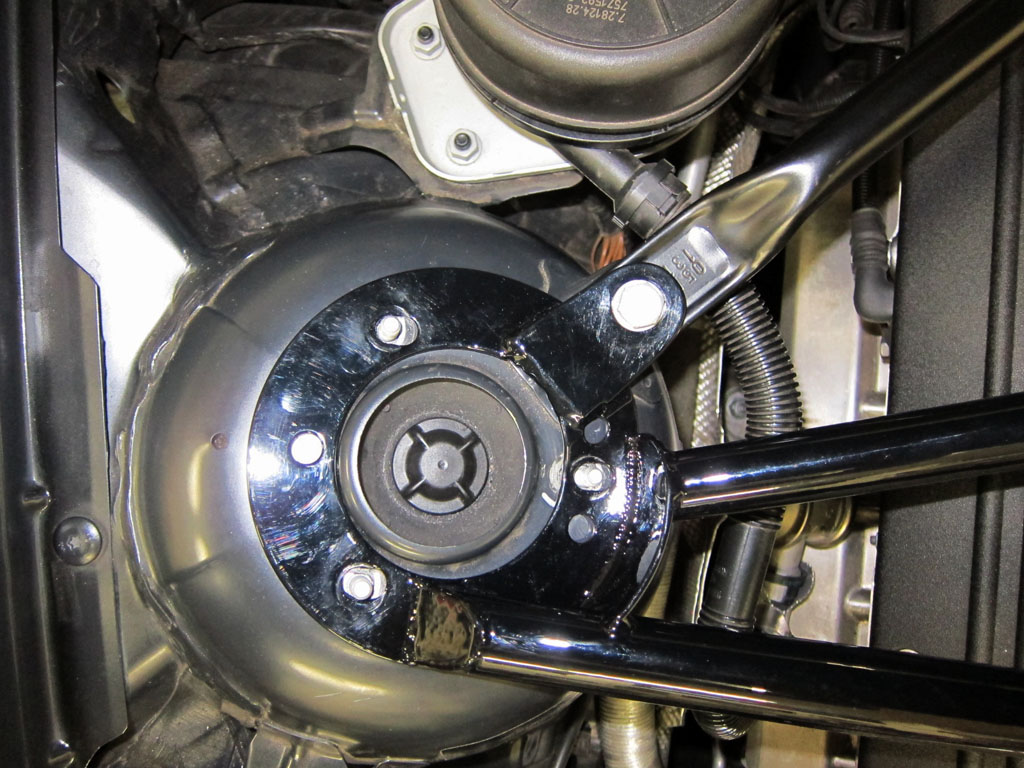 Used 3 of the supplied washers for the firewall brace spacing on both side. On the driver side I had to pry up the RE Brace lip to slide the 3 washers and I loosened the firewall brace at the firewall as well to allow for play and adjustment. 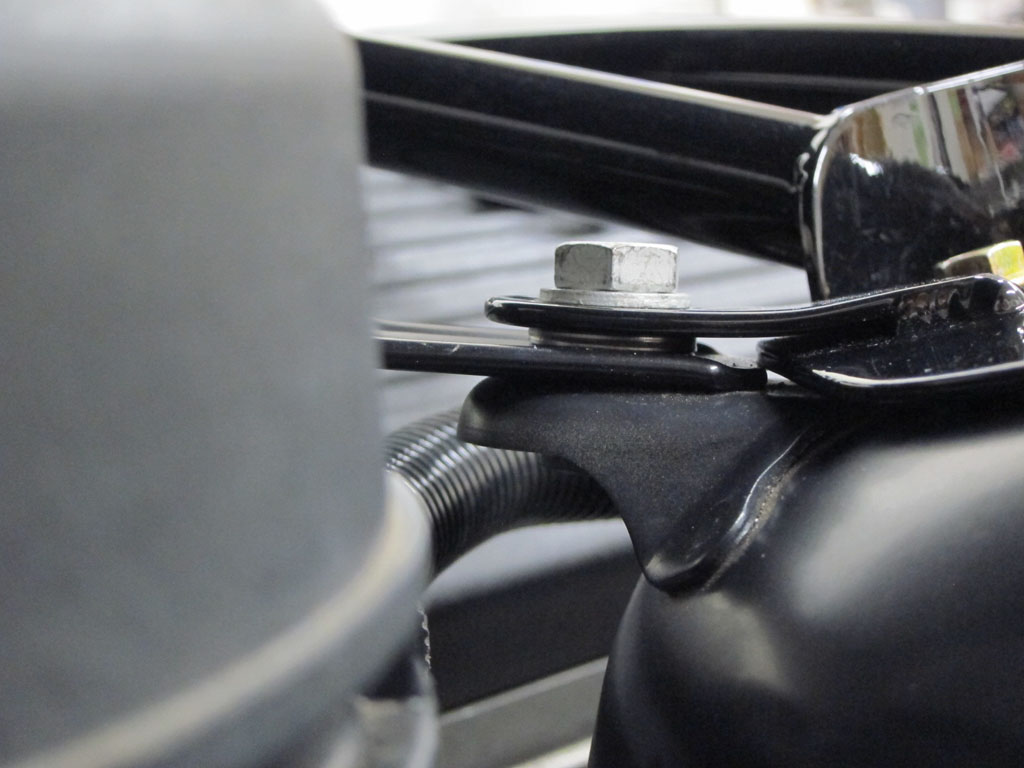 Clears the hard lines by about 2-3 mm - sufficient I would think.  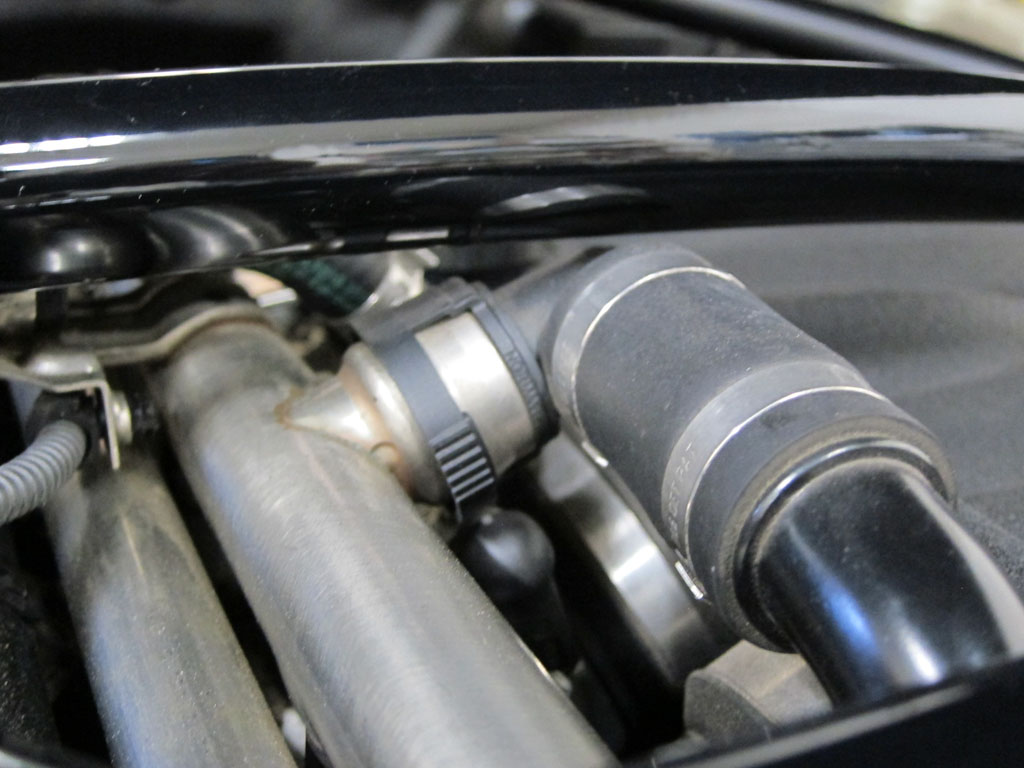 Installed - 15lb-ft for the stud nuts and 20 ft-lbs for the firewall brace bolts per the Rogue supplied instuctions. 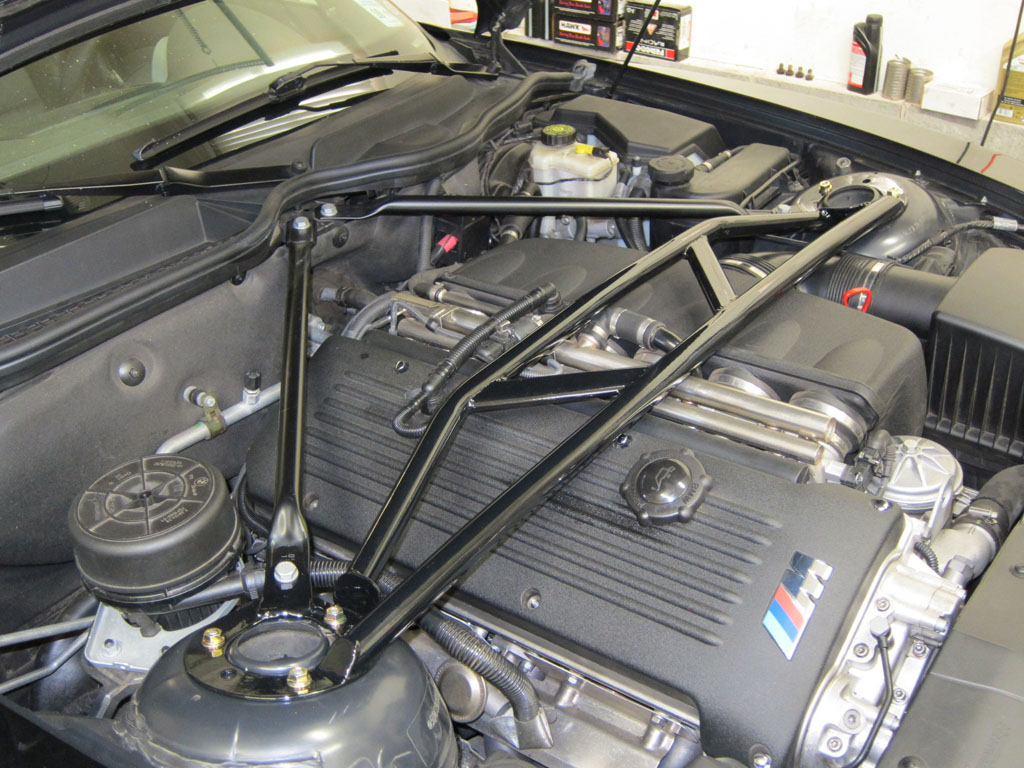 Looks awesome  |
|
|
Appreciate
0
|
| 08-12-2012, 05:49 PM | #151 | |
|
Lieutenant
551
Rep 541
Posts
Drives: 2022 X3MC
Join Date: Feb 2012
Location: Fairfax, VA
|
Quote:
Pal, thank you very much for your insightful posts. I will be taking them to a local shop to get installed. During my attempt, I knocked a strut tower bolt down and in an attempt to fix it the nut somehow got seized on the bolt and I cannot for the life of me undo or fasten it. I tried with the wheel off too but cannot get the bottom of the strut tower bolt to stay in place to unfasten/tighten. More time/$$$ involved than I had originally planned but the pro's are definitely worth it imo.
__________________
'00 328i // Sold
'04 Z4 3.0i // Sold '22 X3MC LCI |
|
|
Appreciate
0
|
| 08-13-2012, 03:33 PM | #153 | |
|
Major General
423
Rep 5,328
Posts |
Quote:
__________________
Z4MR VT2 - Clubsport build.
Multi award winning Detailing | Wrap | PPF specialists UK based - www.topwrapz.com |
|
|
Appreciate
0
|
| 08-14-2012, 09:55 AM | #154 |
|
Lieutenant
551
Rep 541
Posts
Drives: 2022 X3MC
Join Date: Feb 2012
Location: Fairfax, VA
|
At the shop getting it installed, will lose all adjustability without widening the holes. Placed a call to RE and spoke with them; they are aware of the issue but are offering no resolutions. Pretty much stated that no 2 cars are the same and the chassis will flex overtime once out of the factory. Recommended PAL's method for installation.
Since I do not track and don't plan on getting camber plates, the shop (RRT) is going to dremel out the holes a bit to retain adjustability. Not what I had in mind when I 1st purchased this but I'm set on getting this installed on my car. Future buyers be aware of all the potential issues!
__________________
'00 328i // Sold
'04 Z4 3.0i // Sold '22 X3MC LCI |
|
Appreciate
0
|
Post Reply |
| Bookmarks |
|
|


