| BMW Garage | BMW Meets | Register | Today's Posts | Search |
|
|
|
 SUPPORT ZPOST BY DOING YOUR TIRERACK SHOPPING FROM THIS BANNER, THANKS! |
|||||||||
Post Reply |
|
|
Thread Tools | Search this Thread |
| 01-21-2013, 09:06 AM | #1 |
|
Lieutenant General
 2289
Rep 12,565
Posts
Drives: Z4 M, X5, GX460
Join Date: Apr 2008
Location: CT
iTrader: (99)
Garage List F15 X5 xDrive35i [8.75]
E86 Z4 M [10.00] F10 550i (Retired) [9.17] F25 X3 xDrive35i (R ... [9.43] E82 135is (Retired) [9.50] E85 Z4 M (Retired) [9.41] E90 328i xDrive (Re ... [9.25] E86 Z4 3.0si (Retired) [9.24] |
Custom Brake "Cooling" Duct Install
This is an update to a DIY I had done few years ago. This is probably my 3rd attempt of installing brake ducting on my Z4 and I can finally say that I'm happy with this latest iteration. This is specific to the pre-facelift (03-05) and Aero bumpers. And once again, thanks to v3.2mc for helping me source the parts.
Special tools needed are: 1. any tools you'd normally use for a standard brake job 2. snips 3. box cutter 4. 3" hole saw 5. drill 6. dremel Hardware needed: 1. Set of backing plates (sold by vendors such as BW, Turner, etc) 2. OEM fog covers left and right (p/n: 51117044227 and 51117044228) 3. 3 feet 2-ply hi temp hoses in 3" diameter x2 (total 6 feet) 4. 3 feet 1-ply regular hoses 3" diameter x1 (total 3 feet) 5. 3" ID flanges x6 6. 8 worm clamps that fit 2.5-3.5" hoses 7. mesh screen 8. screws/bolts and nuts Items 3-5 can be purchased at http://www.aircraftspruce.com. I picked up worm clamps from Pegasus Auto racing, mesh screen from local HD and the fog covers from ECS. Despite running a big brake kit up front, my Stoptech 332x32mm 2 piece rotors have tiny cracks from heat:  1. Apparently you could've optioned your pre-facelift Z4 for no fogs, which in that case you would've received fog case covers. The fog covers will replace the fog lights on your pre-facelift or Aero bumper and will serve as a "collector" from the bumper. First thing you will need to do is dremel out the front fog cover. See before and after below:  2. Then insert a flange into each fog light so you and drill 2 holes between flange & fog cover. Then take the other 4 flanges, hold them back to back and drill 3 holes through those. 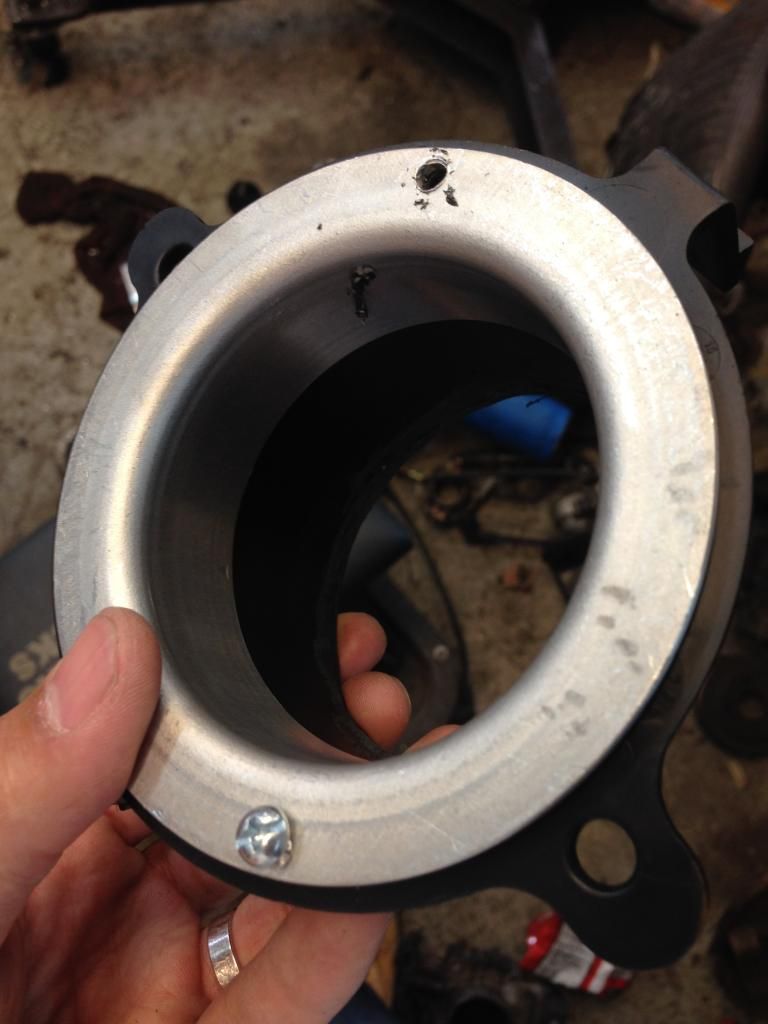 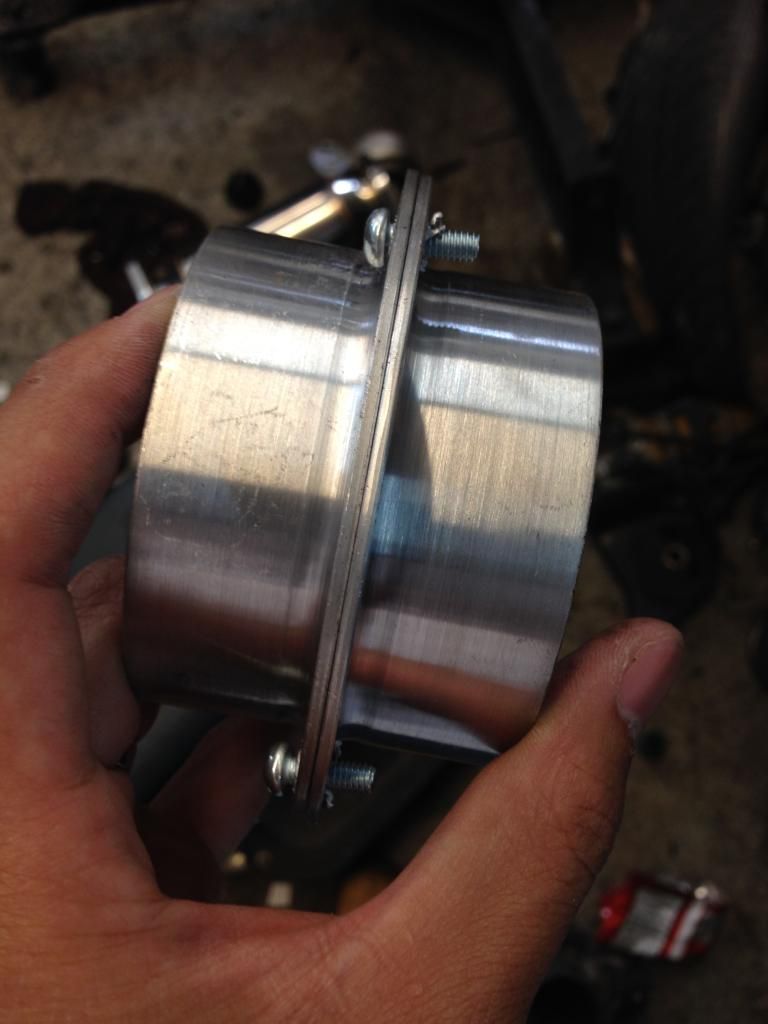 By flipping the flange over and reattaching to the fog light you can see how the hoses will mount up to the rear bumper: 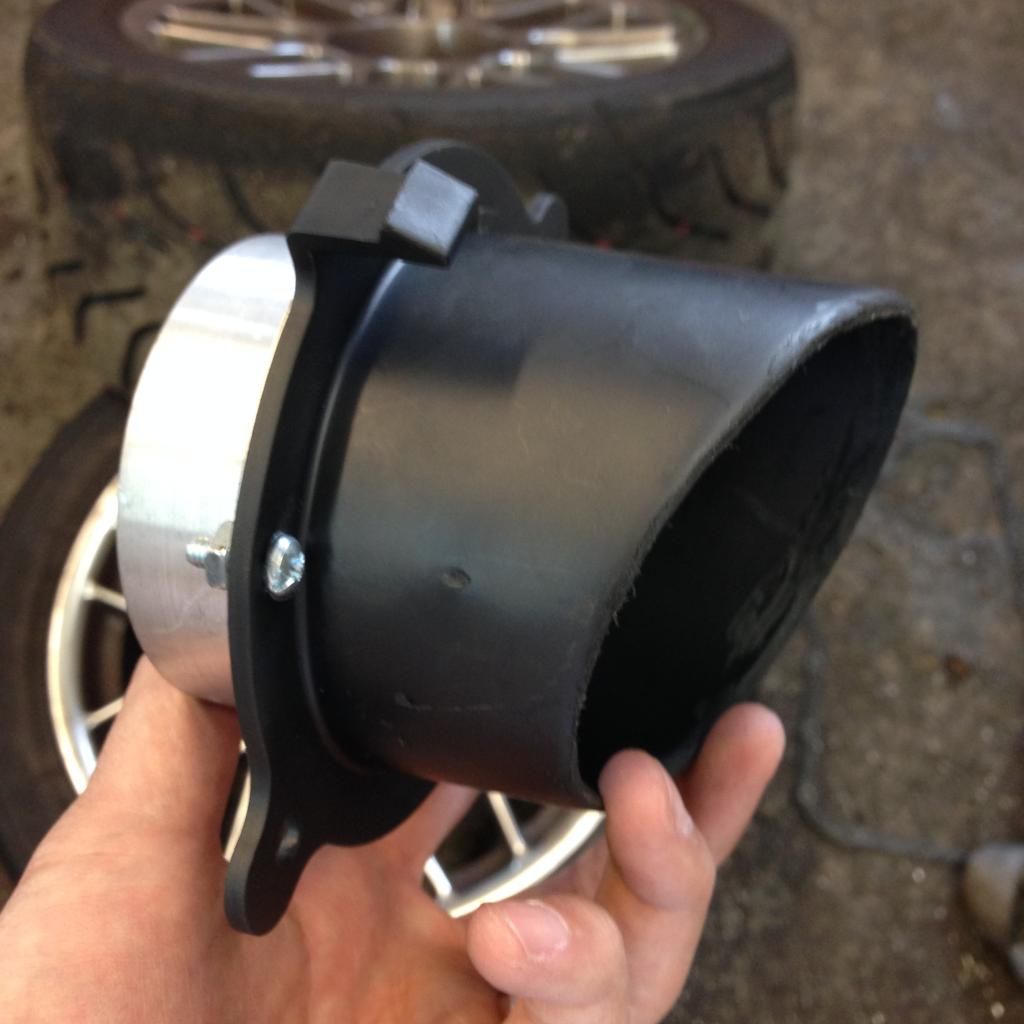 3. Next you'll need to remove the front bumper (plenty of DIY's here). So after removing the bumper, jack up the car and remove the front 2 wheels and access the factory backing plates. These cannot be removed without taking apart the hub so quickest/easiest way is to take a pair of tin snips and cut them off. Upon removing the backing plates, install the aftermarket backing plate onto the factory spindles. My backing plate was only able to reuse 2 of the 3 mounting holes but I found it plenty secure. For some reason can't find my picture but it looks just like this: 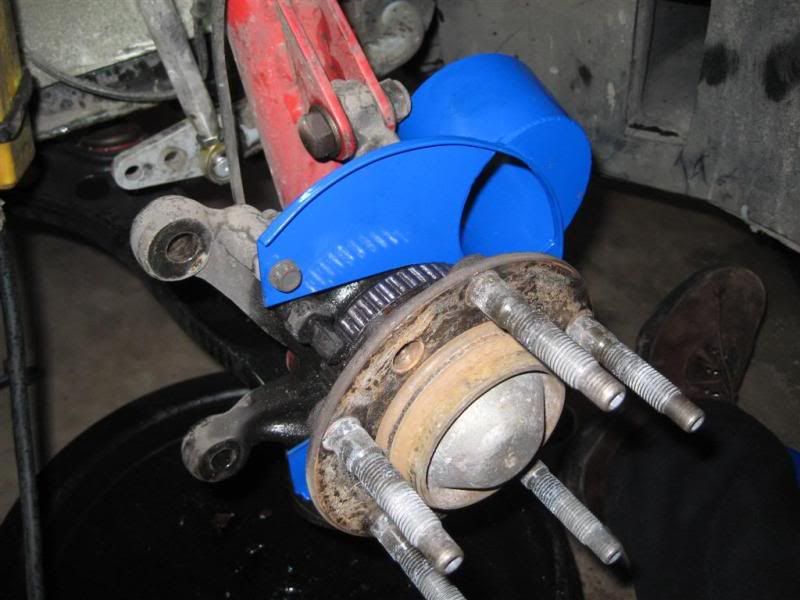 4. Next you'll need to drill a 3" hole with your hole saw into each side of the splash guard. Then you'll mount the a pair of flanges on each side. Since you already drilled through your flanges before, simply line it up over the 3" hole and then drill again through those same holes through the plastic splash guard. 3" hole through the splash guard: 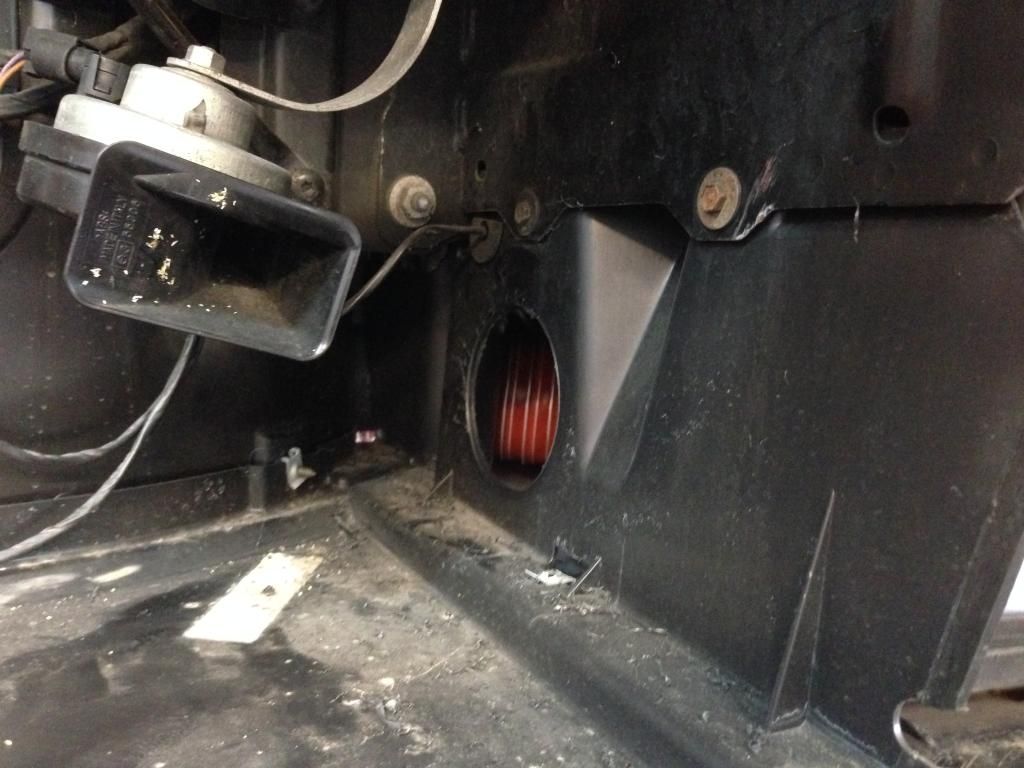 Flanges mounted on each side 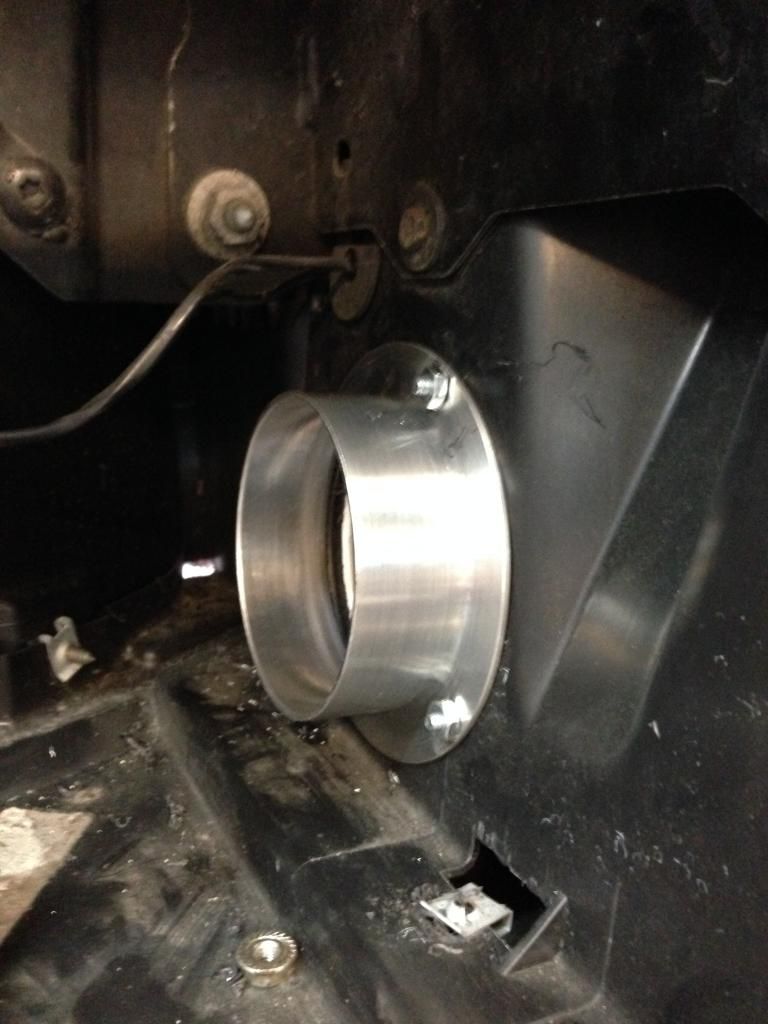 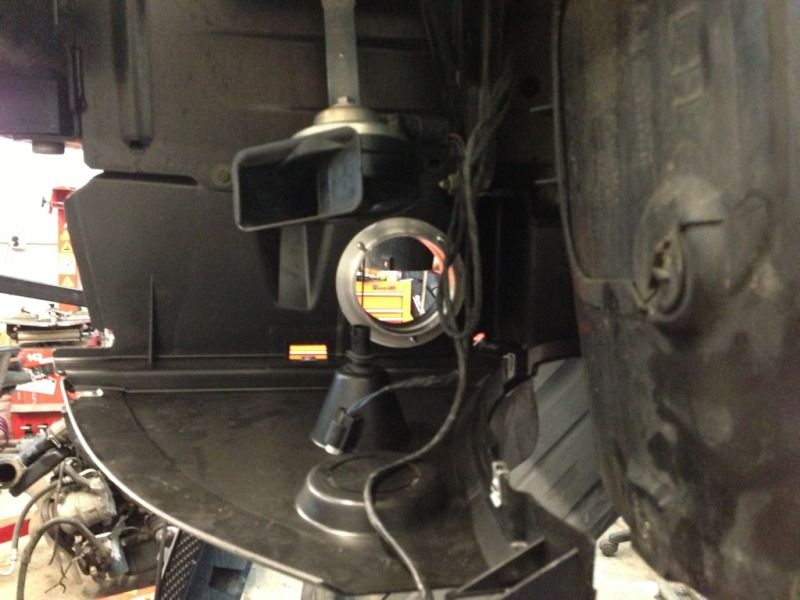 5. Now you can start attaching your hoses. Use the 2-ply high temp hose from wheel to splash guard. This is the hose that will take most abuse (heat, rub from tire, etc). 3 feet was enough to reach backing plate to splash guard while still giving it enough play for turning the steering side to side. Attach hose from backing plate to the inside of the splash guard using the worm clamps Shot of the orange hose coming around the liner, underneath the front sway bar and attaching to the inside of the splash guard 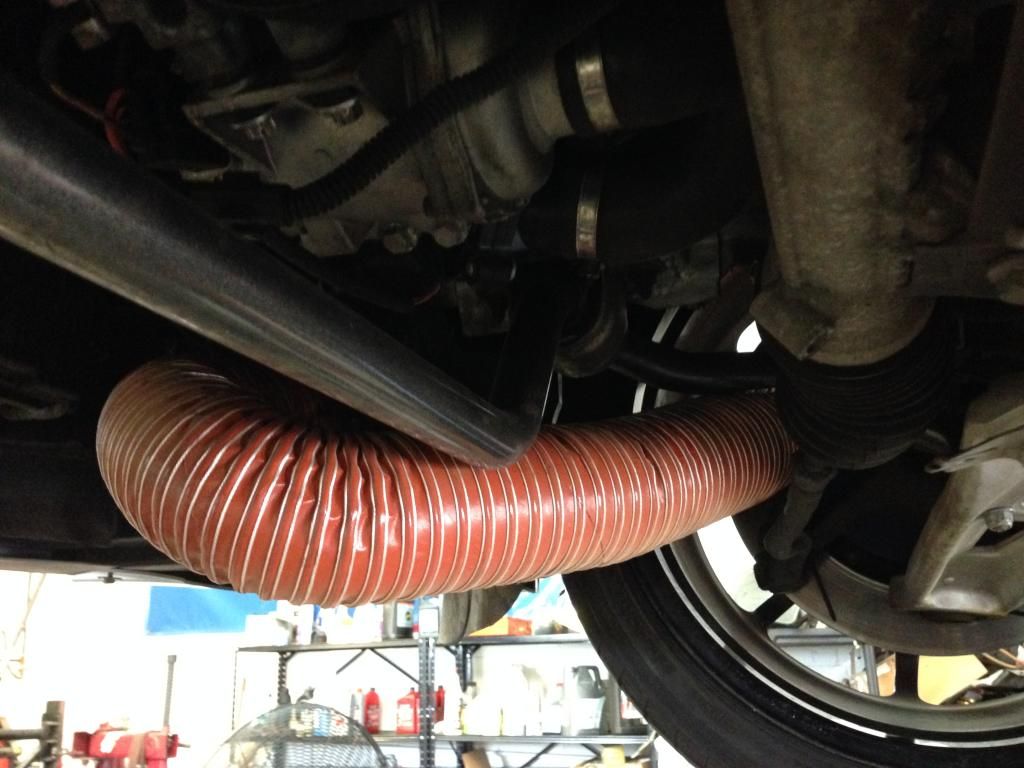 Looking top down:  And behind the rotor:  6. Now it's time to attach the fog covers onto your front bumper. First you'll need to remove the fog lights as well as a metal clip on each side (those clips only get used with the fogs). Screw the fog cover where the fog light would've gone, don't attach the flange yet. I then cut out a mesh square around 5x5" and gave it a quick spray with the rattle can and sandwiched it in between the fog cover and flange. And while you're at it, you may as well spray the inside of the flange as well. I used the squares of the mesh as mounting points for the 4 screws (2 screws attach fog cover to bumper, 2 screws attach flange to fog cover). 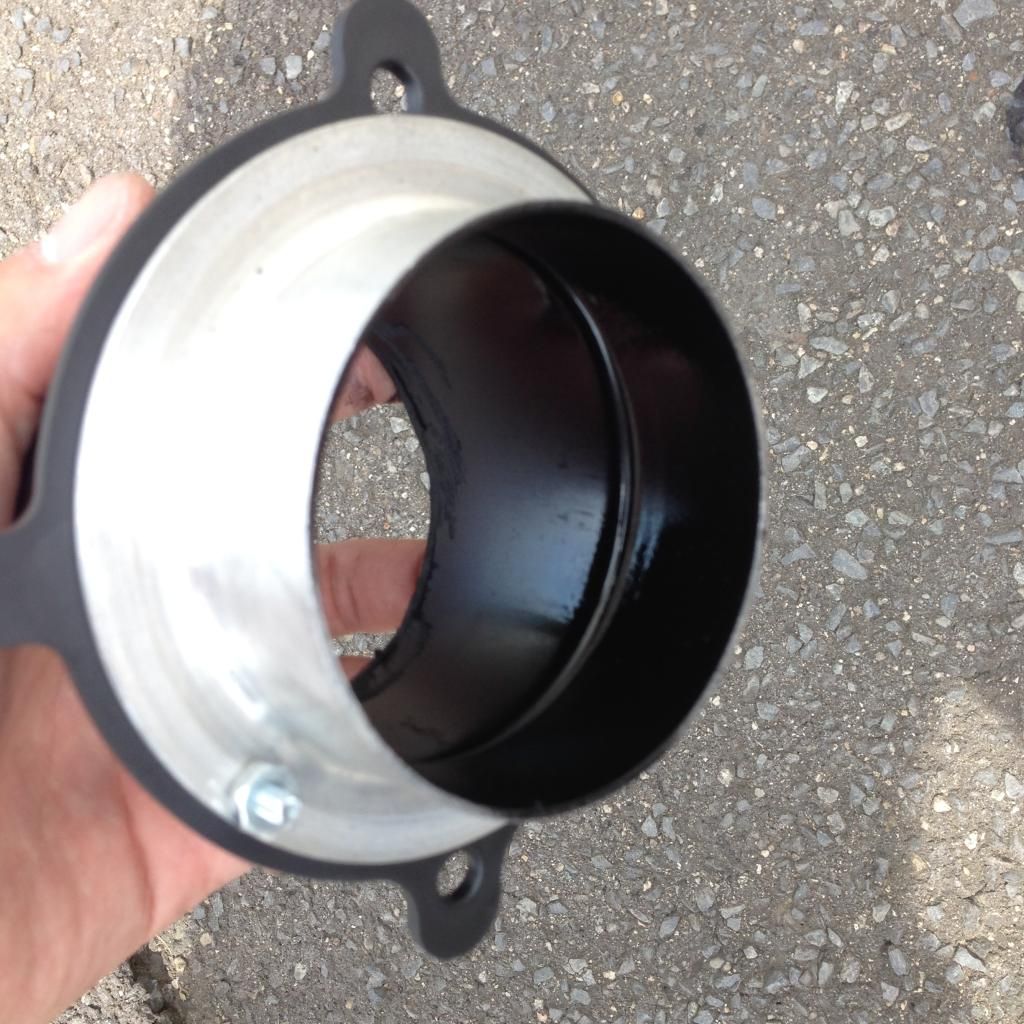 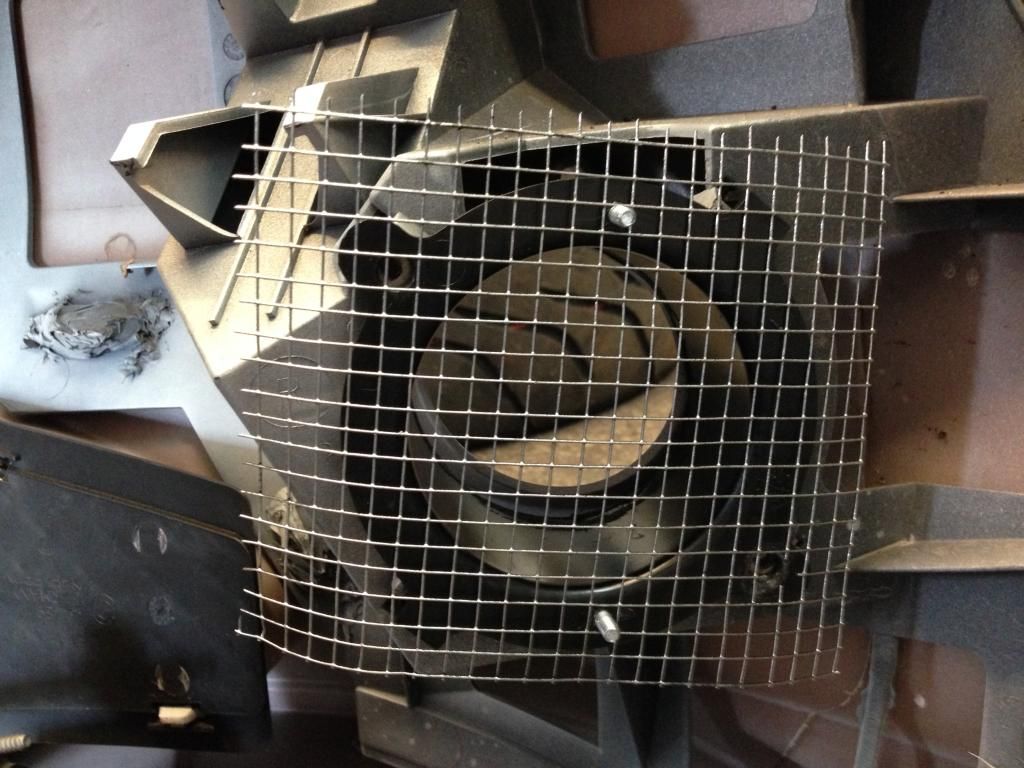 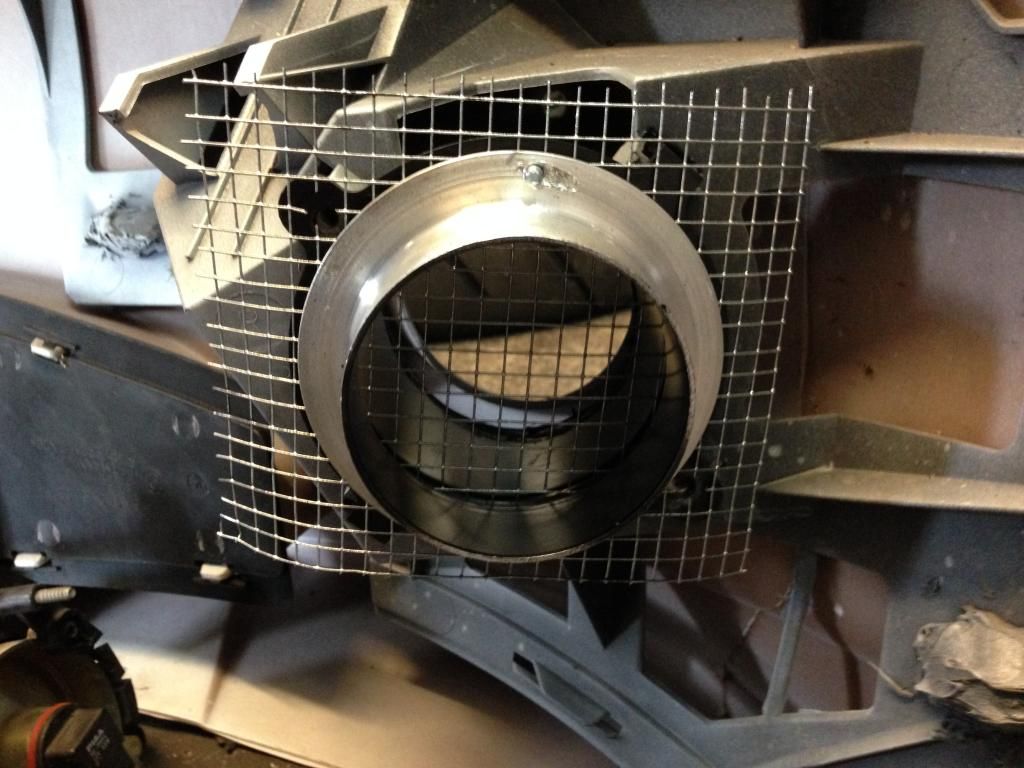 Backside of the bumper with fog cover, mesh & flange attached. Looks OEM! =D 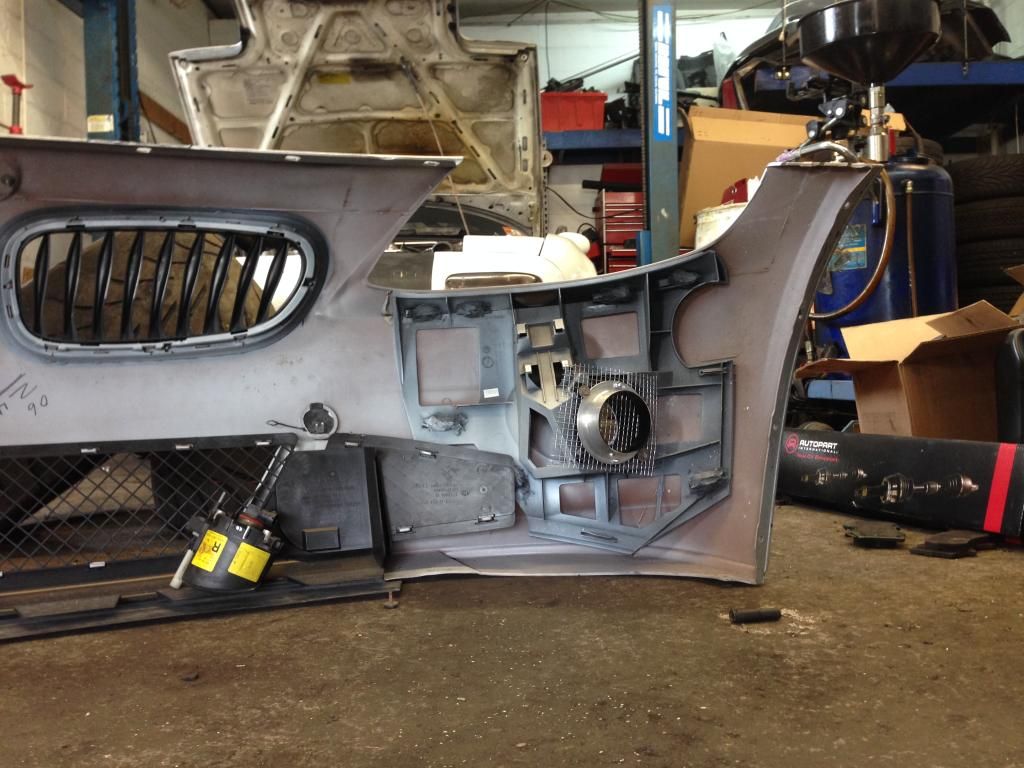 7. Almost done, now take that single 3" foot single ply hose and cut it in half. Then mount each hose onto the outside of the splash guard like so: 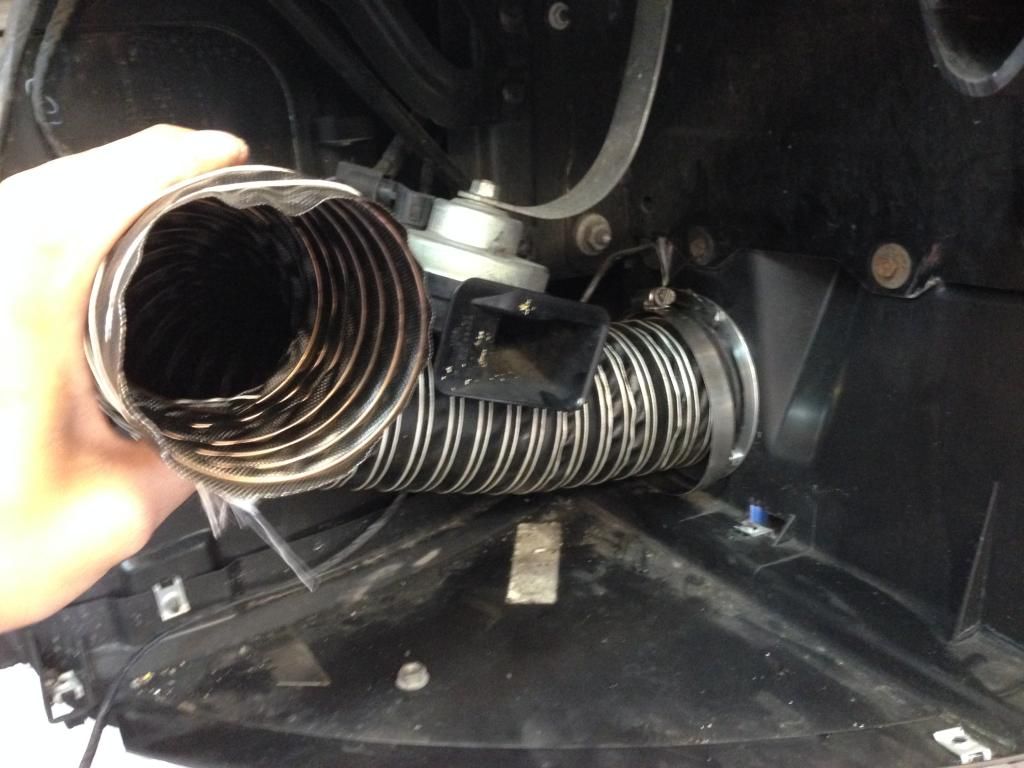 8. This is where having a 2nd set of hands helps. While one person holds the bumper, have the other person attaching the hoses to the fog covers. If you're doing this by yourself, your best bet would be to reinstall the bumper but remove the wheel liners and do each side one by one. Right side, looking down: 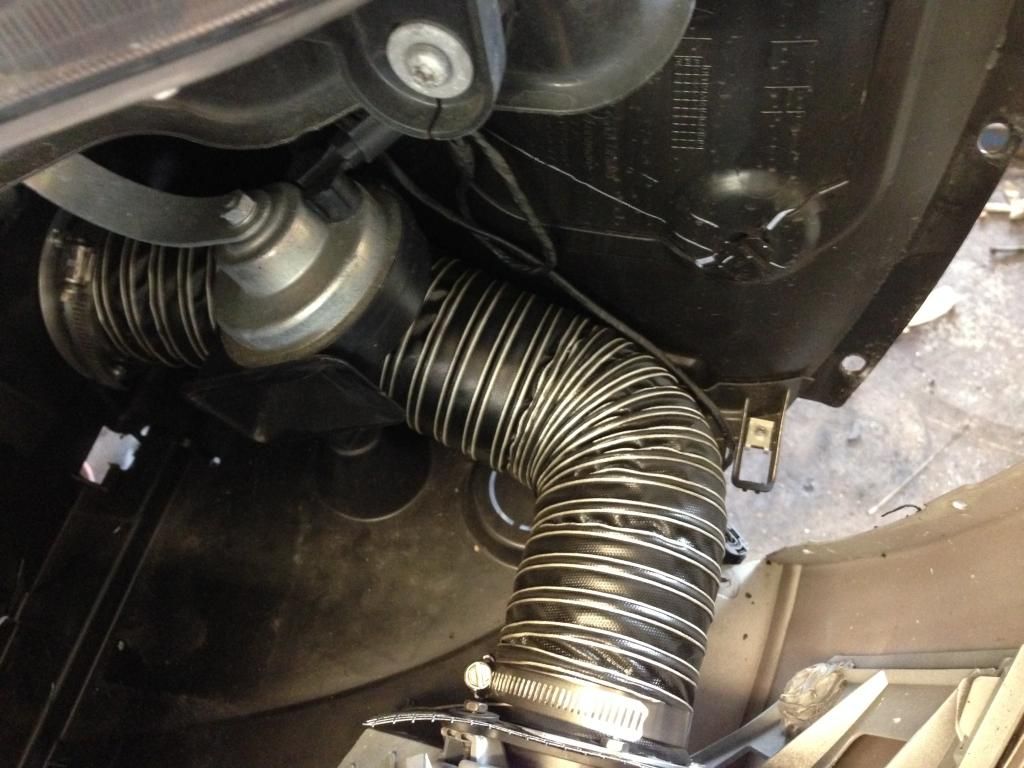 Underneath the car, hoses exiting the backing plate and meeting the splash guards: 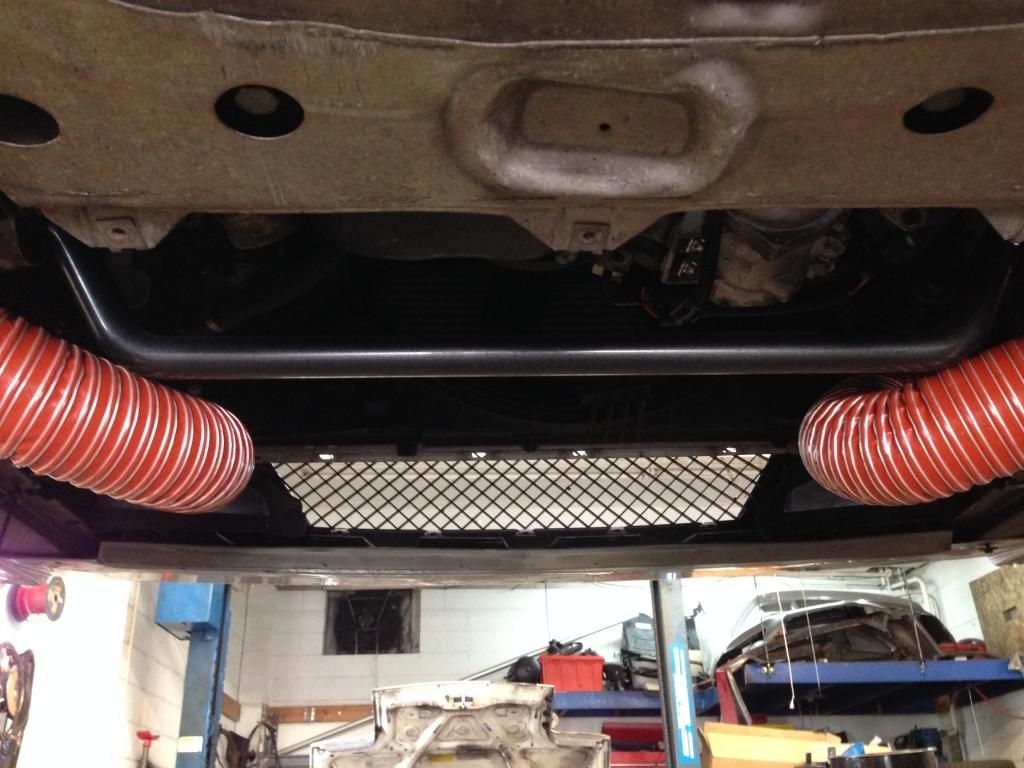 9. Reattach bumper and belly plan, and you're done! Close-up of the collectors up front: 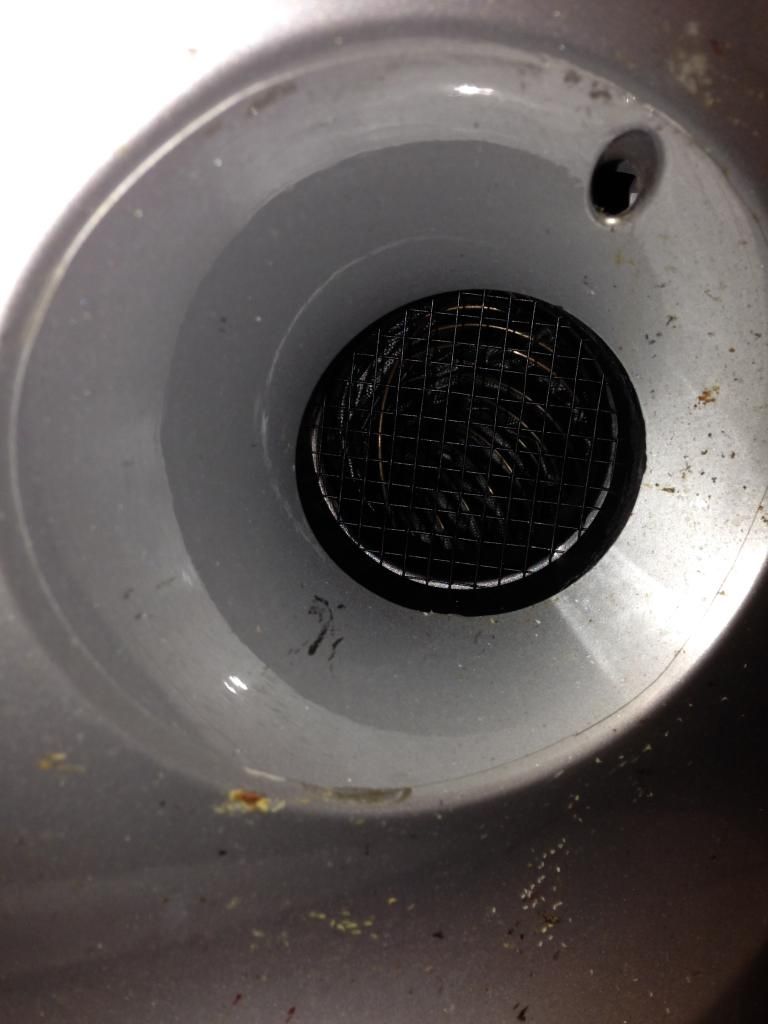 10. Give the car a nice wash  FYI: You may be wondering why I went with 2 separate hoses (orange vs. black). As I noted earlier, the orange is 2-ply with high temp resistance. You want stronger hoses in this area since it'll be more subject to wear and heat. The cheaper 1-ply hoses by the bumper won't be taking any abuse so no point in spending more than necessary. If anything the less rigid the better since it'll flex more when putting the bumper back on. Also having a 2 piece design allows you to replace these hoses easily without removing the bumper.
__________________
Follow
Last edited by 3002 tii; 06-24-2017 at 11:48 AM.. |
| 01-21-2013, 09:19 AM | #2 |
|
Not a New Member

94
Rep 925
Posts
Drives: with both hands and both feet
Join Date: Mar 2012
Location: midwest
|
well done, sir! it looks like the couplers will make future repairs/upgrades much easier. make sure you update again with performance reviews.
also, thanks for the link for supplies. i have been struggling to find a decent place to get some of this stuff.
__________________
#1498E86 | Sepang Bronze | Dark Sepang Leather | Carbon Leather Trim
 |
|
Appreciate
0
|
| 01-21-2013, 09:24 AM | #4 | ||
|
Lieutenant General
2289
Rep 12,565
Posts
Drives: Z4 M, X5, GX460
Join Date: Apr 2008
Location: CT
iTrader: (99)
Garage List F15 X5 xDrive35i [8.75]
E86 Z4 M [10.00] F10 550i (Retired) [9.17] F25 X3 xDrive35i (R ... [9.43] E82 135is (Retired) [9.50] E85 Z4 M (Retired) [9.41] E90 328i xDrive (Re ... [9.25] E86 Z4 3.0si (Retired) [9.24] |
Quote:
Quote:
__________________
Follow
Last edited by 3002 tii; 01-22-2013 at 08:14 AM.. |
||
|
Appreciate
0
|
| 01-21-2013, 10:58 AM | #5 |
|
Second Lieutenant
 25
Rep 299
Posts |
Can't wait to see how this works...! I'm not sure I agree with using the mesh though, seems like it would just get clogged with road debris (especially on the track).. Either way, additional airflow to the brakes certainly won't hurt anything..
 |
|
Appreciate
0
|
| 01-21-2013, 11:43 AM | #6 | |
|
Lieutenant General
2289
Rep 12,565
Posts
Drives: Z4 M, X5, GX460
Join Date: Apr 2008
Location: CT
iTrader: (99)
Garage List F15 X5 xDrive35i [8.75]
E86 Z4 M [10.00] F10 550i (Retired) [9.17] F25 X3 xDrive35i (R ... [9.43] E82 135is (Retired) [9.50] E85 Z4 M (Retired) [9.41] E90 328i xDrive (Re ... [9.25] E86 Z4 3.0si (Retired) [9.24] |
Quote:
Worst case the screen is easy enough to remove or I can just manually remove the rubber chucks manually.
__________________
Follow
|
|
|
Appreciate
0
|
| 01-21-2013, 06:44 PM | #7 |
|
Brigadier General

1564
Rep 4,109
Posts
Drives: BMW M3
Join Date: Feb 2011
Location: Blue Bell, PA
|
Awesome job ... nice write-up. Custom ducting made a big difference for me on the track, no problems at all w/ R-comps. Fade free sessions are more relaxing.
__________________
2024 BMW M3 Sedan Frozen Pure Grey II/Fjord Blue, 6MT
Past: 2021 Z4 M40i Frozen Grey II/Black Alcantara | 2017 F30 340i Mineral Gray/Coral Red, 6MT | 2011 E92 335i Le Mans Blue/Black, 6MT |
|
Appreciate
0
|
| 01-21-2013, 07:28 PM | #9 |
|
Lieutenant General

2434
Rep 11,668
Posts |
Nice work!

__________________
'21 M2C Hockenheim Silver
'18 718 Cayman S Lava Orange (sold) '13 E92 M3 Santorini Blue (sold) '07 Z4 M Coupe Alpine White (sold) |
|
Appreciate
0
|
| 01-21-2013, 10:35 PM | #11 |
|
Lieutenant
27
Rep 415
Posts
Drives: 2005 z4 3.0
Join Date: Jun 2012
Location: Vancouver
|
I don't track my car and I might even do this for looks!, great work
__________________
 2005 Z4 3.0 steptronic | TiSilver on Black | sport & premium package | 108s | Msport seats | wind deflector OMP strut bar | blacked out emblems | de-french-fried | sound gen | DIY aux input | custom speedo logos | stubby antenna | polished exhaust tips |
|
Appreciate
0
|
| 01-21-2013, 11:00 PM | #13 | ||
|
Lieutenant General
2289
Rep 12,565
Posts
Drives: Z4 M, X5, GX460
Join Date: Apr 2008
Location: CT
iTrader: (99)
Garage List F15 X5 xDrive35i [8.75]
E86 Z4 M [10.00] F10 550i (Retired) [9.17] F25 X3 xDrive35i (R ... [9.43] E82 135is (Retired) [9.50] E85 Z4 M (Retired) [9.41] E90 328i xDrive (Re ... [9.25] E86 Z4 3.0si (Retired) [9.24] |
Quote:
Quote:
__________________
Follow
|
||
|
Appreciate
0
|
| 07-18-2014, 04:55 PM | #14 |
|
Lieutenant General
2289
Rep 12,565
Posts
Drives: Z4 M, X5, GX460
Join Date: Apr 2008
Location: CT
iTrader: (99)
Garage List F15 X5 xDrive35i [8.75]
E86 Z4 M [10.00] F10 550i (Retired) [9.17] F25 X3 xDrive35i (R ... [9.43] E82 135is (Retired) [9.50] E85 Z4 M (Retired) [9.41] E90 328i xDrive (Re ... [9.25] E86 Z4 3.0si (Retired) [9.24] |
BUMP, just updated my DIY
__________________
Follow
|
|
Appreciate
0
|
| 07-24-2014, 12:54 AM | #15 |
|
Lieutenant Colonel

94
Rep 1,546
Posts |
Well done sir!
__________________
|
|
Appreciate
0
|
Post Reply |
| Bookmarks |
|
|