| BMW Garage | BMW Meets | Register | Today's Posts | Search |
|
|
|
 SUPPORT ZPOST BY DOING YOUR TIRERACK SHOPPING FROM THIS BANNER, THANKS! |
|||||||||
Post Reply |
|
|
Thread Tools | Search this Thread |
| 11-25-2010, 08:00 PM | #1 |
|
Banned

602
Rep 2,703
Posts
Drives: 2009 335i - Sport PKG
Join Date: Jun 2009
Location: NY
|
Premium BMW Blue/White Real Carbon Fiber Hood or Trunk Emblem Badge
Hi All
i found this Premium BMW Blue/White Real Carbon Fiber Hood or Trunk Emblem Badge and looks nice. i would like to replace my OEM hood badge. i am not sure if new Ebmlem will fit in my Z. new emblem is 82mm and i am not sure about the OEM Hood emblem size. does anybody know if this Carbon fiber will fit in my 03 Z? and also Does anybody have DIY for replacing hood emblem? http://www.amazon.com/Premium-White-...ef=pd_sxp_f_pt Thanks |
| 11-25-2010, 08:37 PM | #2 |
|
Captain
 25
Rep 615
Posts |
The size badge you are looking at will fit most BMW's except the Z4, which uses a badge that is about 25% smaller.
__________________
2013 Audi TT RS (Tech Pkg, Sport Exhaust, Heated Seats, Sirius)
Retired--2007 Z4 M Coupe (Imola Red/Black, Premium Pkg, Heated Seats, XM, Bimmian stubby antenna, CDV delete, Apex EC-7--Anthracite, Goodyear F1 Asymetric 2. |
|
Appreciate
0
|
| 11-25-2010, 09:14 PM | #3 |
|
Banned
602
Rep 2,703
Posts
Drives: 2009 335i - Sport PKG
Join Date: Jun 2009
Location: NY
|
i like that blue carbon fiber
 |
|
Appreciate
0
|
| 11-25-2010, 10:14 PM | #4 |
|
Colonel

479
Rep 2,782
Posts
Drives: ESS/G-Power Z4M, VF Z4, 996tt
Join Date: Sep 2009
Location: Los Angeles
|
What about the overlay stickers?
|
|
Appreciate
0
|
| 11-25-2010, 11:43 PM | #5 |
|
///M-fanatic


193
Rep 3,885
Posts |
lol I tried overlay stickers like 5 years ago on my 325, and it didn't hold up well. After a few car washes, it started peeling. Plus, it was difficult to apply/put on to begin with. I'd vote against it
 |
|
Appreciate
0
|
| 11-26-2010, 01:20 AM | #6 |
|
Colonel
479
Rep 2,782
Posts
Drives: ESS/G-Power Z4M, VF Z4, 996tt
Join Date: Sep 2009
Location: Los Angeles
|
Thanks for saving me the $25 haha.
|
|
Appreciate
0
|
| 11-26-2010, 06:42 AM | #8 |
|
Lieutenant General
 
2432
Rep 11,667
Posts |
The front Roundel is the hardest one to find in the right size w/o using a stick on.
Most BMW front Roundels are 73mm.... the Z4 uses a 70mm. On my previous roaster I did get a 73 to fit but it was a custom DIY -The pins had to be cut off - the back of the roundel ground off a bit to make it sit flush - I ground off a bit of the bumper under the roundel - stick it on with silicone. A pic of my old car.... Blue area is where underside is modified. 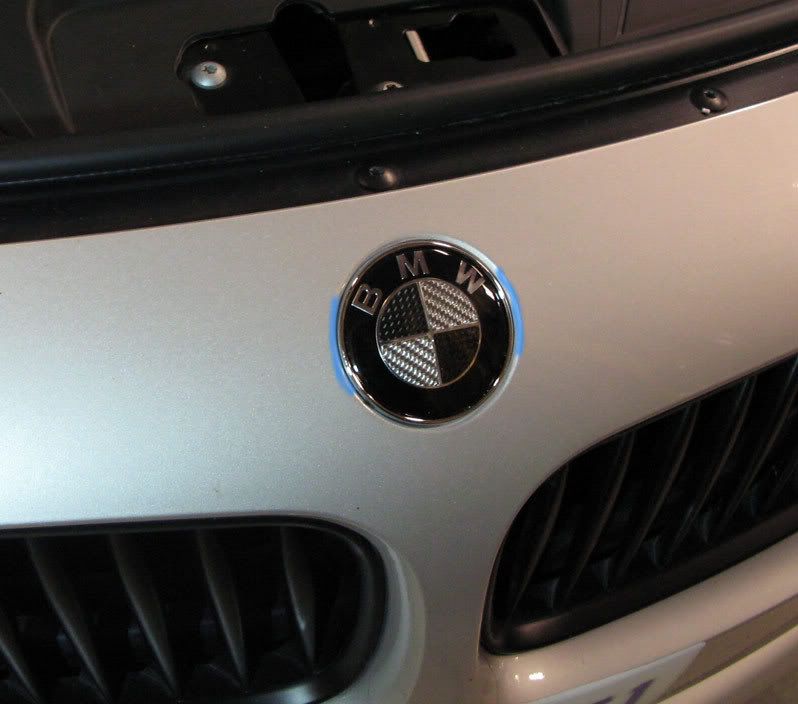
__________________
'21 M2C Hockenheim Silver
'18 718 Cayman S Lava Orange (sold) '13 E92 M3 Santorini Blue (sold) '07 Z4 M Coupe Alpine White (sold) |
|
Appreciate
0
|
| 11-26-2010, 07:18 AM | #9 |
|
Banned
602
Rep 2,703
Posts
Drives: 2009 335i - Sport PKG
Join Date: Jun 2009
Location: NY
|
Too much work
never mind, let me save $$$$$$$$$$$$$ |
|
Appreciate
0
|
| 11-26-2010, 08:21 AM | #10 |
|
Captain
50
Rep 753
Posts |
I had no problems with overlays... it's been a good 6 years now on my summer beater and they're all still there on the wheel emblems. I think I have extras somewhere still to... and you honestly cannot notice the difference without actually touching them.
I switched my trunk emblem to an actual (fake) CF replacement because I drilled a hole in the middle for the reverse camera, didn't think the overlays would hold up in that scenario. Just remember to clean the area really well with some rubbing alcohol, and apply it in a warm environment. I applied all mine in the sun. My steering wheel emblem was also changed with CF overlays and those are still primo looking too. If our emblem is 70mm then the overlays you want to use are the same size as the WHEEL overlays for e30, e36, e34, e39, e31, e32, e38 which are also 70mm. If you want to replace the entire roundel I *THINK* the convertible REAR emblems on e36 and e46's are 70mm. But I don't know if they'd fit or not. Apparently our roundels are unique to the Z4's... Part 51147044207 (Badge) was found on the following vehicles as realOEM says it only fits the following: E85: Details on E85 E85 Z4 2.5i Roadster E85 Z4 3.0i Roadster E85 Z4 3.0si Roadster E85 Z4 M3.2 Roadster E86: Details on E86 E86 Z4 3.0si Coupe E86 Z4 M3.2 Coupe E89: Details on E89 E89 Z4 30i Roadster E89 Z4 35i Roadster E89 Z4 35is Roadster |
|
Appreciate
0
|
| 11-26-2010, 01:48 PM | #12 |
|
Colonel
479
Rep 2,782
Posts
Drives: ESS/G-Power Z4M, VF Z4, 996tt
Join Date: Sep 2009
Location: Los Angeles
|
I'm looking for black/white or black/gray CF (both colors) emblems. I may give the overlays a shot then, because for $25 x 2 I can replace everything, including the wheel emblems.
I think the car is too busy... too many colors and lines going on with the blue/white roundels, amber lights and reflectors, chrome accents, M badges, etc. I plan on going grayscale in the near future, including having the stock wheels refinished in hyper black. I've found some ///M badges in grayscale as well, but I'll start with a simple debadging and go from there. |
|
Appreciate
0
|
| 12-07-2010, 05:38 PM | #13 |
|
Colonel
479
Rep 2,782
Posts
Drives: ESS/G-Power Z4M, VF Z4, 996tt
Join Date: Sep 2009
Location: Los Angeles
|
Here are some 70mm emblems if anyone is interested:
http://cgi.ebay.com/ebaymotors/2X-CA...Q5fAccessories |
|
Appreciate
0
|
| 01-20-2011, 07:56 PM | #14 |
|
Colonel
479
Rep 2,782
Posts
Drives: ESS/G-Power Z4M, VF Z4, 996tt
Join Date: Sep 2009
Location: Los Angeles
|
Swapped all my OEM exterior roundels today for carbon fiber. I'm still working on the front bumper roundel... it was 73mm vice 70mm. I'd HIGHLY recommend not attempting to make the 73 mm fit unless you really know what you're doing... let's just say I'll be stopping my the stealer for some touch up paint tomorrow. The rest of the roundels were fairly easy. Only the side roundels required modification.
Here are some preliminary iPhone pics:  Sides are debadged at the moment. Grayscale badges are in the mail.  Grayscale ///M badge with CF trunk roundel.   This one will be a PITA. New matte grills. Next on the list is fixing that panel gap.  |
|
Appreciate
0
|
| 01-21-2011, 12:23 AM | #15 |
|
Major

111
Rep 1,351
Posts
Drives: in Anger.
Join Date: Sep 2010
Location: Newcastle, WA
|
Awww daaaamn bra you bought them tight cuztom plates. You should get yo BMW some medicine cus its mad sick.
__________________
Gone (2006 STI, 2008 EVO MR, 1968 Mustang)
AFE Intake/Euro Cats/CSL Headers/Sportline CSL/H&R Springs 1217/1815 !!! BOILER UP !!! |
|
Appreciate
0
|
| 01-21-2011, 01:11 AM | #16 | |
|
Colonel
479
Rep 2,782
Posts
Drives: ESS/G-Power Z4M, VF Z4, 996tt
Join Date: Sep 2009
Location: Los Angeles
|
Quote:
|
|
|
Appreciate
0
|
| 01-21-2011, 01:16 AM | #17 |
|
Lieutenant Colonel

92
Rep 1,603
Posts
Drives: Imola Red Z4MC
Join Date: Apr 2010
Location: Ontario, Can
|
OMFGGGGGGG I JUST DIED LAUGHING WHEN I SEEN THE PLATES LOLOL UR MY HERO AHAHAHAHAHA
also, so for my clarification: the roundels i would need for my trunk and hood on my m coupe are the 70mm ones? What about for the sides of the car? Thanks
__________________
///M - Some Mods 'N Stuff
|
|
Appreciate
0
|
| 01-21-2011, 02:16 AM | #19 |
|
Colonel
479
Rep 2,782
Posts
Drives: ESS/G-Power Z4M, VF Z4, 996tt
Join Date: Sep 2009
Location: Los Angeles
|
You can go on realoem.com and figure out the roundel part numbers. Some are shared with the 6 series and other cars across the BMW model line. Once I found the part numbers for my roundels, I cross-referenced them to see which other cars used the same ones.
http://www.realoem.com/bmw/showparts...63&hg=51&fg=20 #4 is part number 51147057794. It's the same 82mm roundel used in the E63/64/65 6 series (hood) and FXX 5 series (trunk). I gave the Ebay seller (euro-body-kits) the part number, size, and other BMW models that use it just to make sure everything was correct. I'll get some better pics in the next few days. Dark wheels would really compliment the car. |
|
Appreciate
0
|
| 01-21-2011, 02:51 AM | #20 |
|
Colonel
479
Rep 2,782
Posts
Drives: ESS/G-Power Z4M, VF Z4, 996tt
Join Date: Sep 2009
Location: Los Angeles
|
Be aware that you will need some sort of adhesive for the side and front bumper roundels.
Side roundels: Grab and rotate the whole unit 1/8 of a turn counterclockwise (I think). Unsnap the wires. Separate the roundel from the rest of the unit by cutting it apart as shown in the picture. Remove any extra adhesive from the clear/amber part. Next, cut off the studs on the back of the new CF emblem. Even though it's the same part number, it doesn't come with adhesive and has the extraneous studs on the back. Sand down the studs that are on the clear/amber part to about half of their original length. I marked up some tape to help me line up the new CF roundel.  Front bumper roundel: This is where I screwed up. I misread inTgr8r's post and sanded part of the bumper to try and make the roundel fit in hopes that the roundel would cover up the parts I sanded. Don't touch the bumper except to sand the raised area directly below the roundel. And, I'm not even sure it needs to be sanded anyway. Otherwise you will be buying some touch up paint like me. If I was to do it again, I would start by only sanding the roundel itself. Removal of the original roundel was a bitch. I tore up my plastic pry bar and caused some minor indentations in the paint surrounding the roundel from where I tried to pry it off (even with a towel underneath). I finally got frustrated after 15 minutes, ripped off one of my grills, and took a hammer to the studs on the back. I'm not advocating this brute force approach by any means  . Anyway, I knocked them off and ripped the roundel off Hulk-style. . Anyway, I knocked them off and ripped the roundel off Hulk-style. If you place a 73mm roundel in the 70mm's place, you'll wonder how in the world you'll get it to fit. It seesaws, pivoting on the left and right sides. It's actually quite easy to fix this. Sand down the back of the left and right sides, just like inTgr8r said and outlined in blue. This will effectively make the roundel thinner on the sides and thicker on the top and bottom ends. You'll want to taper your sanding so that the 90 and 270 degree marks are sanded the most, and top and bottom of the roundel are left untouched. In other words, if the roundel was a compass with north being the "M" in "BMW," you want to sand down the east and west points the most and not touch north or south. Sorry I can't explain it any better than this. Once you see it you'll understand. It sounds a little complicated, but it's not tedious. It took a couple hours to figure out and complete, and the car looks phenomenal. Difficulty is 3/10 considering I screwed up the front roundel pretty badly and it looks like it was installed by an amateur ") . I'll put up some pics of my Frankensteining tomorrow. Edit: pictures . I'll put up some pics of my Frankensteining tomorrow. Edit: pictures   The good thing about the grayscale ///M badges I'm adding is that they aren't as loud as the original red and blue badges, especially when coupled with the new carbon fiber roundels. I know many owners debadge because the car gets busy. Now I think it's possible to maintain both a clean look and ///M badges because the colors are much more subdued. Last edited by pokeybritches; 01-21-2011 at 12:07 PM.. Reason: clarity, pictures |
|
Appreciate
0
|
Post Reply |
| Bookmarks |
|
|


 np! Anytime


 Nikki
Nikki