

| BMW Garage | BMW Meets | Register | Today's Posts | Search |
|
|
|
 SUPPORT ZPOST BY DOING YOUR TIRERACK SHOPPING FROM THIS BANNER, THANKS! |
|||||||||
Post Reply |
|
|
Thread Tools | Search this Thread |
| 08-24-2007, 01:35 PM | #1 |
|
Private First Class
 
13
Rep 136
Posts |
Front Bumper Removal - DIY by mister_roger
In my recent project of converting my standard Z4 bumper to a Z4M front bumper, I decided it would be good time to also create a new DIY for removing the front bumper. The old DIY (http://www.zpost.com/forums/showthread.php?t=63034), as descriptive as it may be, has dead links to its pictures.
So with intention to provide our community with a new resource, here is my writeup for a standard Z4 front bumper removal: Overview: First you need to understand how the front bumper is attached to the body. It is held on by 7 hex screws along the top edge in the engine compartment, 4 expanding tabs along each fenderwell, and 7 8mm screws along the underside of the front bumper edge. The sides of the bumper snap into place where it meets with the fender. Tools required: -Screwdriver with hex bits -or- allen wrench crank tool from BMW tool kit. -Tiny screwdriver (size of a toothpick) -8mm socket or wrench -confidence Step 1: Start by removing the expanding tabs along each fenderwell. These tabs function by having a small plastic rod become inserted down the middle, causing the tab to expand and lock in place. To remove these tabs, take the tiny screwdrive and PUSH the rods all the way in until you hear them fall. Don't worry, you'll be able to recover them when the bumper is removed. 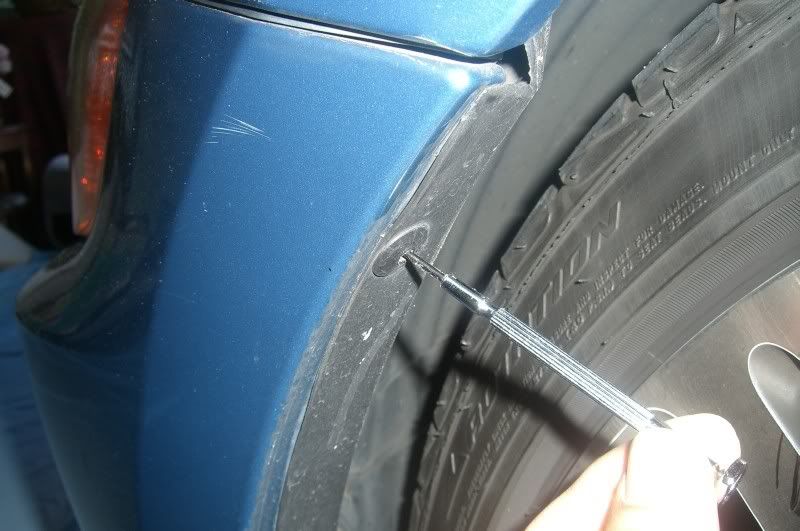 Now it's loose 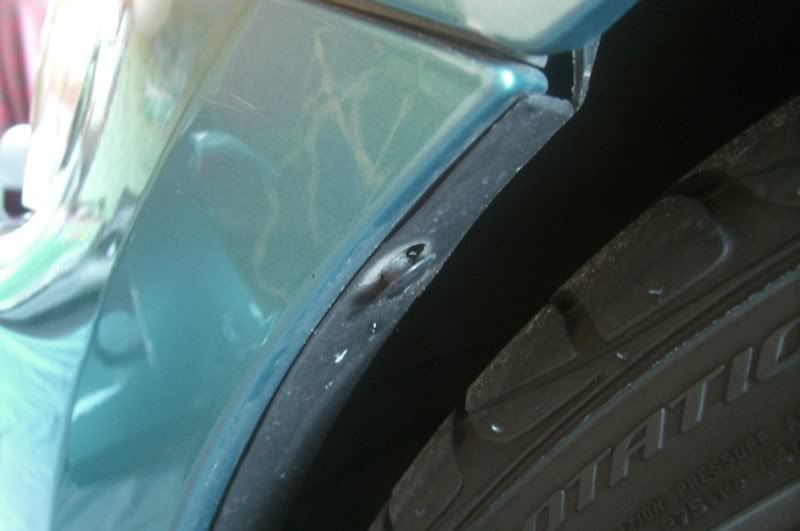 Remove the 7 remaining tabs from both fender wells in the same manner. Step 2: Remove the 7 8mm screws/bolts along the underside of the front bumper. These are pretty straightforward. 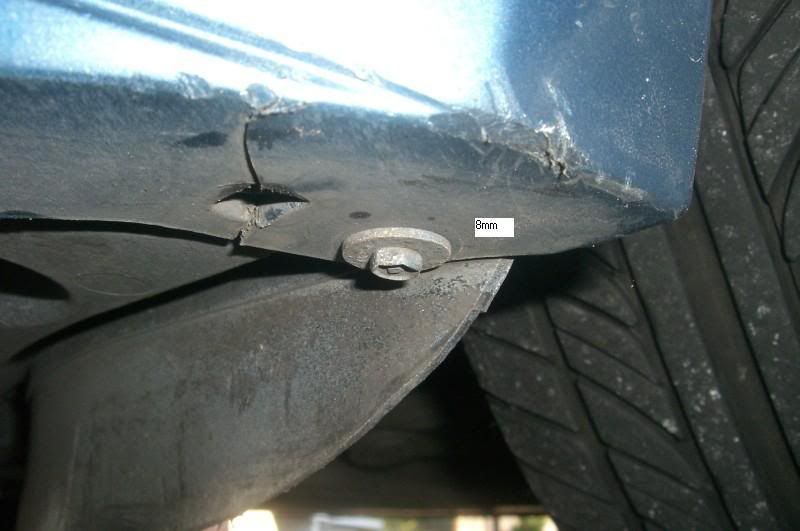 Step 3: Pull off the sides of the bumper where it meets the fender. You may have to give it some force, but after some firm pulls and it should eventually pop off. 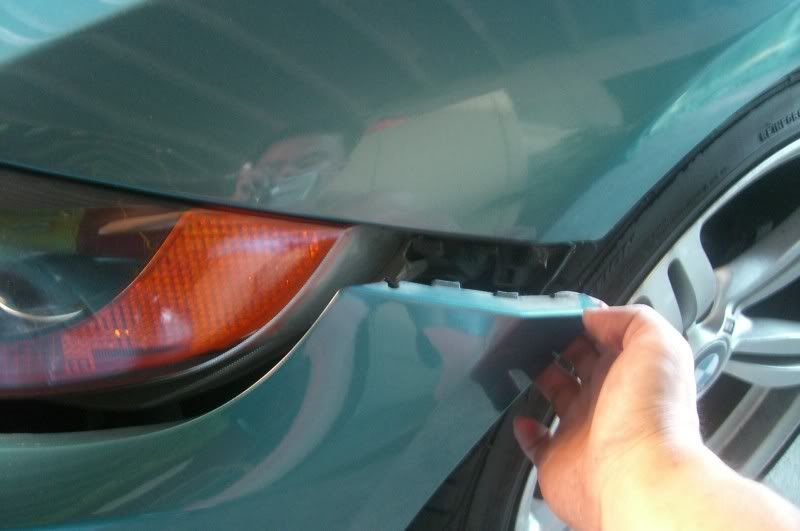 Step 4: Remove the 7 hex screws along the top edge of the front bumper. This should be done last, because these 7 screws are all that's holding your bumper in place at this point. Using your Screwdriver with hex bit, simply remove the screws. Watch out, they may be a little tight. OPTION 2: If you do not have a hex screwdriver handy (like i did), I discovered that this allen-wrench crank tool thingy from the supplied emercency tool kit actually fits into the hex screws. It's not intended for this use though, because you run the risk of stripping out the allen head when it turns against the teeth in the hex screw. But as long as you're careful and don't overdo it, this tool should be able to get these screws out. This tool is made from pretty strong metal. 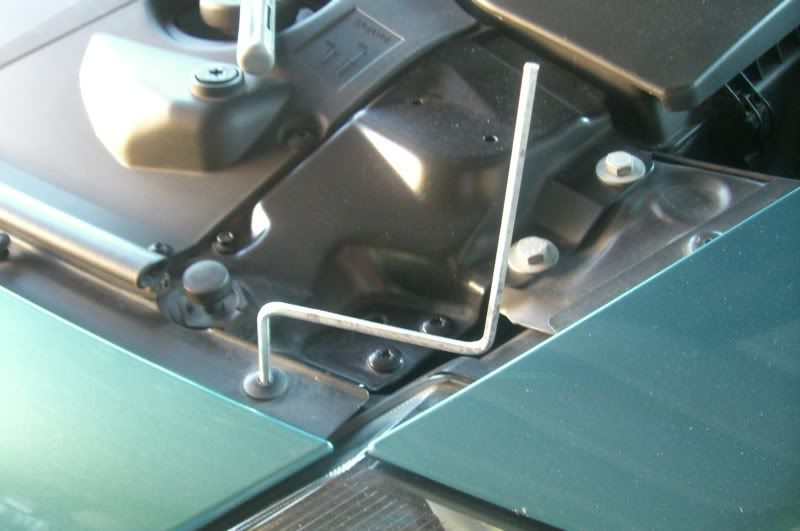 Step 5: With all the screws and hardware removed, gently pull the bumper forward a bit and disconnect the fog light harnesses (if you have fog lights). The bumper should now pull completely forward and is no longer attached to the body.  Make sure you save this piece as well, which runs along the top edge where the hex screws were. 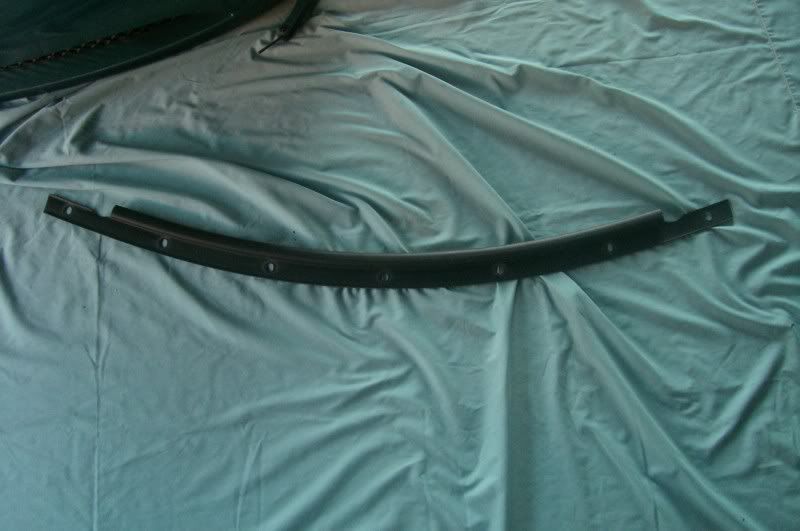 With the bumper removed, you should see the 4 expanding tab pins that dropped. Save them for use later. 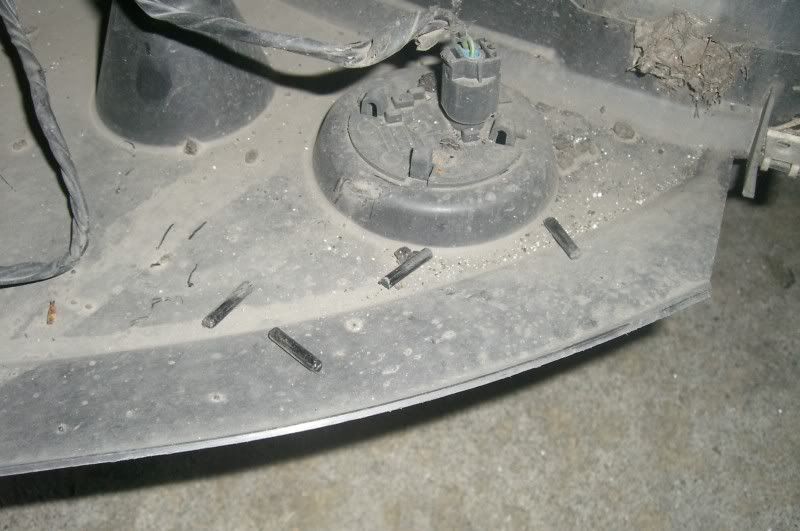 Reinstalling the bumper is the exact same process in reverse order. The expanding tabs are placed in their holes, and the pins inserted afterwards to lock them into place. And that is how it's done. Best, -Roger
__________________
2003 Maldives Blue 2.5i -- 18" M6 wheels, 12mm rear spacer, ///MZ4 front bumper conversion, Eibach lowering springs, Koni shocks, Hotchkis F/R anti-roll bars, Helene Performance air filter.
 Last edited by mister_roger; 08-24-2007 at 08:09 PM.. Reason: typo |
| 03-31-2008, 06:24 PM | #3 |
|
Major
 75
Rep 1,143
Posts |
Can anybody confirm if those expanding tabs are PN: 51118174185? (#3 in this diagram: http://www.realoem.com/bmw/showparts...51&hg=51&fg=70)
I don't want to remove the bumper, but I'm interested in getting under there to replace the front reflectors, and I was curious if I could just get a set of replacement tabs instead of taking off the bumper and recovering the pins. |
|
Appreciate
0
|
| 03-31-2008, 06:57 PM | #4 |
|
Major
61
Rep 1,210
Posts |
you might be able to reach in through the fog light pass way in the fender lining and grab them since it looks like they fall in the same general area.
From the realoem.com schematics it looks like #3 is what you're looking for. Looks like it comes with the pin and the expanding rivet |
|
Appreciate
0
|
| 03-31-2008, 07:09 PM | #5 | |
|
Colonel
 
60
Rep 2,128
Posts |
Quote:
|
|
|
Appreciate
0
|
| 03-31-2008, 10:07 PM | #8 | ||
|
Major
75
Rep 1,143
Posts |
Quote:
Quote:
|
||
|
Appreciate
0
|
| 06-24-2008, 06:59 PM | #11 |
|
Major General
 684
Rep 5,069
Posts
Drives: BMW 230i Msport w/LSD
Join Date: Nov 2007
Location: Astral Projecting: ∞ 23.516 -122 02.625 0242.101 ĕv'rē-hwâr'
iTrader: (16)
Garage List 2009 Porsche 911 997.2 [10.00]
2019 Hyundai N (Sold) [10.00] 2013 BMW M3 (Sold) [10.00] 2011 1M Coupe (Sold) [8.78] 2008 E90 M3 (Sold) [8.60] 2007 Z4 Mcpe (Sold) [9.50] 2005 BMW M3 (Sold) [10.00] |
Nice write up. Color and bumper still look great!!!
__________________
 |
|
Appreciate
0
|
| 05-03-2011, 01:46 PM | #13 |
|
New Member
0
Rep 6
Posts
Drives: 2007 z4 3.0si Coupe
Join Date: Apr 2011
Location: Monrovia ca
|
 I am in need of "re-aligning the" front bumper , i bought the car used I am in need of "re-aligning the" front bumper , i bought the car usedand i noticed later that the top left side has a larger gap than the right. (where the bumper meets the hood) Im hoping its just not centered correctly and not actually damaged in some way. is there a certain order to tighten them when you reinstall the top bolts? I read somewhere (maybe the splitter diy post) theres some "play" on the top bolts where you can actually adjust the alignment , so Im hoping just loosening up the top bolts and trying to re-tighten them in a certain way would be easier than pulling off the entire bumper . |
|
Appreciate
0
|
| 05-03-2011, 09:17 PM | #14 |
|
Private

9
Rep 51
Posts |
Front Bumper
I just installed the bumper on my 07, and yes there was enough clearance in the holes to allow for some adjustment of the gap between the hood and bumper. I just installed the bumper, then SLOWLY and carfully lowered the hood to observe the gap. Mine was good on the left, but I needed to decrease the gap on the right. I just loosened the right side bolts, pushed the bumper in a bit then retightened them. The gap is perfect now.
|
|
Appreciate
0
|
| 02-26-2012, 11:26 PM | #16 |
|
Lieutenant

22
Rep 428
Posts |
How do the headlight washers come into play? The cap is connected to the pump itself.
__________________
1997 /// M3 Coupe Arctic Silver CES STAGE IV (651rwhp/615rwtq)
1999 /// M3 Convertible Techno Violet |
|
Appreciate
0
|
| 12-01-2012, 11:06 AM | #18 |
|
First Lieutenant

23
Rep 347
Posts
Drives: 2006 BMW M COUPE
Join Date: Dec 2008
Location: Charlottetown PEI, Canada
|
Not sure if only in Canada or ?
The "plastic rivets that hold the front bumper on my 06M are not the same as those shown in this write up or in the ESS instructions. They don't push in and are made like zip ties -they go in and then you pull up on the pin and cut it off.
There are lots similar around 0 you can get 35 from CHina on E-bay for 3 bucks - make sure the diameter of the pin and the top are roughly the same as well as the length that the "rivet" goes through what you are attaching. |
|
Appreciate
0
|
| 12-01-2012, 11:19 AM | #19 |
|
Lieutenant General
2432
Rep 11,667
Posts |
^ I have seen a few different types used.
My 06 had the nail type pins but I think there was a production change at some point. My 07 has the other type.
__________________
'21 M2C Hockenheim Silver
'18 718 Cayman S Lava Orange (sold) '13 E92 M3 Santorini Blue (sold) '07 Z4 M Coupe Alpine White (sold) |
|
Appreciate
0
|
| 12-01-2012, 05:36 PM | #20 |
|
Major
55
Rep 1,224
Posts |
My 5/07 production had the crush body/break off shaft type rivets. Parts manual shows other reusable type.
__________________
If you can't take the time to teach a kid something good, someone will take the time to teach them something bad.
|
|
Appreciate
0
|
| 03-18-2013, 10:01 AM | #21 |
|
Hug the road... Carpe Asphalt

105
Rep 722
Posts |
I'm struggling with step 3... Do you just pull the front bumper top edge out to the side or down or a combination? The attachement bracket between the fender and bumper seems to stay with the fender, not the bumper?
__________________
2007 BMW ///M Coupe
 |
|
Appreciate
0
|
| 03-18-2013, 10:12 AM | #22 | |
|
Lieutenant General
2282
Rep 12,565
Posts
Drives: Z4 M, X5, GX460
Join Date: Apr 2008
Location: CT
iTrader: (99)
Garage List F15 X5 xDrive35i [8.75]
E86 Z4 M [10.00] F10 550i (Retired) [9.17] F25 X3 xDrive35i (R ... [9.43] E82 135is (Retired) [9.50] E85 Z4 M (Retired) [9.41] E90 328i xDrive (Re ... [9.25] E86 Z4 3.0si (Retired) [9.24] |
Quote:
Hold UNDERNEATH the bracket and grab BUMPER ONLY. Click on link below, Shipkiller shows where you should be grabbing: http://www.zpost.com/forums/showpost...&postcount=450
__________________
Follow
|
|
|
Appreciate
0
|
Post Reply |
| Bookmarks |
|
|


