| BMW Garage | BMW Meets | Register | Today's Posts | Search |
|
|
|
 SUPPORT ZPOST BY DOING YOUR TIRERACK SHOPPING FROM THIS BANNER, THANKS! |
|||||||||
Post Reply |
|
|
Thread Tools | Search this Thread |
| 01-10-2015, 12:07 PM | #1 |
|
New Member
2
Rep 19
Posts |
Eventuri Intake Development and 1st impressions
(Copied from z4 forum
Hey guys, just wanted to say some words about the Eventuri kit that my other half (KatieK) has been running on her Z4MC Firstly i want to so sorry for how long its taken for write up, but we have been on holiday for the last month, also writing a review the day after fitting a mod is not a great review of product, because you have not had time to live with it and see how it feels from day to day. Bit of a background build up to the kit and how we ending up testing it for the guy at Eventuri, I have done a bit of testing, development and work with Imran with the CSL intake for the e46 M3, so when Bilal and Imran wanted to start the Eventuri Project i was all ears to hear what they had planned. They also know that they will get a honest opinion from us and if something is shit we will tell them, rather than blowing smoke up their ass So the guys had 2 kits under their belt with the e60 m5 and e46 m3, and it was time for them to develop their 3rd kit, being a z4m s54 kit. Imran called me and asked me to speak to Katie about using her car for development of the new kit, of course she said yes. So it was late august and we where heading up there to have the car mapped before heading off to the ring for a week in September, before mapping started the guys wanted to show us what they have been doing with the 2 other kits and what they had planned for the z4, followed by a few test fits of parts. First thing that was tested was OEM airflow situation with that odd upside down scoop they have behind the passenger side grill, so measurements where taken in front of the car and then another in the engine bay to see how much airflow came through. The answer was a big fat ZERO, Not a thing (we know the oem air box is a sealed unit, so will create a certain amount of sucking power but no direct ram air effect at all)  So a intake scoop from their e60 kit was fitted in place to test airflow, the scoop from this kit was fairly small , but worked great for a test purpose. There was next to no loss of airflow from the outside of the car to the engine bay, it worked a treat. After this Bilal check how the intake sat on the bay and started dreaming up mounting points in his head. So the oem air box went in and off to the ring we headed. e60 scoop in place  kit test fitted with no heat shields and prototype cone and MAF housing  SO fast forward a month and we arranged to leave the car with Bilal and Imran for final prototyping and some testing, while they had it i got updates on all the new parts and also asked on our opinion on what we think the kit needed. One of the things Katie and myself mentioned was the mounting of the coolant overflow tube, with the oem air box in place it mounts on the air box, we said that this would need to be addressed on the Eventuri kit. Go forward to Mid November and the car is good to go, I headed up after work to collect the car, Bilal had removed the whole kit from the car so he could give me a run down on what they had been doing  First thing he showed me was the new scoop design, the e60 scoop would have worked just fine but they wanted to reengineer a new scoop, the new scoop is as big as it possibly could be and the really tidy part is that it fits using the OEM holes and mounts, so no need to modify the plastics by drilling holes. Then there is the general shape, the other scoops we have seen on the market are basically a thin bit of tin that is folded in to a boxish shape to try and catch air. This scoop is solid, and has a super smooth curve, not a flat piece of metal like the others out there. IMO this must create a lot smoother movement of air and less turbulent flow into the intake. New larger Intake Scoop  Next part of the kit is the heat shield, again its a very clever design cos it does a few things, it houses the intake cone, so it can then be also used as the kits mounting bracket, it bolts directly to a OEM mounting in the bay, its nicely made and finished. Doing it this way has eradicated the need for ugly bracket going off to random holes to hold the intake in place. The guys also took on board the coolant pipe we mentioned to them. On the top of the heat shield is a OEM style clip for the pipe to clip into. At this point i was already more than impressed with the thought process that goes into this design. So then the Pre preg Carbon filter housing is the part that follows, it is a work of art, perfect weave and finish, the venturi system that it works to creates a unique shape and i would imagine a nightmare to get the finish to such a high standard. This is the real mccoy when it comes to carbon and not a cheap wet lay construction, its stunning! The last part to the kit is the MAF housing, IMO this part is so often over looked on intake kits, the Eventuri housing started out as a part from the e46 M3 kit, but they were not happy with the fit, so they went back to the drawing board a made a new housing specifically for the Z4M kit in the time they had the car. Bilal showed me how quick and simple it was to instal in the car before then going on to the dyno results  The guys returned the car to a stock map to test out the intake, now i have spent a lot of time around dynos and dyno tuning and i have learnt never to pay a huge amount of attention to the numbers but more the gain and loss as well as curve profile, There are just soo many variables that can effect the numbers. So i just always use them as a measure of change rather than outright power, this is just the way my head thinks about things. So it made a nice 10 hp on this print out, but i was told during testing they did see gains of up to 15hp depending on conditions, the other thing that is also worth keeping in mind is the wind speed, these kits have a much greater effect when the car is being driven rather than being dyno tested with a fan. Personally for a bolt on part this has a great effect.  But as they say proof is in the tasting, so Bilal handed me the keys with a smile on his face and said i think Katie will enjoy the noise, now bare in mind i have a e46 m3 will a Evolve Dry Carbon air box fitted which makes a pretty epic noise, so in my head i have that as a bench mark for noise as i drive off. Well let me tell you, what a awesome noise. I have found that the Z4M is all induction noise as standard with very little exhaust noise (the opposite of a standard e46 m3), and this intake kit work soooo well with this car. It has a very deep CSLesque growl to it, obviously its never going to be quite as loud as a CSL box, but its a damn good effort. I was massively impressed with the noise from such a small intake. for testing purposes the intake was run on a standard map so this is a good judge on the arse dyno. The car just has the bit more get up and go, I'm not going to exaggerate things like some people and tell you its like having a charger fitted, but there is a noticeable increase in throttle response and pick up. the noise response just like the CSL box, its totally throttle load dependant, so effectively you can keep it nice and quiet and then load the engine up and it barks into life. So my opinion??? great bit of kit, engineering and finish is 2nd to none. Performance exceeded with i would expect from any bolt on kit and its a difference that can be felt in the real world and if anything its worth it for the noise alone lol Over the weekend KatieK will add a review to her Journal and i will add it in to the bottom of this post. I will also get the car clean and get some fresh photos on the kits and i will also get the go pro rigged up in the car for the videos which i will also add to the is thread I hope you have enjoyed the read and take in a honest opinion of the kit and the work these guys have put into the Kit. I would like to thanks Bilal and Imran at Eventuri for giving katie and myself this opportunity not just to test the kit but give you opinion on the design. Thanks guys and best of luck to you with the new venture Video update Last edited by Paul46; 01-10-2015 at 05:59 PM.. |
| 01-10-2015, 12:39 PM | #2 |
|
Second Lieutenant
 
36
Rep 210
Posts |
Very well written review and thanks for putting up your car to help get this done! I have been watching this since I came across it and have mine kit pre-ordered. Very nice to hear honest and positive reviews and very much look forward to receiving mine!
Cheers |
|
Appreciate
0
|
| 01-10-2015, 01:08 PM | #3 |
|
Lieutenant

35
Rep 441
Posts |
I'm glad to read a good review...especially since I put in my order last week haha
__________________
2007 //M Coupe. BSM. Fabspeed headers. Catless. BMS x-pipe. Strömung cans. evolve tune. Turner CSL airbox. Airrex air suspension with autopilot v2 management.
My Build Thread |
|
Appreciate
0
|
| 01-11-2015, 09:42 AM | #4 |
|
Lieutenant General

2433
Rep 11,667
Posts |
....looks great nice write up
Vid has been posted on the UK forum
__________________
'21 M2C Hockenheim Silver
'18 718 Cayman S Lava Orange (sold) '13 E92 M3 Santorini Blue (sold) '07 Z4 M Coupe Alpine White (sold) |
|
Appreciate
0
|
| 01-11-2015, 11:25 AM | #5 |
|
Colonel
 
1144
Rep 2,868
Posts
Drives: Anything
Join Date: Apr 2010
Location: SoCal
|
Thanks for taking the time out to write an in-depth review! Looks like it's much more livelier on the UK forum on this subject
 |
|
Appreciate
0
|
| 01-11-2015, 12:13 PM | #6 |
|
Colonel
479
Rep 2,782
Posts
Drives: ESS/G-Power Z4M, VF Z4, 996tt
Join Date: Sep 2009
Location: Los Angeles
|
Good review! I loved my aFe when I had it. Back then there were only aFe or Gruppe M at 3x the price. It's great to see Evolve add another product to the market. Although it's kinda hard to justify spending $220 to before/after dyno a $600 intake, I'd love to see an independent dyno. I never saw any for the other intakes out there, and the naysayers claiming power loss had clearly never owned either intake.
Even if the only benefit is an improved driving experience through carbon airbox-like sound, the price of entry is worth it. So many S54 owners pay $$$ for an M car yet miss out on that unique engine growl.
__________________
|
|
Appreciate
0
|
| 01-15-2015, 11:01 AM | #7 |
|
Private
 
2
Rep 89
Posts
Drives: 2008 BMW Z4 M Coupe
Join Date: Jul 2011
Location: San Juan
|
Can't wait for mine!
|
|
Appreciate
0
|
| 01-15-2015, 05:51 PM | #8 |
|
General
2045
Rep 25,989
Posts |
Nice write up. Thanks for sharing!
__________________
VMR|Wheels | 714.442.7916 |
sales@velocitymotoring.com | www.velocitymotoring.com | facebook | flickr | Instagram |
|
Appreciate
0
|
| 01-15-2015, 08:09 PM | #9 |
|
Lieutenant
56
Rep 588
Posts
Drives: 2007 Z4M Coupe
Join Date: Feb 2011
Location: Tennessee
|
Wow that thing sounds mean. Exhaust/headers, or was that just intake?
__________________
2021 m240i on order
|
|
Appreciate
0
|
| 02-13-2015, 09:57 AM | #10 |
|
Colonel
1144
Rep 2,868
Posts
Drives: Anything
Join Date: Apr 2010
Location: SoCal
|
After patiently waiting for a couple of long months, finally received my intake last night – skipping dinner, got it fitted and took it out for a short test run
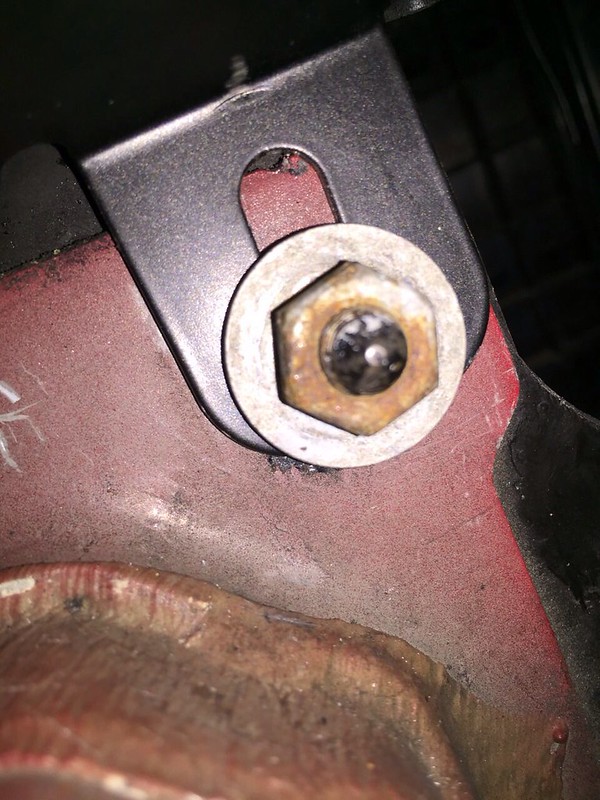
 Initial impression: WOW…is all I can say. The sound above 4K is so intoxicating – I want a CSL intake NOW  None of the video/audio clips that I’ve heard had done it any justice! I can’t hear my Remus exhaust anymore None of the video/audio clips that I’ve heard had done it any justice! I can’t hear my Remus exhaust anymore  Throttle response appeared to have a slight improvement, but this may just be my imagination. More comments to come after I get more seat times. Throttle response appeared to have a slight improvement, but this may just be my imagination. More comments to come after I get more seat times.Now...onto a problem I’ve noticed – Due to the new angle of the intake, the air tube into the plenum is now pushing onto the secondary water pump connector, pinching the connecting wires - see attached picture. Hopefully, in the long run, this won’t cut the wires or break the connector as the engine moves under load. I’m not sure how no one else had noticed this? May be the e46 guys have this in a slightly different location? One solution that I see is to change the MAF housing design to have a slight bend to make the angle transition so it doesn’t affect the original angle of the plenum intake tube. I’m open to all ears if anyone has any other suggestions or solutions? A couple of nitpicks:
 Now I need to find a solution for the water pump connector clearance issue Now I need to find a solution for the water pump connector clearance issue Last edited by XMetal; 02-13-2015 at 10:15 AM.. |
|
Appreciate
0
|
| 02-13-2015, 07:58 PM | #11 |
|
Second Lieutenant
36
Rep 210
Posts |
Hmm interesting thanks for posting and including the pic of the MAF housing touching the connector! I recieved my intake last week but I am waiting to install it so I can do a before and after comparison but I'll now know to keep an eye on that area!
Is there any "wiggle room" anywhere so that its lifted off that somehow? I think this is going to make me go down and test fit the new intake. Just out of curiosity what number is yours? Mine is 52 |
|
Appreciate
0
|
| 02-13-2015, 08:20 PM | #12 |
|
Colonel
1144
Rep 2,868
Posts
Drives: Anything
Join Date: Apr 2010
Location: SoCal
|
There's some "wiggle" room at the front mounting point, but I've lifted it up as high as it will go. Mine is #59
|
|
Appreciate
0
|
| 02-14-2015, 04:46 AM | #13 |

5374
Rep 3,789
Posts |
There is some movement in the elbow and shield to allow clearance. We haven't noticed this issue on the 2 test cars but will ask the customers to take a look and report back shortly.
|
|
Appreciate
0
|
| 02-14-2015, 11:42 AM | #17 |
|
Colonel
1144
Rep 2,868
Posts
Drives: Anything
Join Date: Apr 2010
Location: SoCal
|
Thanks for the input and suggestions
From the mounting nut view, it looks like I can move the shield up a bit more. However, the top of the shield is running into the hood release cable clip as shown in my attached pictures - which means I really can't move the shield up any further? I'll play with it some more to see if I can back out the silicon joiner a bit at the 1st jubilee clip in order to angle up the intake tube. |
|
Appreciate
0
|
| 02-14-2015, 12:59 PM | #18 |
|
Colonel
1144
Rep 2,868
Posts
Drives: Anything
Join Date: Apr 2010
Location: SoCal
|
Quick update...Just went out and fiddled around with it some more. Had to back out the silicon joiner about a quarter inch from the carbon cone and turned the intake tube at the plenum upward slightly. Now, the intake tube is no longer touching the pump connector...YAY! It's not as much clearance as Paul's car, but I'm happy that it's no longer pinching the connector wires
 So...for step 10 of the instruction, do NOT push the silicon joiner onto the carbon housing "as far back as possible". Apparently, I followed this to the "T" and pushed it in too far, I guessed Paul/Imran, Thanks again for the quick responses...even on a Valentine Saturday  Really appreciates the feedback and suggestions...that is what I called customer support! Really appreciates the feedback and suggestions...that is what I called customer support! Last edited by XMetal; 02-14-2015 at 01:06 PM.. |
|
Appreciate
0
|
| 03-22-2015, 07:38 PM | #20 |
|
Lieutenant General
2433
Rep 11,667
Posts |
Hey guys, Chris ( crfine88 ) and I have been sharing some ideas on creating more room for the WP connector under the elbow and the routing of the coolant line equalization tube.
For the WP Chris and I collaborated on a way to create more space by lowering the mounting bracket as well as canting the mount angle. The mounting bracket is fastened with two 10mm bolts. The WP itself is on three rubber grommets which simply side up to remove. Once off, two extension tabs were added to the bracket, which lower the mounting position. The tabs where given a slight angle bend which does two things; it cants the top of sensor towards the fender and gives clearance for the screw heads. (I used counter sunk heads) If you are making tabs, use 1" center to center on the holes. These pics are from the trial fit. They will be cleaned up and painted black to match the OE bracket. Front view with tabs mounted 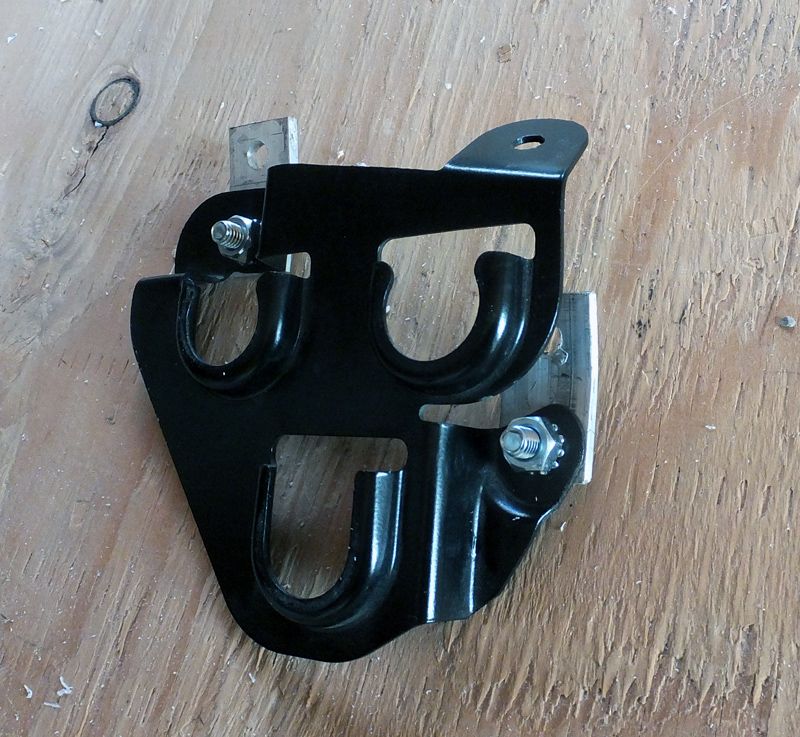 Back view tabs mounted 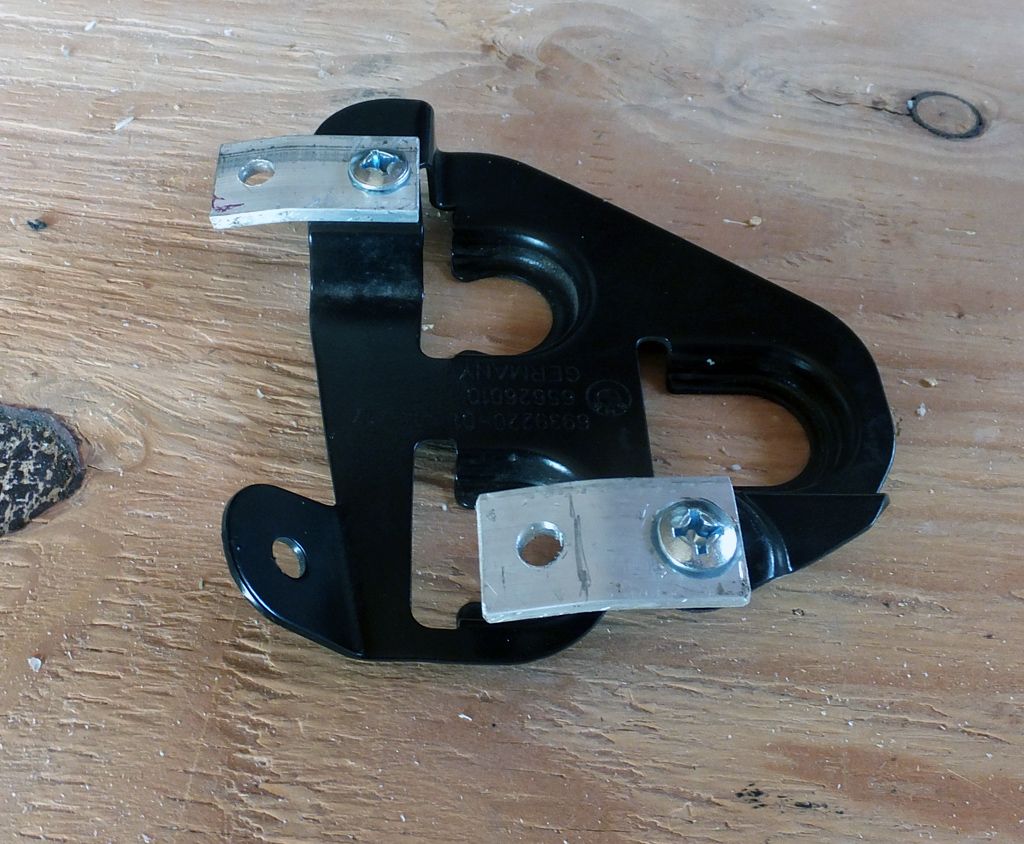 Side view showing the tabs bend angle 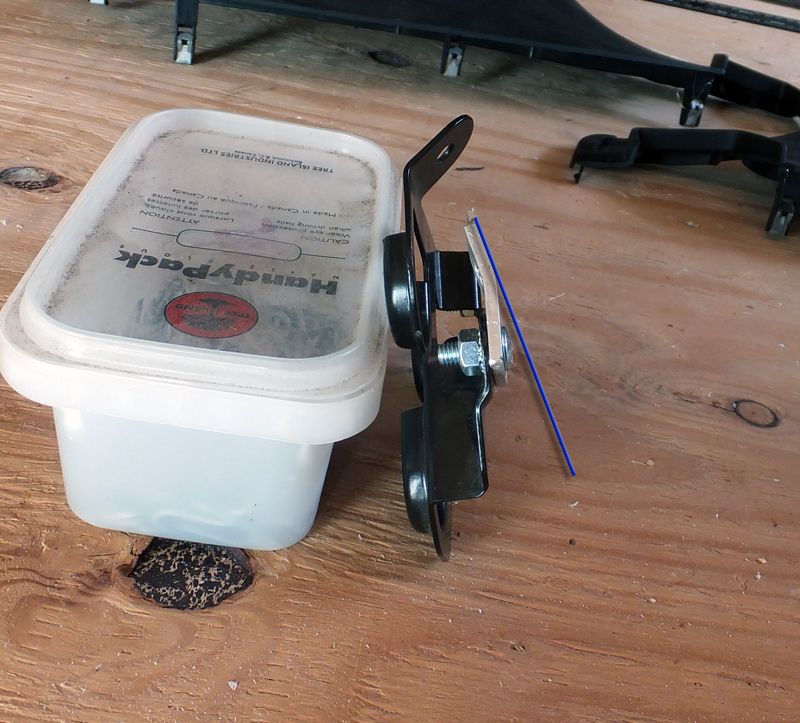 bracket mounted  WP mounted 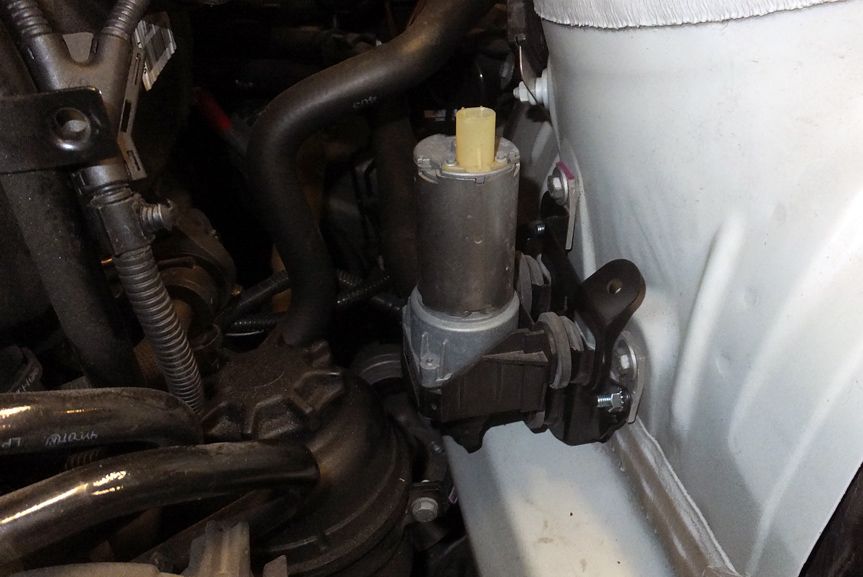 ample clearance intake to WP connector 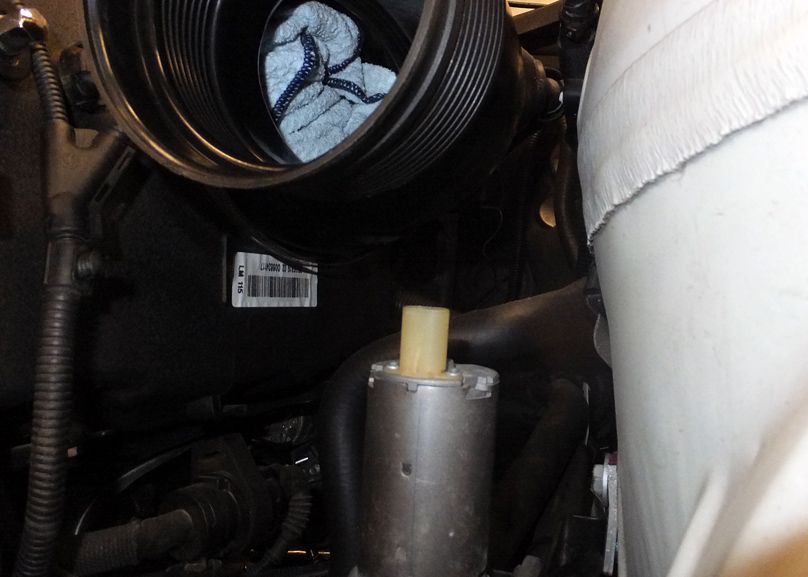 Next was the coolant line. Chris and I both felt that running the line in the OE location really detracted from the beauty of the Eventuri intake. My first inclination was to make a new line and re-route it. Chris came up with the idea of just rerouting the existing line w/o need to disconnect it. One concern that we discussed was whether it was OK to have a droop loop in the middle. This line is not used for coolant flow; the function is for pressure equalization, a breather tube so that coolant flows back and forth between rad and expansion tank freely in the main hose. We speculated that any pressure build up should blow by any condensate or coolant that may find its way to the bottom of the loop. This is further corroborated by the fact that blower kit installs also re-route the line in a similar way. We will continue to monitor this mod. At the tank end the two nuts were removed and there was enough play in the tank to lift it up and lower the tube below the tank. ...dont mind the dirt ") 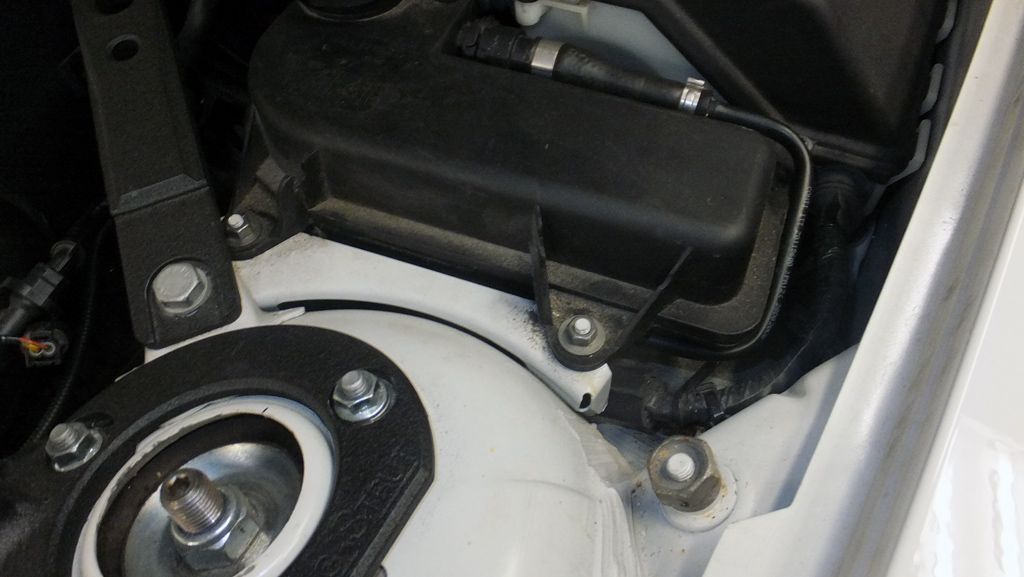 Line from below tank and along to sensor. (zip ties are temporary for test fit, proper clips will be installed later) 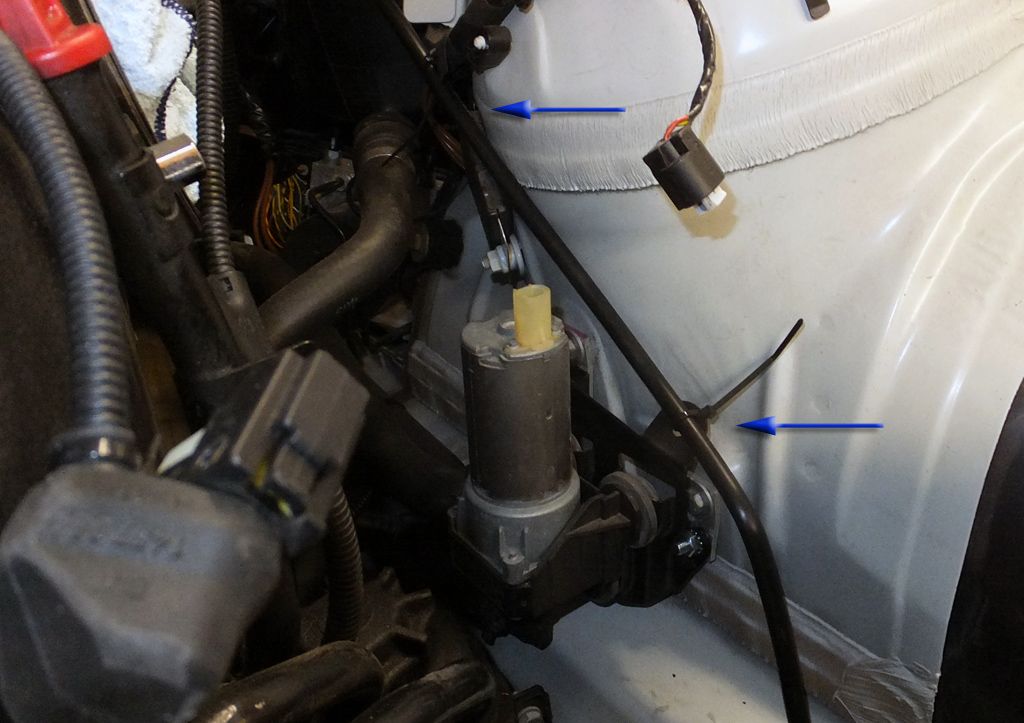 Line route below Eventuri location  the rest of the Eventuri install notes apply from this point onwards 
__________________
'21 M2C Hockenheim Silver
'18 718 Cayman S Lava Orange (sold) '13 E92 M3 Santorini Blue (sold) '07 Z4 M Coupe Alpine White (sold) Last edited by inTgr8r; 03-23-2015 at 05:26 AM.. |
|
Appreciate
0
|
| 03-23-2015, 01:17 AM | #21 |
|
Colonel
1144
Rep 2,868
Posts
Drives: Anything
Join Date: Apr 2010
Location: SoCal
|
Thanks for sharing
|
|
Appreciate
0
|
| 03-24-2015, 01:03 PM | #22 |
|
New Member
7
Rep 18
Posts |
Hi,
Many thanks for sharing. I'm in progress to purchase the Eventuri intake. This is a good idea to move the support, why if the thikness is too low i'm afraid with time the elbow touch the connector. Thanks for the foto and the good explanation. Sorry for my english |
|
Appreciate
0
|
Post Reply |
| Bookmarks |
|
|