| BMW Garage | BMW Meets | Register | Today's Posts | Search |
|
|
|
 SUPPORT ZPOST BY DOING YOUR TIRERACK SHOPPING FROM THIS BANNER, THANKS! |
|||||||||
Post Reply |
|
|
Thread Tools | Search this Thread |
| 04-23-2015, 10:11 PM | #1 |
|
Lieutenant
 

67
Rep 501
Posts |
UPDATE: installed with some pics below
I'm so close to pulling the trigger on a set of Corbeau Sportline Evolution seats but I can't figure out how to mount them in my Z4M. Corbeau doesn't seem to make anything that will specifically fit the Z4 platform. Also, their brackets seem rather tall (I need to sit lower than the stock seats) with questionable reviews, and apparently can't be bought without sliders? I don't want/need sliders. So I was going to go with a VAC race seat kit. But then I realized that the Evolution seats are probably bottom mount only (not 100% on this). So I thought I'd maybe be able to go with a VAC floor mount alone. But, wouldn't the Corbeau seats not be able to mount directly to those floor mounts? Without some sort of adapter or something? Or am I not understanding this correctly? Last edited by intoflatlines; 05-15-2015 at 11:20 PM.. |
| 05-14-2015, 12:37 AM | #2 |
|
Lieutenant
67
Rep 501
Posts |
I'll post an update here. I see that some people have read the thread but not responded, so it could be that not many Z4 owners install this type of setup? I hope that what I've learned so far will help someone else down the road.
Standard disclaimer - I am not a professional, I cannot vouch for the actual safety/legality of anything I've done. This is just to share what I've done and record my own thoughts. Doing anything similar to the below is up to you to deal with any consequences on your own. I bought Corbeau RRS seats (bottom mount) with 1" universal bracket and double locking slider, which is supposed to be 1" tall in total. I was hoping to buy sliders from another company like VAC but Corbeau claimed that their seats will only fit the sliders that they sell, and also that the mounting holes on the seats vary between production runs (apparently intentionally), so the only sure shot in having sliders that fit is to buy the slider at the same time as the seat. Kind of a bizarre design/practice but whatever. So I chose to buy the slider/bracket from Corbeau mainly for that reason. I will be installing only the driver's seat this season and did not buy a slider/bracket for the passenger's seat, so we'll see how easy/difficult it is to find a slider for the passenger when the time comes. The universal bracket that they sent to me has a label that says "Porsche" on it, and has a few pre-drilled holes. The bracket itself is quite narrow, making it impossible to make it fit the Z4 floorpan by drilling new holes in the bracket. You'd have to drill the floorpan to make it fit the universal bracket. I bought the VAC floor mount adapter. I was considering the Turner adapter as well which looks to be a very similar design and height. The floor mount adapter actually says E36/E46 on it, which I for some stupid reason did not notice until I had it installed. The mounting holes match up to the Z4 floorpan just fine, so hopefully it's the same design. For seatbelt, I decided to keep my stock seatbelt for street and track use. I wanted to reuse my stock seatbelt receptacle, since it contains a sensor which influences the airbag system, along with some pyrotechnics which will put additional tension on the belt in the event of a crash. Research suggested that replacing the stock receptacle with a more basic version would cause issues with airbag deployment. And the pyrotechnic tensioner seemed like a good safety feature to keep. The seatbelt receptacle can be removed from the stock seat using a T50 bit. I needed to clip a zip tie or two to free the wires so that I could remove the receptacle and wires/connector. Not sure if my seat was in the wrong position when I pulled it from the car but the connector couldn't be removed without removing a bracket underneath the seat which was secured with two T25 screws which were a bit of a pain to loosen due to low clearance. After I got the little bracket removed I was able to pull the connector out for reuse with the new seat. I could have pulled two wires from the connector and reset them afterwards but I wanted to keep the wires seated if possible. I will be using a Schroth Rallye 4 cross w/wrap ends 4 point harness for autocross use. The "harness bar" system I am using is not street legal and kind of pieced together so I will skip over that for now. To mount the stock seatbelt, receptacle, and harness lap belts, I bought the VAC lap belt mounting bracket kit. The website states that if you have a Z4, you need to buy their factory seat belt replacement kit, which is more expensive and is literally the lap belt kit linked above, with the addition of a basic OEM BMW receptacle, which I'm pretty sure does not include the pyrotechnic tensioner, and might not include the sensor/wiring. So for my purposes, the factory belt replacement kit was not ideal for safety. Since the stock belt and receptacle bolted directly into the stock seat bracket, I needed to buy some nuts to secure to the stock bolts. However, the stock bolts are too short for reuse for this purpose, so I bought new bolts along with the nuts. The stock bolts are M10, the longer bolt for the receptacle is 27mm, not exactly sure how long the bolt is for the seatbelt end (it's too short anyway). So I ordered some very strong bolts, nuts, and washers from McMaster-Carr. Bolts are M10x35mm. 35mm is likely needed for the receptacle bolt since the 25mm I initially bought was too short even before I put the Schroth lap belt on. The RRS seat is a tight fit against the pyrotechnics of the belt receptacle and the transmission tunnel but I am hoping that a little bit of pressure/contact won't mess things up. I think it will be fine. Next step for me is measuring and drilling holes in the universal bracket so that it can be mounted to the VAC floor mount adapters. I'm sure I'm forgetting things but hopefully this information will help answer future questions if someone is planning something similar. I will post another update hopefully soon when everything is finished. |
|
Appreciate
0
|
| 05-14-2015, 12:10 PM | #3 |
|
New Member
2
Rep 27
Posts |
In for Pics! Man, I would love to get sport seats for my Z4, but I don't want to sacrifice my all power memory, and heated seats. lol
__________________
2006 Z4 M Roadster Silver Gray Metallic "The Daily"
1995 325I Alpine White "Project Joy 325" Instagram = Pik Masta |
|
Appreciate
0
|
| 05-14-2015, 04:15 PM | #4 |
|
Lieutenant General
 2280
Rep 12,565
Posts
Drives: Z4 M, X5, GX460
Join Date: Apr 2008
Location: CT
iTrader: (99)
Garage List F15 X5 xDrive35i [8.75]
E86 Z4 M [10.00] F10 550i (Retired) [9.17] F25 X3 xDrive35i (R ... [9.43] E82 135is (Retired) [9.50] E85 Z4 M (Retired) [9.41] E90 328i xDrive (Re ... [9.25] E86 Z4 3.0si (Retired) [9.20] |
If you can find Corbeau mounts and brackets that work for e46 it should work for Z4. At that point the limiting factor would be seat width and how you'll deal with passenger side airbag.
__________________
Follow
|
|
Appreciate
0
|
| 05-14-2015, 04:43 PM | #5 | |
|
Lieutenant
67
Rep 501
Posts |
Quote:
The problem with the Corbeau brackets is that they are pretty high, from what I've heard. The Z4M seats are pretty low stock, so buying a Corbeau bracket would likely raise the seating position a bit. The way I went, I will be sitting a tiny bit lower than stock. If I eliminate the slider then I would gain about 3/4 inch but I'd need to get a custom bracket built. |
|
|
Appreciate
0
|
| 05-14-2015, 04:44 PM | #6 | |
|
Lieutenant
67
Rep 501
Posts |
Quote:
 |
|
|
Appreciate
0
|
| 05-15-2015, 08:06 PM | #7 |
|
Lieutenant
67
Rep 501
Posts |
Some updates with pics.
Here is the bracket that Corbeau sent me as the 1" universal bracket. The label says Porsche, Part# C22059. The label is on the forward side of the bracket. I pulled the sliders off to drill the holes to mate up to to the VAC floor mounts. The blue arrows are the holes for the sliders, the red holes are the ones that I drilled for the floor mount after a lot of test fitting and measuring. The other holes are probably to mount the bracket to the floorpan of some Porsche car. 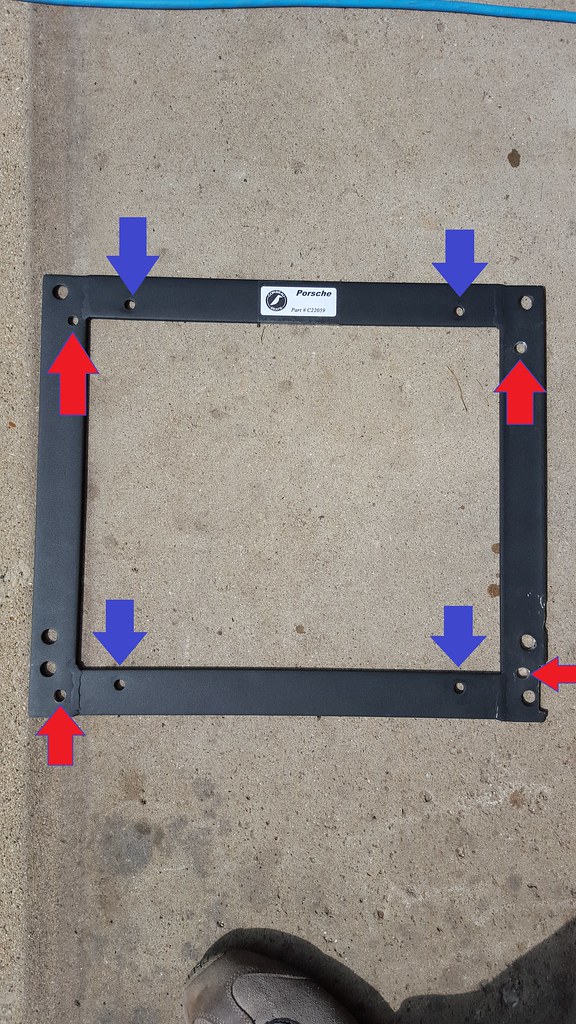 Here are close ups of the holes. It was really difficult to measure where exactly the holes needed to be, for various different reasons. So as you can see, I had to elongate the holes a bit. Red arrow points to the hole that needed to be drilled. Front left: 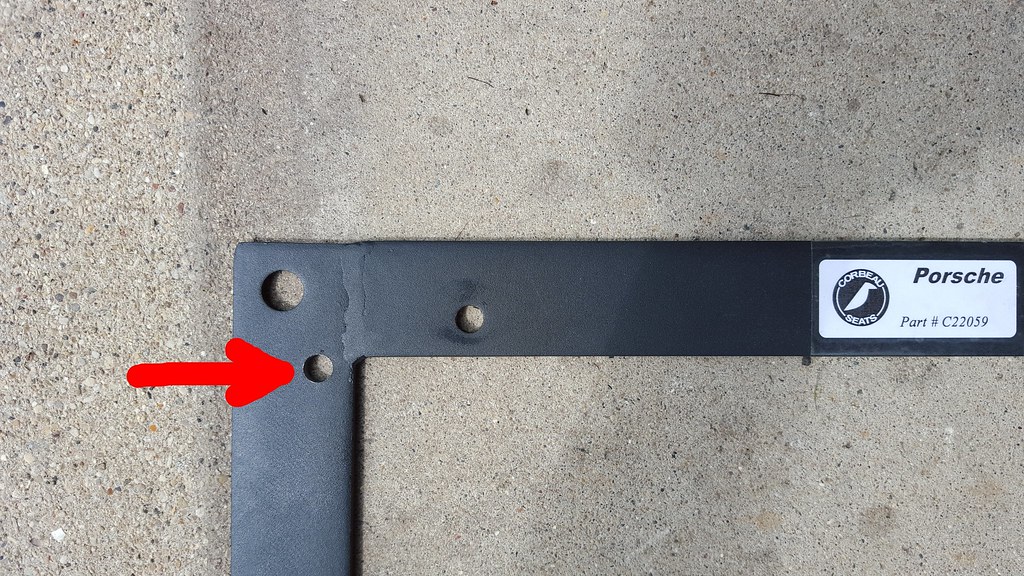 Front right: 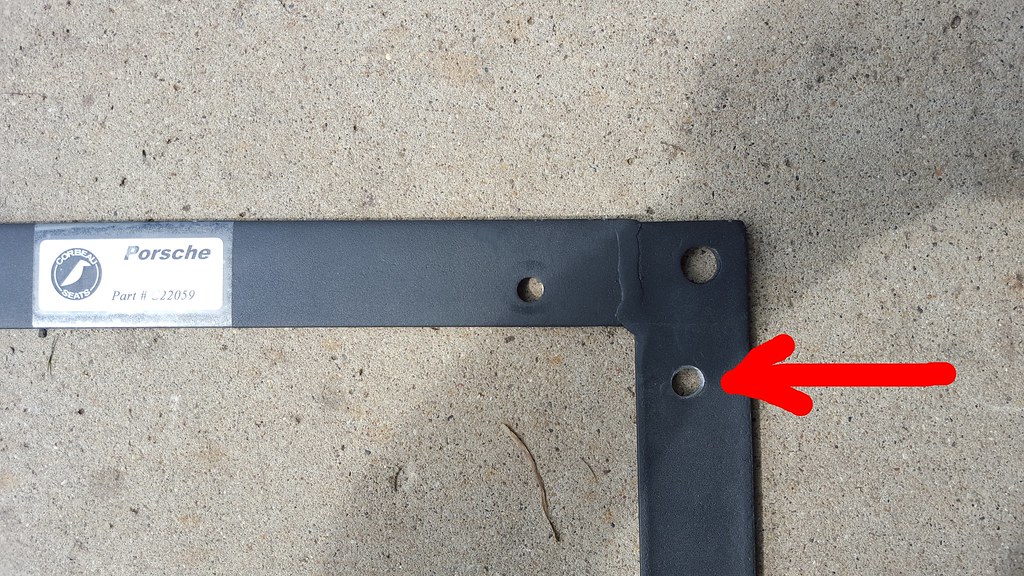 Rear left: 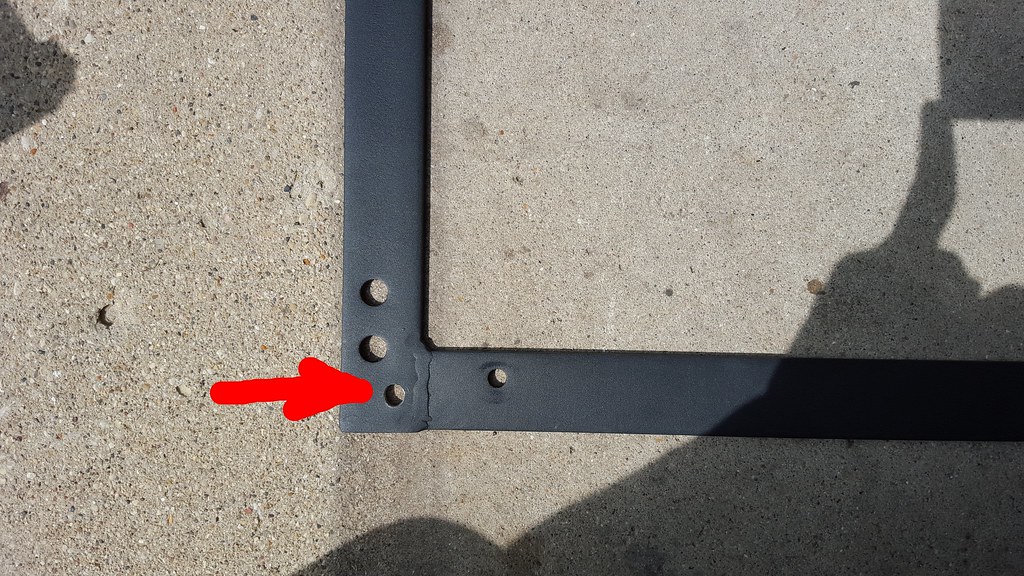 Rear right. Here you can see an area I cut out to give some clearance for the seat belt bracket. The seat belt bracket is on a slider which would allow it to clear on other cars, but the Z4 transmission tunnel is so close to the seat bracket, there is not much room for the bracket to slide out. So I cut out this portion (marked in yellow) to allow the bracket to sit straight forward and centered with the steering wheel. Otherwise the seat would be crooked or offset to the left: 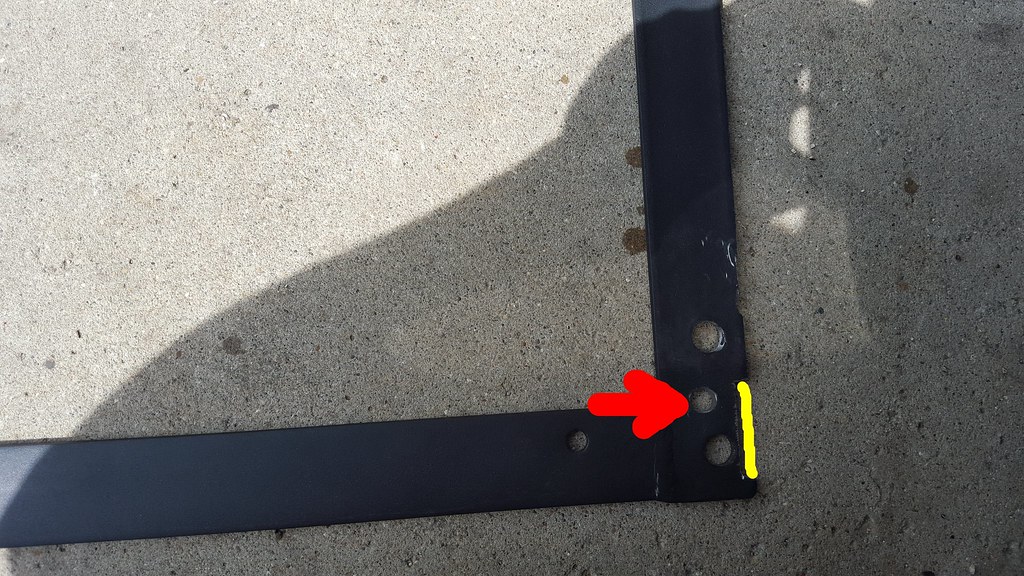 View from above of the VAC floor adapters, seat belt brackets, OEM seat belt and Schroth harness mounted. 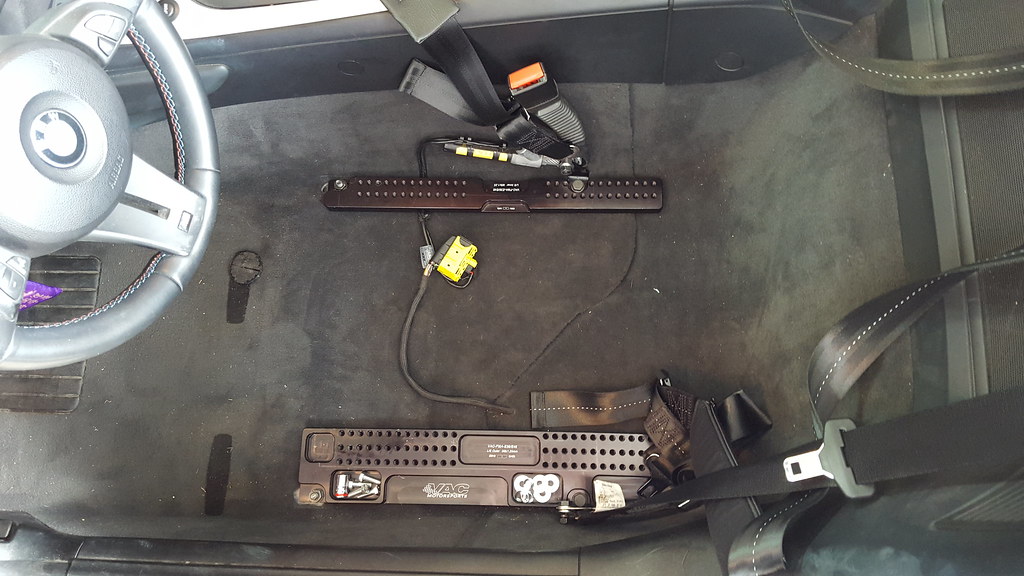 Seat installed w/harness. Harness is only for autocross use and the shoulder straps will be down and tied/wrapped somewhere behind the seat (too lazy to remove the lap belt bolts, so they will stay mounted). OEM seat belt is for street and track use. 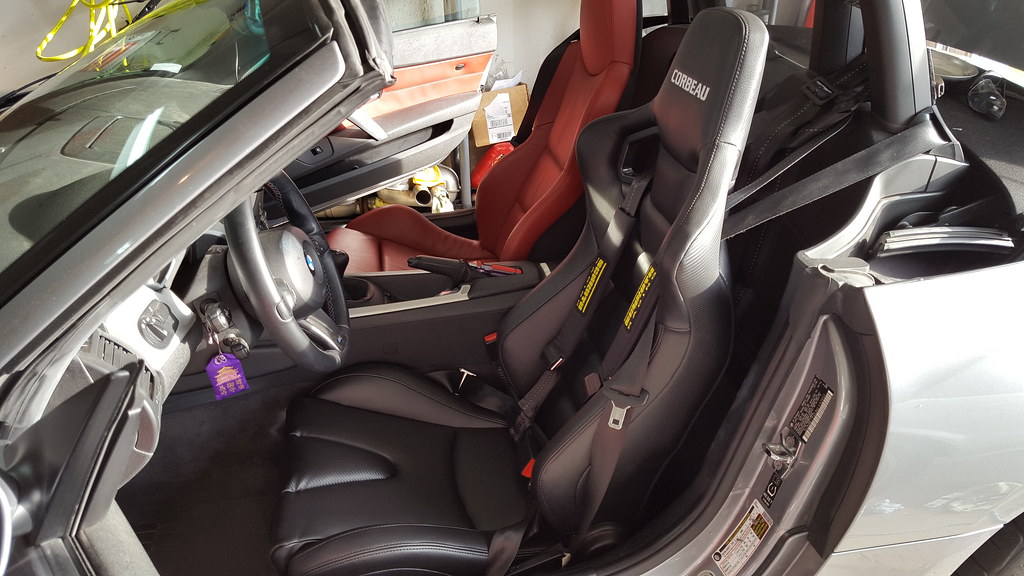 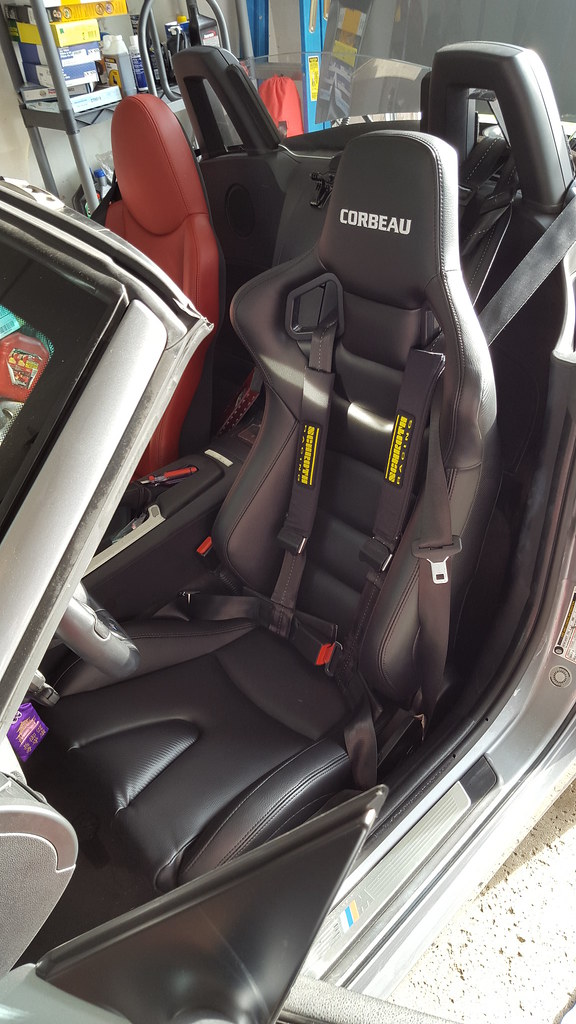 I was a little worried because my battery was disconnected for some time but everything powered up no problem with no loss of memory/settings (other than reset trip odometer). And since I kept the stock seatbelt receptacle with wiring, the car properly senses the seatbelt and pyrotechnic tensioner. |
|
Appreciate
1
|
| 05-16-2015, 06:28 PM | #8 |
|
I plead the 5th.
523
Rep 1,519
Posts |
Really great work here! Appreciate you posting the detailed pics.
This may sound silly but one of my biggest problems with going with racing seats in the roadster is losing the seat heaters. Given my car is street driven, top down at night with the heaters on is just too great a thing to waste! Nice to see these corbeau's have the option for seat heaters and are overall reasonably priced, had a Corbeau in a past car and loved it.
__________________
-Matt
|
|
Appreciate
0
|
| 05-16-2015, 07:14 PM | #10 | |
|
I plead the 5th.
523
Rep 1,519
Posts |
Quote:
Cheers again on the install and posting up the details, I appreciate it. Really having to hold back on purchasing these right now...
__________________
-Matt
|
|
|
Appreciate
0
|
| 05-16-2015, 09:06 PM | #11 |
|
Lieutenant
67
Rep 501
Posts |
Thanks!
Another thing to note... the stock seats really killed my lower back on drives longer than 30 mins long for some reason. I tried adjusting it every way possible to help my back but it would still hurt pretty quickly. I drove in the new seat for 2hrs today with zero lower back pain! |
|
Appreciate
0
|
| 05-16-2015, 09:46 PM | #12 |
|
Down Under!!

1621
Rep 4,294
Posts |
bloody nice seats mate, looks like you did a fine job. tell us more about your harness rig up.
cheers and congrats on your new seats.
__________________
2007 EuroSpec Z4///MC - Building/Developing Z4 GT3
Powered by  |
|
Appreciate
0
|
| 05-16-2015, 10:45 PM | #13 | |
|
Lieutenant
67
Rep 501
Posts |
Quote:
Harness setup is a Schroth Rallye 4 cross with wrap ends. A local guy with a Z3M Roadster fabricated a bracket that sits behind his roll hoops as a makeshift bar for autocross, and it seemed to work well so I asked him to make one up for me. I will take a pic after I paint it but basically it is made out of some bits of steel and kind of looks like a + sign. The horizontal section is what bears almost all of the force of the harness as it sits behind the roll hoop. The top and bottom vertical sections are there only to prevent the bar from rising up or falling down. Although it seems very strong, I would never use it on the street or track because it is untested and generally is not something that I would trust my life to. Since there is pretty much no risk of a high speed collision at autocross, I use it for that only. The first autocross event is in a week so I'll see how it goes then, but for now I did some quick testing in a deserted parking lot and it seems to hold solid for all directions of movement. |
|
|
Appreciate
0
|
| 05-18-2015, 04:58 AM | #14 |
|
Major General

423
Rep 5,327
Posts |
so is the pre tensioner bolted directly to the stock belt reciprocal ??
all you needed was long bolts? The passenger side is where it gets alittle tricky however because of the seat occupancy sensor, would ideally need to have this incorporated to get a plug and play system.
__________________
Z4MR VT2 - Clubsport build.
Multi award winning Detailing | Wrap | PPF specialists UK based - www.topwrapz.com |
|
Appreciate
0
|
| 05-18-2015, 12:44 PM | #15 | |
|
Lieutenant
67
Rep 501
Posts |
Quote:
This is basically what the one on the Z4M looks like (this picture is off of an E36 I believe). 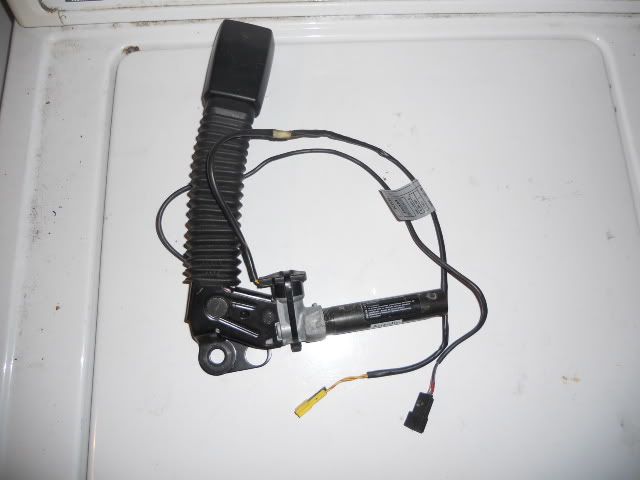 On the stock seat, the part is mounted using the hole on the bottom left. When I do the passenger's side I will build the occupancy circuit thing along with a toggle switch. It appears to be two resistors and a diode, should be pretty simple. Then I can put a switch in and turn on/off the passenger airbag as needed. |
|
|
Appreciate
0
|
| 05-18-2015, 02:39 PM | #16 |
|
Major General
423
Rep 5,327
Posts |
this info is making this much much easier to deal with, its actually not that bad...
so basically if i order myself a seat occupancy mat and get it sewn into the new seat this will make this plug n play basically... id also guess the S/O MAT on the passgener side just plugs into the same harness with the yellow plug. OP are we able to unplug those plugs with the seat in place or is it a case of raise the seat, pull battery terminal, then unplug? where is the seat getting its power from ( same yellow plug ) in terms of difficulty rating 10 being the hardest how hard is this?? invaluable info for anyone wanting to do this..... for the first time I'm actually understanding what needs to be done, and it actually seems like an enjoyable DIY.
__________________
Z4MR VT2 - Clubsport build.
Multi award winning Detailing | Wrap | PPF specialists UK based - www.topwrapz.com Last edited by Beedub; 05-18-2015 at 02:45 PM.. |
|
Appreciate
0
|
| 05-18-2015, 02:40 PM | #17 |
|
Major General
423
Rep 5,327
Posts |
btw the VAC floor mounts look like a really nice piece of hardware.
__________________
Z4MR VT2 - Clubsport build.
Multi award winning Detailing | Wrap | PPF specialists UK based - www.topwrapz.com |
|
Appreciate
0
|
| 05-18-2015, 03:45 PM | #18 | ||
|
Lieutenant
67
Rep 501
Posts |
Quote:
There is no occupancy sensor for the drivers side (in the US at least). There are 2 pairs of wires that come from the seat belt receptacle... one to sense whether the seat belt is fastened or not, and the other to trigger the pyrotechnics if necessary. From what I've read online, you can't buy the occupancy sensor separately from BMW... you have to find a donor seat to pull it out, or maybe try an aftermarket one. I personally am choosing to try to solder an emulator box with switch. I haven't pulled the passenger's seat yet (and won't until later this season) but yes I am pretty sure that it plugs into the same yellow harness under the seat. Regarding unplugging the harness with the seat still in place... I did not attempt that so I can't say, unfortunately. If I were to try that, I would move the seat all the way up and back to see if it gives you more room. However make sure to unplug the battery before disconnecting the harness because you will trip the airbag sensor even with the car off, if the door was recently opened, etc. Yes, the seat was getting its power from the yellow plug. It was the only thing plugged into the seat. In terms of difficulty, it is pretty easy. It is frustrating at times, because you want the seat to be perfectly centered and not skewed one way or the other, and having to measure/mark/drill the bracket is a pain because you can't really sit in the seat when it's not bolted down without moving the bracket, which would throw off your measurements, and you can't measure anyway without fully removing the bracket from the seat. So what I did was first rest the seat with bracket mounted on the floor plate, and then mark with a pencil on the floor bracket, the outline of the outermost corners of the bracket. Made sure the seat was properly positioned first (distance forward/back). Then I took the seat out, removed the bracket from the seat, and then lined up the bracket alone and double checked that it was centered with the steering wheel. Then I outlined the entire bracket on the floor plate, outlined the existing holes (so that I could decide where to drill new holes, keeping a safe distance from edges and existing holes). Drilled them but they had to be filed/dremeled out a millimeter or two in various directions so that all 4 bolts could be installed at the same time. I would say on a scale of 1-10, it is about a 3 in terms of actual difficulty. It's not so much that you need to know about how to remove a brake rotor, adjust valves, etc... it's more about measuring everything and getting it to fit together. So not much mechanical knowledge is needed, just patience, and an obsession with fitting everything and making sure everything is centered. I'm glad that the thread is helping you. I spent a lot of time researching/asking questions without finding too much info, to the point where I decided I was just gonna do it and see what happens. Some more things to note... the stock seats are decently low already, so if you are trying to gain vertical clearance you will need to be careful with what seat and mounting brackets you choose. For reference, the seat I chose had a base height of 2.5". This means that if you put the seat directly on the floor, the seat surface would be 2.5" higher. This is pretty low, lower than many other seats. Add 0.75" for the VAC adapter, 1" (specified) for the Corbeau bracket/sliders, and you have a minimum of 4.25" from floor to seat surface. Note that other seats have base heights of ~4.0" or so, but are usually side-mount so I imagine it is easier to drill the side mount brackets to get the seat lower, provided the mounting points are low enough on the seat. Also for the Z4, it is a pretty narrow cockpit. I didn't really think about it because it seems spacious enough, but the seat I got is on the narrow side, and it JUST clears the transmission tunnel. It might even be rubbing it a bit. The kidney bolsters, no problem, fit. The shoulder bolsters are maybe about 0.5" from hitting the door when closed. I will measure the clearances later and get better numbers, hopefully to help out with yours/others' seat choices in the future. Quote:
|
||
|
Appreciate
0
|
| 05-18-2015, 03:58 PM | #19 |
|
Major General
423
Rep 5,327
Posts |
such good info, the occupancy mat is readily available over here in the UK.
This whole thing would be even easier for me as id use the carbon fibre and tiny tillet Race seats, once you've bolted the floor mounting hardware they have their own slider / side fixings so it would be much easier to just bolt in.... with the tiles being so light id probably stump up the extra and just use their sliders for better adjustments. heres some in a z4m.... perfect fit and insanely light, now if i could get a a P/O MAT to tillet and ask them to incorporate it at manufacture id basically have a plus and play setup. 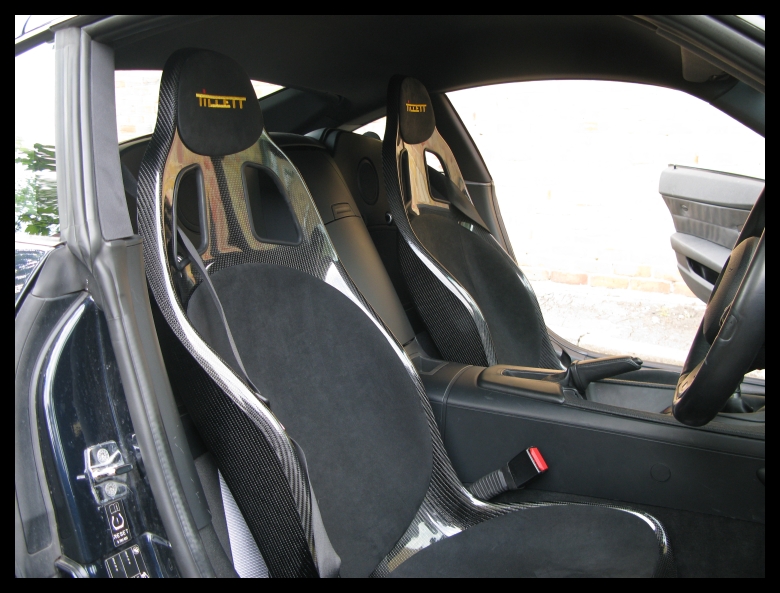
__________________
Z4MR VT2 - Clubsport build.
Multi award winning Detailing | Wrap | PPF specialists UK based - www.topwrapz.com |
|
Appreciate
0
|
| 05-18-2015, 04:01 PM | #20 |
|
Major General
423
Rep 5,327
Posts |
lastly is the wiring tucked up under the seat? or easily accessible? I'm assuming centre the seat, lift up high and its clearly visible or centre and loosen bolts rock back then unclip harness?
lastly to get at the actual seat mountings on the stock seat ( the bolts that hold it down,) is their a specific position that makes this easier? dead centre and high up?
__________________
Z4MR VT2 - Clubsport build.
Multi award winning Detailing | Wrap | PPF specialists UK based - www.topwrapz.com |
|
Appreciate
0
|
| 05-18-2015, 04:03 PM | #21 |
|
Major General
423
Rep 5,327
Posts |
thanks again, finally have info that means i will give this a go now.
__________________
Z4MR VT2 - Clubsport build.
Multi award winning Detailing | Wrap | PPF specialists UK based - www.topwrapz.com |
|
Appreciate
0
|
| 05-18-2015, 04:17 PM | #22 | |||
|
Lieutenant
67
Rep 501
Posts |
Quote:
Quote:
One thing I should have done was move the seat back forward to center it before removing it from the car... as it is now if I sit on the stock seat in my office, it will tilt start to tilt back too easily if I put my weight back. Quote:
|
|||
|
Appreciate
0
|
Post Reply |
| Bookmarks |
|
|