| BMW Garage | BMW Meets | Register | Today's Posts | Search |
|
|
|
 SUPPORT ZPOST BY DOING YOUR TIRERACK SHOPPING FROM THIS BANNER, THANKS! |
|||||||||
Post Reply |
|
|
Thread Tools | Search this Thread |
| 05-30-2010, 05:57 PM | #1 |
|
Second Lieutenant
 42
Rep 250
Posts
Drives: '07 Imola Red Z4 MCoupe
Join Date: Feb 2010
Location: El Dorado township, CA
|
First Mod - Ultimate Pedals (heel-toe extension)
As I type this, Finnegan is outside installing the pedals on my Z4MC
 (I had intended to do it myself, but woke up feeling crummy and he went to it... I figure if I clean around the house it should make up for it). Photos coming from me soon, and I can ASSURE you that Finnegan has some tips and input to add on this thread. (I had intended to do it myself, but woke up feeling crummy and he went to it... I figure if I clean around the house it should make up for it). Photos coming from me soon, and I can ASSURE you that Finnegan has some tips and input to add on this thread. I hear vacuuming - that can only mean one thing! *grabs camera*  Okay, first the finished work! Perfectionists will note that the brake and clutch have different screw holes in use. There's a reason for this which Finnegan will touch on in his post.
__________________
~Krissi~ '07 Imola Red Z4 MCoupe
 Eisenmann Sport Exhaust | RE X-Pipe | RE Transmission Mounts Last edited by Skelekitty; 06-01-2010 at 02:15 AM.. |
| 05-31-2010, 06:01 PM | #2 |
|
Dog Listener

701
Rep 7,850
Posts |
So I ended up going out enjoying the car last evening, got home late, and we went for a hike today, and didn't update. Sorry guys.
These pedal extensions are fantastic! Feel is improved considerably (solid vs. semi-solid rubber surface), and it's a breeze to heel/toe. It's so easy and so natural now. In fact, I find I have to keep more foot on the brake or I get too much "blip"--which is a good thing since gives more confidence in terms of braking. Regarding the screw placement on the pedals....on Skelekitty's car, the brake pedal is metal while the clutch is plastic. Yes, the entire pedal and lever are plastic! I'll be interested to hear what others find. In any case, given the differences in flexion between clutch pedal and brake and the size of the drill I was using (use or borrow a small drill), getting to the top outside on the brake wasn't possible, and the bottom left had a bit of structure behind the pedal that made "freehand drilling", even with using a center punch, more iffy that I was comfortable with. I might go back later and re-do the holes, but Skelekitty said it's about function, not looks for her. The pedals are tightly locked down even with this configuration so there are no safety worries.... Now on to the DIY. First, this is intended as a supplement not a replacement to the manufacturer's instructions. Please read and follow those (standard legal disclaimer) as your pedals/car may be different, blah blah blah. Things you'll need for the job or that will make it easier:
Recommended Screw Locations for Pedals See InTgr8r's post for recommended screw locations (2 posts down). Dead Pedal This is the easiest to do. It's held on by velcro, and has "fins" to prevent lateral movement, so just get your fingers under it a bit and apply steady force straight back towards the seat. Apply tape to the plastic dead pedal, and fit the pedal over it. Use a sharpie or pencil to mark the tape. Auto punch the plastic on the tape markings, and clear away the tape. Place on wood block and drill with 1/8" bit, then 3/16". I've done this two ways: screws and velcro. Screw method: I selected areas where the nuts would be next to structural pieces on the back (avoiding the velcro), and whittled off one area so the nut would snugly fit. I should have taken a picture, but it should be possible to gauge the areas I selected by looking at the screw placement. Place the dead pedal back in place and lock it in with the velcro. Velcro method: I had some industrial strength velcro lying around and just attached the dead pedal with this (clean surfaces well before applying). You don't get the look of the screws being in place, but it works well and seems very solid. Will report back in 6 months on durability. (Update: Still holding on strong!) Throttle Use the same approach as with the dead pedal (tape, marker) but brace the throttle pedal with a wood block so it won't move, then use the auto punch. Since the throttle is plastic, I decided to use the self-tapping screws rather than screw/nut, and simply drilled a 1/8" hole and then screwed the new pedal on. There is ample clearance for this behind the pedal, the plastic is thick and solid, and the self-tapping screws provide a snug fit. (I'll check the condition frequently and see how it holds up. If there is any sign of loosening I'll just go back and use a screw/nut.) Those of you who are conservative may want to do this right from the start. Although the attaching the nut on the bottom will be a challenge--see "brake" for suggestions on making that easier. Brake Remove the rubber cover. Use the same approach as with the others (tape, marker) but brace the throttle pedal with a wood block so it won't move, then use the auto punch (a couple of times helps). Drilling here takes patience, and you want to make sure you have the pedal well braced. Start with the 1/8", then move to the 3/16". Note, starting the drill moving before you hit the hole with the 3/16" bit keeps it from seizing up. I selected holes based on where it seemed the drilling would find a flat surface behind the pedal (pedal is not smooth on the backside), and to avoid thinner sections, and to accommodate the amount of room I had to work with. (IMO there is probably no "wrong" holes to use as long as two are some distance apart.) This is where the (small) metric sockets come into play. I have a short thumb wheel extension. Using that and a Phillips screwdriver you just turn the thumb wheel and it's easy to tighten. Since these are nylok nuts (smart and safe), you have to find something to hold them while the screw is tightened. I found getting the nut + washer on pretty easy (I have good finger dexterity though), but getting and more importantly keeping the wrench in place was difficult. The mirror comes in very handy here, as does a lot of patience! I found that I'd get the nut under control only to find I then was out of position to tighten the screw and tangled up, then I'd move, and lose my lock on the nut. Grrr... Solution: the mini vice-grip! This allowed me to lock down on the nut, reposition myself, then hold the vice grip while turning the screw. Alternate Marking/Drilling Method: Since the surface of the pedals are curved, one way to get excellent results is to clamp the new pedal to the existing pedal and then use the pedal holes as drilling guides. The drill bit does want to wander even with the center punch method, and this allows for drilling on the outer edges with accuracy for outer 4 corner fastening. Note: Clamps should be cushioned to avoid marring the metal, use caution and care as even with this method the drill bit wants to wander and aluminum is soft and it's hard to keep it in place even with the clamp....(Thanks Intgr8r!) Clutch Remove the rubber cover. Same concepts as the others, but since this one has a lot more movement, it's extra critical to brace it correctly with the blocks. Otherwise you risk messing up or more importantly injuring yourself. (If your clutch pedal is metal then the same steps as with the brake apply here and the next steps do not apply to your case.) The plastic pedal is "round" on the back, so using the screw + nuts really isn't a good option (the nut would dig into the pedal on an angle, risking breaking the pedal. So I used 1/8" bit only and then the self-tapping screws. Fit is nice and tight, and I'll check it from time to time. I may go back and do two more screws to really make sure there is no play and to distribute the load. In fact, I recommend using 4 screws to start with if you have a plastic pedal since it's so easy when using the self-tapping screw method. (Although if you're a visual perfectionist you'll end up having to put on 4 screws/nuts on the brake then--which is 2 x more "fun" with those nuts...). Summary All and all it's pretty easy mod to do and the results are well worth it. In fact, I'd say this is a "must have" mod since it makes it so much more fun to drive the car. It's so easy to heel toe now and to consistently get the exact throttle blip you want. Plus, as noted above, I have more control and confidence since more of my foot is on the brake. Besides, it looks great as well! This is how the car should have come from the factory! Feedback welcome, and if there's anything amiss here (or if there are variations) let me know and I'll update this as needed. Photo 1: Using blocks on brake pedal, knee pads, carpet, drill Photo 2: Mirror and auto punch Photo 3: Tight quarters! Photo 4: Bracing throttle, close up of crazy-ass plastic clutch pedal Photo 5: Painter's tape on clutch pedal Photo 6: Job site supervisor who is not happy with my asymmetrical screw pattern on the brake/clutch! (Also, gotta love that super-tacky "bee" lawn ornament in the planter box--so damn tacky it's cool!  ) )Last edited by Finnegan; 11-16-2012 at 12:55 PM.. Reason: Added tips and corrections from Intgr8r; Added Velcro Method and Other Easy Install Tips |
|
Appreciate
1
|
| 05-31-2010, 11:19 PM | #3 |
|
Long Live the 1911
46
Rep 643
Posts
Drives: Hooptie
Join Date: May 2007
Location: USA
|
Good to know! Did you get the upper toe extension? Rubber inserts? Smooth or textured finish?
|
|
Appreciate
0
|
| 06-01-2010, 02:12 AM | #4 | |
|
Dog Listener
701
Rep 7,850
Posts |
Quote:
My take--great grip (was wearing Chucks), great feel, totally worth it. |
|
|
Appreciate
0
|
| 06-01-2010, 06:35 AM | #5 |
|
Lieutenant General
 
2427
Rep 11,667
Posts |
Nice writeup
 FWIW Just a couple of notes from my previous install. ('06 M Roady) My throttle pedal was more of a soft plastic and I installed the alum pedal over top of it. I didn't remove anything. I liked this because it elevated the plane of the peddle making h&t easier. On the clutch & brake; I wedged blocks in behind the pedal AND in front. That held it in a partially down position to drill the top holes. Also, I clamped the alum pedals in position and used them as a drilling template. This after trying the center punch method proved difficult due to the non-flat surface of the pedal under the rubber. (even with a center punch the drill wants to walk away out of position) This is is the result. 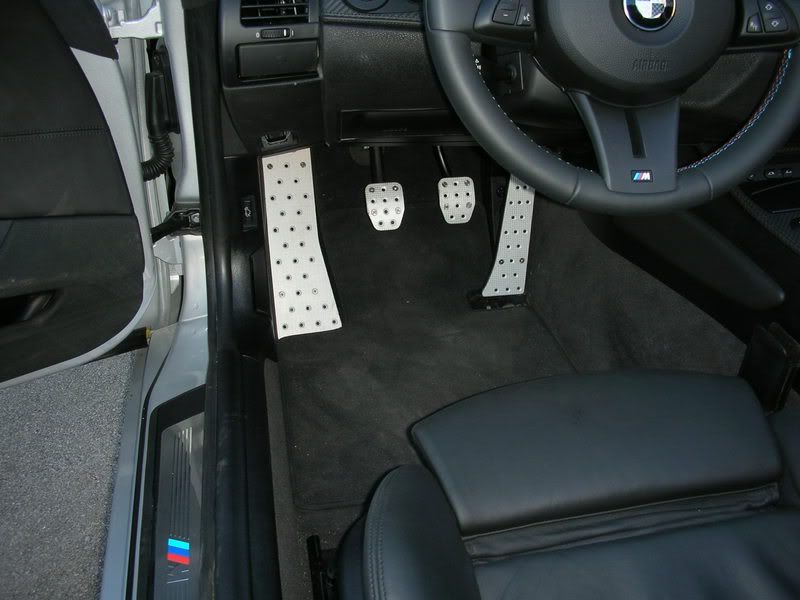
__________________
'21 M2C Hockenheim Silver
'18 718 Cayman S Lava Orange (sold) '13 E92 M3 Santorini Blue (sold) '07 Z4 M Coupe Alpine White (sold) |
|
Appreciate
0
|
| 06-01-2010, 12:13 PM | #6 |
|
Dog Listener
701
Rep 7,850
Posts |
Great idea on using the pedals as a drilling template! You're right, the drill bit does want to wander on the brake and clutch, and your method would allow for easy drilling on the outer corners. (I assume you used something like cushioned workworking clamps or cushioned a C clamp to avoid marring.)
RE: throttle, I did not actually remove a "cover" (note to self, do not write DIYs late at night on three day weekends.) Did you find the clutch pedal was plastic? Thanks for the tips--this should make it easier for others to get excellent results! I like your decision on the screw locations better too (so does the supervisor).  DIY has been updated with your improved information and corrections. Nice work! Last edited by Finnegan; 06-01-2010 at 12:28 PM.. |
|
Appreciate
0
|
| 06-01-2010, 12:26 PM | #7 |
|
Lieutenant General
2427
Rep 11,667
Posts |
Yes clutch was plastic.
Some caution is still necessary using the alum. pedal as a template. Alum. is soft so it's still a bit of a struggle to keep the drill bit in place.
__________________
'21 M2C Hockenheim Silver
'18 718 Cayman S Lava Orange (sold) '13 E92 M3 Santorini Blue (sold) '07 Z4 M Coupe Alpine White (sold) |
|
Appreciate
0
|
| 06-01-2010, 04:47 PM | #8 |
|
First Lieutenant
21
Rep 352
Posts |
Finnegan, and Skelekitty, Thanks for the post...
I had been thinking of changing my pedals and these might be what I want. I had not seen inTgr8r's post in the past, should have searched. The wider Throttle pedal would make heal toe a breeze... (or easier anyway) Anyway, looks good!
__________________
 OEM Strut Brace / UUC SSK / Zeck CDV / Clutch Stop / ZHP Shift Knob / Stubby Ant / Top Covers / Dinan K&N / M Seats / SP / PP |
|
Appreciate
0
|
| 06-02-2010, 08:18 AM | #9 |
|
Brigadier General

2070
Rep 4,365
Posts
Drives: '07 Z4 Coupe, '21 X3, '16 GMC
Join Date: Aug 2007
Location: Iowa
|
Looks great, good DIY as well!
__________________
2007 Z4 3.0si Coupe 6 MT Black Saphire Metallic PP SP
2016 GMC Sierra SLT Z71 Premium Plus 4x4 2017 Harley StreetGlide Denim Black V&H Tune 2021 BMW x30i Phytonic Blue Metallic Fully loaded |
|
Appreciate
0
|
| 06-02-2010, 02:24 PM | #10 |
|
Long Live the 1911
46
Rep 643
Posts
Drives: Hooptie
Join Date: May 2007
Location: USA
|
Sorry for the shameless plug, but there's a group buy for the Ultimate Pedals going on right now. It's due to close on 6/6/10.
http://www.zpost.com/forums/showthread.php?t=387373 |
|
Appreciate
0
|
| 06-02-2010, 06:57 PM | #11 | |
|
Second Lieutenant
42
Rep 250
Posts
Drives: '07 Imola Red Z4 MCoupe
Join Date: Feb 2010
Location: El Dorado township, CA
|
Quote:
Oh, and TOTALLY off topic.... 
__________________
~Krissi~ '07 Imola Red Z4 MCoupe
Eisenmann Sport Exhaust | RE X-Pipe | RE Transmission Mounts |
|
|
Appreciate
0
|
| 07-01-2010, 08:51 AM | #13 |
|
Long Live the 1911
46
Rep 643
Posts
Drives: Hooptie
Join Date: May 2007
Location: USA
|
I installed my pedals last night and the grip is amazing -- like wrapping skateboard tape over everything. I can better modulate and control the clutch pedal now for smoother shifting. They are pretty pricey, but definitely worth it IMO.
I used the self-tapping screws for everything except the brake pedal, which was the most time-consuming to do because it is a curved piece of metal. As such, I was only able to drill holes at the bottom of the brake since the drill bit kept wandering around at the top. But for all the other pedals, it made things easier by clamping them down and using them as a drill template. Thanks to Finnegan for this DIY guide |
|
Appreciate
0
|
| 07-03-2010, 05:34 PM | #14 |
|
Dog Listener
701
Rep 7,850
Posts |
You're welcome! And I'm glad you're finding the control increases like I did. It really does give on more confidence when driving!
I agree, the brake pedal was a PITA. The auto-punch set to maximum + 3-4 punches really helped keep things from wandering (as you can see, I also went toward the middle of the pedal--less curvature). But even then it was a ***ch to get done. I'm still loving this mod--if and when I get to drive the car that is!  |
|
Appreciate
0
|
| 07-04-2010, 12:55 PM | #15 |
|
Skull Squadron Leader
306
Rep 2,031
Posts |
Ahhh... brings back memories...
Nice writeup guys! The whole DIY can be a PITA since you're working in a tight compartment (esp the bottom right of throttle pedal), but in the end it's so worth it! We really need to do a meet now :-) We can compare our goodies LOL And dude... get your own MC already!!! 
__________________
  |
|
Appreciate
0
|
| 08-03-2010, 03:02 PM | #16 |
|
New Member
0
Rep 6
Posts |
new, better grip pedals will be my first mod. I'm assuming most people would recommend replacing the actual pedals vs. using clips?
Any suggestions other than the above? (which, incidentally, looks really good ) |
|
Appreciate
0
|
| 08-27-2010, 07:11 PM | #17 |
|
Lieutenant
9
Rep 452
Posts |
I installed them and these are the best. I paid a little extra and had the 'M' logo machined in. I did not opt for the extended throttle to accomodate heel/toe. One thing I noticed is that the brake is now naturally on the same plane as the throttle. The new aluminum throttle plate screws over the old plastic throttle. This is a safety heads-up for people (like me) who need to pay attention when braking to make sure their foot is all the way over on the brake pedal, otherwise they are going to risk depressing the throttle unintentionally when they brake. It's something you get used to over time, but could be a nasty surprise if you're not aware of it at the beginning.
|
|
Appreciate
0
|
| 09-01-2010, 11:11 AM | #18 | |
|
Dog Listener
701
Rep 7,850
Posts |
Quote:
Yeah, I had that experience at my first stop sign with the throttle. But the clutch was all the way in, so I just realized I'd have to adjust a bit. Not a big deal if, as you say, you realize it and adjust. The trade off is that when heel/toeing you can actually keep way more of your foot on the brake (I use the "roll-over" not true heel/toe method). Without the pedals I never felt I had enough foot on the brake; now with the adjustment I think it's actually safer. |
|
|
Appreciate
0
|
| 10-21-2010, 12:27 PM | #19 |
|
Car Guy

31
Rep 796
Posts |
I found that using a Dremel with a small drill bit at medium to high speed to dimple the metal brake pedal worked better than a center punch given the limited working area......using the pedal as the guide.
__________________
|
|
Appreciate
0
|
Post Reply |
| Bookmarks |
| Tags |
| diy, ultimate pedals |
|
|