

| BMW Garage | BMW Meets | Register | Today's Posts | Search |
|
|
|
 SUPPORT ZPOST BY DOING YOUR TIRERACK SHOPPING FROM THIS BANNER, THANKS! |
|||||||||
Post Reply |
|
|
Thread Tools | Search this Thread |
| 01-17-2010, 05:35 PM | #1 |
|
flying things.

18
Rep 93
Posts |
My truly stealth Superleggera Z4MC Subwoofer Install
i've seen more and more "sub install" posts lately and thought i'd post up some photos of my install.
needless to say i was dissatisfied with how most all of the other sub installs used up a significant portion of the trunk and left unwanted wiring or amps exposed... i also didn't want to add a ton of excess weight which i notice seems to be a given in almost every sub install i've seen on any car before, the usage of wood in a car makes me shudder, but c'est la vie, audio shop people are by no means engineers. thankfully, i am! well... sort of.. so without further ado, i give you my jl 8w3v3 superleggera!  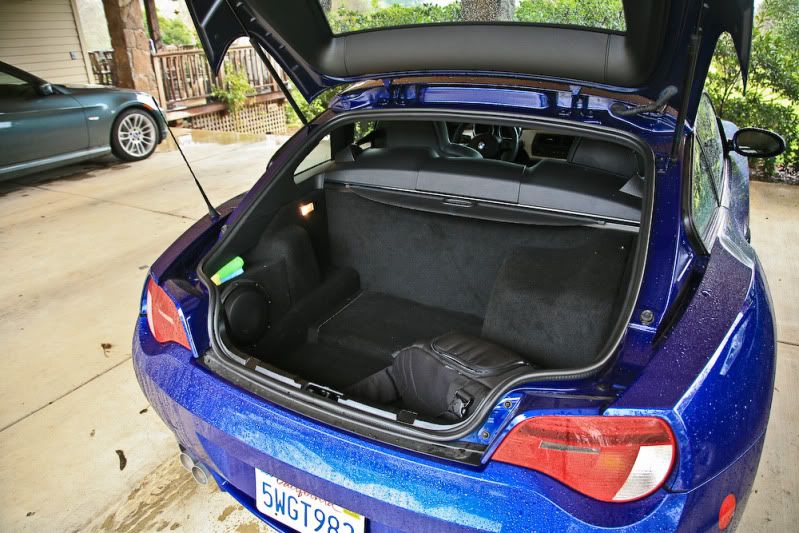 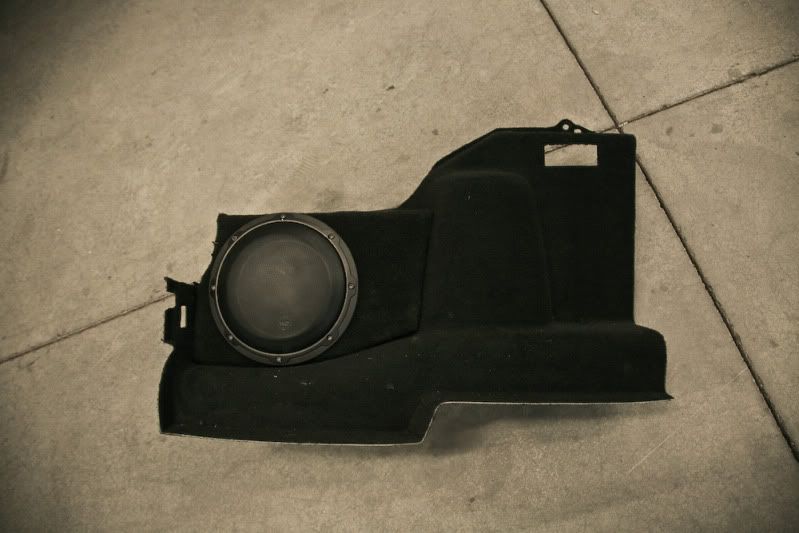 to total weight on the sub, enclosure and all, came in at exactly 10.0 pounds, the stock "subs" which i removed, came in at 14.6, so i came out 4.6 pounds ahead. my trick? using what we use in the aviation world, fiberglass/carbon fiber/composite reinforced honeycomb, it comes out being absurdly strong while very light(and only using 2 layers of glass or carbon)  and to get a perfect mold to the shape of the interior panel, i used a neat trick of covering the entire area the sub would sit in with painters tape, it won't let any resin seap through to the carpet and doesn't stick to the fiberglass/resin all to well, so once your part is cured you simply pull it out then peel the painters tape off your piece, then reinforce from there once you have your basic shape. as for the amp, i got this little guy and followed the instructions in the sub install thread on bimmerfest, just tapping in to the left/right audio feeds and the signal wire.. then hooked them up to this nice little compact guy,  (image is a link) total cost was under $300.00, and i couldn't ask for a greater improvement to the sound in the car... i've never done a sub install/audio work in a car before but this just came out brilliantly, i'd say it's a must for any z4mc owner. it's unbelievable just how much "bump" that little 8" sub kicks out... and it integrates so well, once you get the appropriate level of bass you want(on average) you can use the cars EQ/bass control to adjust it according to the song(if you need to) though i'd do that sparingly as it changes the "semi subs" in the cabin a bit with them too. |
| 01-18-2010, 07:05 AM | #2 |
|
Private First Class
 5
Rep 145
Posts |
Nice work!
I did a similar install in our S2000 with a custom box, used a JL sub and amps, can't say enough good things about JL products! I plan to do a complete install in our Z as well, thanks for the tips on making the box. |
|
Appreciate
0
|
| 01-18-2010, 11:24 AM | #3 |
|
Captain
 
32
Rep 606
Posts |
Make a mold!
Great work. My kinda install. Does the box remove easily?
__________________
|www.onehotlap.com|Real People|Real Cars|
|
|
Appreciate
0
|
| 01-18-2010, 12:11 PM | #4 | ||
|
flying things.
18
Rep 93
Posts |
Quote:
the previous owner went a little over the top on the install.  and yeah if you ever have any questions during the process of making your box just post in here and i can give all the advice i can on composites. Quote:
if anyone wants a box similar to mine(i can change things like the size for larger subs or different tones if needed) then i'm open to the possibility of selling them. i am afterall a starving college student so i've gotta make some money some how. |
||
|
Appreciate
0
|
| 01-18-2010, 12:47 PM | #5 |
|
Private

0
Rep 58
Posts |
Interested in box! Let me know price via PM Thanks!
Just looked a little closer and realized that you are local, so if you'd like I could even leave the car at your hangar!!! Last edited by Getssum96; 01-18-2010 at 12:49 PM.. Reason: more info |
|
Appreciate
0
|
| 01-18-2010, 07:34 PM | #7 |
|
Lieutenant General
 2282
Rep 12,565
Posts
Drives: Z4 M, X5, GX460
Join Date: Apr 2008
Location: CT
iTrader: (99)
Garage List F15 X5 xDrive35i [8.75]
E86 Z4 M [10.00] F10 550i (Retired) [9.17] F25 X3 xDrive35i (R ... [9.43] E82 135is (Retired) [9.50] E85 Z4 M (Retired) [9.41] E90 328i xDrive (Re ... [9.25] E86 Z4 3.0si (Retired) [9.22] |
i would so pay for one of these assuming the m-coupe and non-m could use the same enclosures.
__________________
Follow
|
|
Appreciate
0
|
| 01-19-2010, 02:26 AM | #8 | ||
|
flying things.
18
Rep 93
Posts |
Quote:
Quote:
|
||
|
Appreciate
0
|
| 01-20-2010, 11:13 AM | #9 |
|
Colonel
 441
Rep 2,747
Posts |
Looks great,
I'm doing an 8W3 in the same spot and getting rid of the stock subs. damn, you beat me to it. 
__________________
LINK TO 07 IR PHOTO JOURNAL:http://www.zpost.com/forums/showthread.php?t=1303735
LINK TO 06 IB MOD JOURNAL:http://www.zpost.com/forums/showthread.php?t=403119 |
|
Appreciate
0
|
| 02-14-2010, 02:01 AM | #10 |
|
Captain
40
Rep 969
Posts |
OP, that looks great! The only way I'd do it, if I were to ever install some ICE.
__________________
911 Carrera project car
Previous: E92 M3 ZHP - Sold E86 Z4M - Sold E36 M3 - Sold |
|
Appreciate
0
|
| 12-11-2012, 08:15 PM | #14 |
|
New Member
7
Rep 26
Posts |
Hate to revive a thread from the dead but I'm really interested in building something identical to this. OP, any chance you have the plans from your build or maybe some insight on how I could replicate this?
I want to fill out the low end of the sound system but I also need my trunk. With your solution it seems you can have cake and eat it too. |
|
Appreciate
0
|
| 12-11-2012, 08:45 PM | #15 | |
|
flying things.
18
Rep 93
Posts |
Quote:
If you want to make this the easiest way possible, completely seal and protect the area you want to work with, then fill it with any sort of mildly expanding foam, then use that foam as a plug for your completed box. In step by step form, this is what I'd do: 1. Put down a first layer of painters tape against your car's trunk liner, then build off that with more layers of tape to make a nice solid barrier between the cavity that you'll be filling with foam and your trunk liner, this is to make sure no foam can seep through and bond to your trunk liner. 2. Cut out some plastic or wood panels to act as walls in conjunction with your tape barrier, these walls should work with the tape to make a nice cavity for you to fill. 3. Coat all the interior surfaces with a mold release wax or other compound. 4. Get a can of "Great Stuff" sealing foam and start to fill the cavity from the bottom up, leaving a decent amount of room at the top for you to get the foam plug out when it's complete. 5. once the temporary foam plug is done curing, remove it from the cavity. 6. Now that you have a foam plug of all the complex curves you need to build off of, You can then coat that plug in fiberglass or whatever you feel like using, and if you really want to get fancy, vacuum bag it. 7. Once you have a composite portion of the complex curves complete, you can just attach on the solid faces of honeycomb or whatever material you'd like to use in roughly the same previous locations of the last panels you made up to seal the chamber. in the M Coupe (and most cars) you just get away with having the face and top in honeycomb. 8. Once you have a completely sealed box, put some reinforcing glass around all the seams (don't want any air leaks!). At this point your box is 85% done, just cut holes where you need to and then coat it in some carpeting material (available at most any audio stores where they do this sort of work). I just used some spray 77 and stuck the fabric right on. I found some photos of the box in progress, nothing very useful though. they're showing something around step 7. I've been able to fit some of my 6' talls friends back there when the occasion called for it. I think the tallest being something around 6'2", needless to say he wasn't comfortable, especially when the subwoofer started to bump...
__________________
 |
|
|
Appreciate
0
|
Post Reply |
| Bookmarks |
|
|


")


