| BMW Garage | BMW Meets | Register | Today's Posts | Search |
 |
|
|
 SUPPORT ZPOST BY DOING YOUR TIRERACK SHOPPING FROM THIS BANNER, THANKS! |
|||||||||
Post Reply |
|
|
Thread Tools | Search this Thread |
| 12-12-2007, 11:56 PM | #1 |
|
Private First Class
 28
Rep 139
Posts
Drives: '12 E92 M3 / '20 X5 M50i
Join Date: Aug 2006
Location: Seattle, WA
|
Homelink Install
Here is my variation of the really cool idea posted by DaveZ on bimmerfest - http://www.bimmerfest.com/forums/sho...d.php?t=226233
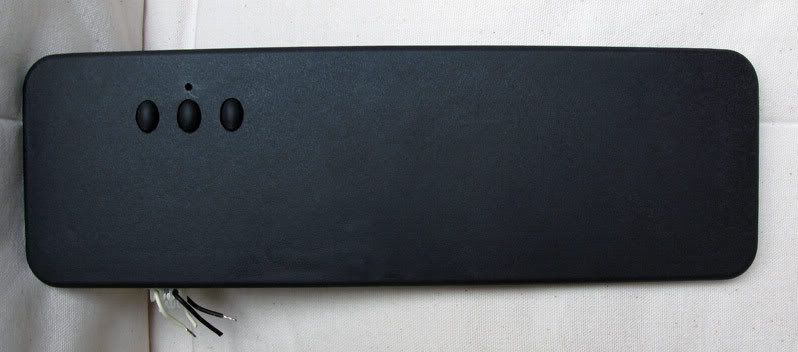
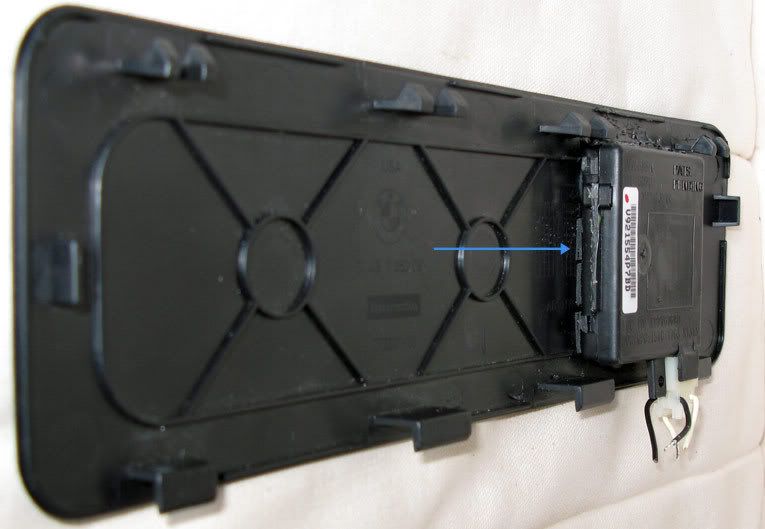
I mounted the ebay-sourced Homelink parallel to the front edge of the panel. If you snip off some of the Homelink extra tabs, there is enough clearance between the panel mounting tabs.   I drilled holes for the three buttons, the 2 mounting posts and the indicator light. Then, I used the Dremmel to grind down the panel surface so the Homelink frontplate swould snap back on to the body. I used 3M mounting tape to secure the rear of the Homelink to the panel, and to lift it slightly for clearance with the thickness of the panel opening.  I ran the wiring over the to the fuse panel since I did not want to tap any wires for power. This involved removing the glovebox and the knee airbag assembly. The airbag is a beast to get out. There are three press-fit clips along the top edge that do not let go easily. There are also four bolts holding the airbag to the dash structure. If you remove the airbag, be sure to disconnect the battery and the airbag connector. I didn't and when I popped the last snap-in clip, the entire assembly fell out and yanked the connector off the airbag. (I recommend popping the clips with a rigid plastic trim tool first, then the bolts.) I had to take the car in and have the airbag warning light reset, fortunately the local independent service shop I use did this for free. I ran a brown ground wire and a striped power wire through a flexible sleeve material I found at Fry's. I used a screw just below the fuse box for the ground. I used an Access-a-Fuse plugged into the fuseblock's empty position one for switched power.   Here is the cable with the Homelink plug connector routed and ready; and the finished product.   Last edited by DaleWA; 12-13-2007 at 07:40 PM.. |
| 12-13-2007, 03:00 PM | #2 |
|
gone baby gone
384
Rep 1,052
Posts |
Very well done and a fantastic idea. That panel is so strange that its there and empty, and so much accessible room behind it, its just dying for projects like this to add to it!
|
|
Appreciate
0
|
| 12-13-2007, 04:15 PM | #3 |
|
Private First Class
 
7
Rep 150
Posts
Drives: 2004 Z4 3.0i
Join Date: May 2007
Location: Webster, NY
|
Is it just me or are the pictures not displaying?
|
|
Appreciate
0
|
| 12-13-2007, 05:34 PM | #4 |
|
My favorite sign.

170
Rep 4,338
Posts |
Links are broken.
__________________
|
|
Appreciate
0
|
| 12-13-2007, 07:26 PM | #5 |
|
Private First Class
 28
Rep 139
Posts
Drives: '12 E92 M3 / '20 X5 M50i
Join Date: Aug 2006
Location: Seattle, WA
|
Sorry about the photo links, I tested them repeatedly before posting and they were working this morning. When I logged on this afternoon, the pictures did not show up, but did when I refreshed the page...
Maybe I'll move the pictures to some other source. ...Photos should be working now, moved them off Comcast... Last edited by DaleWA; 12-13-2007 at 07:42 PM.. Reason: Updated photo links |
|
Appreciate
0
|
| 12-21-2007, 11:16 PM | #7 |
|
Enlisted Member
 3
Rep 35
Posts |
in that placw I installed my laser jammer buttons ...
__________________
Sterling grey ,108 starspoke, alarm,KW v3 suspension,clear lights,cd/mp3, ipod 20GB, hardtop,manual,wind deflector, aerodynamic package, silver trim,Michelin pilot sport tyres, cruise control etc ...http://www.freewebs.com/knb921/
|
|
Appreciate
0
|
| 02-10-2008, 02:10 PM | #8 |
|
Lieutenant General
   
2452
Rep 11,667
Posts |
With thanks to DaveZ & dwabmw for the idea;
I finally got around to doing this one as well. I didn't use the original trim piecethough, just cut the panel for the buttons & led. On the back, I used a couple of layers of the 3M double sided trim tape to get the spacing right.  
__________________
'21 M2C Hockenheim Silver
'18 718 Cayman S Lava Orange (sold) '13 E92 M3 Santorini Blue (sold) '07 Z4 M Coupe Alpine White (sold) |
|
Appreciate
0
|
| 02-12-2008, 02:15 PM | #10 |
|
Enlisted Member
 7
Rep 44
Posts |
Another option:
Location for standard garage door opener. Wire a moment switch to standard door opener, install button as shown and place the opener in the space behind the lights. done
 |
|
Appreciate
0
|
| 02-12-2008, 03:02 PM | #11 |
|
Major
 63
Rep 1,210
Posts |
Thats a good idea also, I have mine under my ash tray, I think the light area would be better for signal strength but I dont want to drill the dome fixture
|
|
Appreciate
0
|
| 12-19-2008, 10:50 PM | #13 |
|
Major
 63
Rep 1,210
Posts |
Just did mine with an eBay homelink unit as well. I wasn't able to get the faceplate to fit on with just holes for buttons,light,latches no matter how much I tried. I even sanded down the side of the panel that meets the homelink. Ended up just opening up the holes i made and made one big hole big enough to fit the whole faceplate through. Its not perfect but impossible to see unless upside down and works the same. Thanks to OP and DaveZ
|
|
Appreciate
0
|
| 03-19-2012, 12:50 AM | #15 |
|
More of this than that!

30
Rep 817
Posts |
Considering doing this to my roadster...can you provide more pictures of switch and placement of the remote. I'd appreciate that....thanks.
__________________
 '06 Z4 3.0i Jet Black/ Biege/Black Leather / Premium Package / DICE Silverline DUO / Stubby Antenna / Matte Black Grill Ultimate Cup Holder x2 / Gaptech RCH+ / First Aid storagebox x2 / Acrylic Wind Deflector |
|
Appreciate
0
|
| 03-24-2012, 11:14 PM | #16 | |
|
Major
 159
Rep 1,108
Posts |
Quote:
|
|
|
Appreciate
0
|
| 03-25-2012, 09:16 PM | #17 | ||
|
More of this than that!

30
Rep 817
Posts |
Quote:
Quote:
Well I did this today....what an awesome little trick...works like a charm.  Well, I did this little DIY today... No more garage opener hanging on the sunvisor I bought the momentary push-button switch (SPST contact * rated 3A * normally open) Here are a few pics of the final result.  Single push, garage door opens, another push and garage door closes. Since the actual remote is located behind the light bezel itself I see not loss in overall performance or distance. The switch from The Source (Radio Shack in Canada) was $5.99, other than a bit of time and soldering...this was a very easy DIY and easily hides the remote . 
__________________
 '06 Z4 3.0i Jet Black/ Biege/Black Leather / Premium Package / DICE Silverline DUO / Stubby Antenna / Matte Black Grill Ultimate Cup Holder x2 / Gaptech RCH+ / First Aid storagebox x2 / Acrylic Wind Deflector Last edited by bucko521; 03-25-2012 at 09:37 PM.. |
||
|
Appreciate
0
|
| 03-25-2012, 09:34 PM | #18 |
|
Captain
    118
Rep 855
Posts |
heres my homelink install. slide garage remote onto visor. done. lol :P
__________________
2014 335i M Sport
 2010 328i M Sport 2007 Z4MC #1019/1815 (Sold) 1997 M3 (Sold) 1991 325i |
|
Appreciate
0
|
| 05-23-2018, 10:17 PM | #19 |
|
Enlisted Member
 11
Rep 42
Posts |
Just did my super stealth garage door opener install. Took about 20 minutes total. 2 dollars for the momentary switch from amazon, and 3 bucks for the velcro holding the remote in place behind the panel. Other than that, it was just two thin wires that I tapped, and soldered onto the remote board. Best, easiest mod to do. If anyone is curious, I'll post pics.
|
|
Appreciate
0
|
| 06-03-2018, 08:02 PM | #21 | ||
|
HammerHead

60
Rep 116
Posts |
Quote:
Quote:
what did you use to cut the oblong holes so perfectly? Also, what circuit did you tap into? Thanks a lot, ed |
||
|
Appreciate
0
|
| 06-03-2018, 10:19 PM | #22 | |
|
Lieutenant General
   
2452
Rep 11,667
Posts |
Quote:
Then I drilled an undersized hole as a starter, then used a file to shape them. I tapped into the cigarette lighter cct.
__________________
'21 M2C Hockenheim Silver
'18 718 Cayman S Lava Orange (sold) '13 E92 M3 Santorini Blue (sold) '07 Z4 M Coupe Alpine White (sold) |
|
|
Appreciate
1
Hedward59.50 |
Post Reply |
| Bookmarks |
|
|