Cant stand it anymore. Been watchin STIHLBOLTS car in my rear view (yes I know, only so you could show them off, otherwise no one else drives that fast - except when I'm trying to keep up with you).
Little background:
1. Started out looking at Tekarbon - They do an Awesome job. Considering what involved, their price is pretty reasonable. But I'm cheap - that's mod money I can spend elsewhere.
2. Then I saw this thread from across the pond:
http://z4-forum.com/forum/viewtopic.php?f=2&t=2953
After reviewing all million pages it's obvious it can be done (kudos to CJ10Jeeper and approx 1/3 of the current UK population. Yes they all contributed; perhaps the UK received more of the Z4 production than we did.). Its not a proper "How To" as the Brits would say, but its very informative. It is also pretty narrow in scope towards the pre-facelift lights. Mine are post-facelift, but the really rough stuff is all external or in the details of keeping things clean.
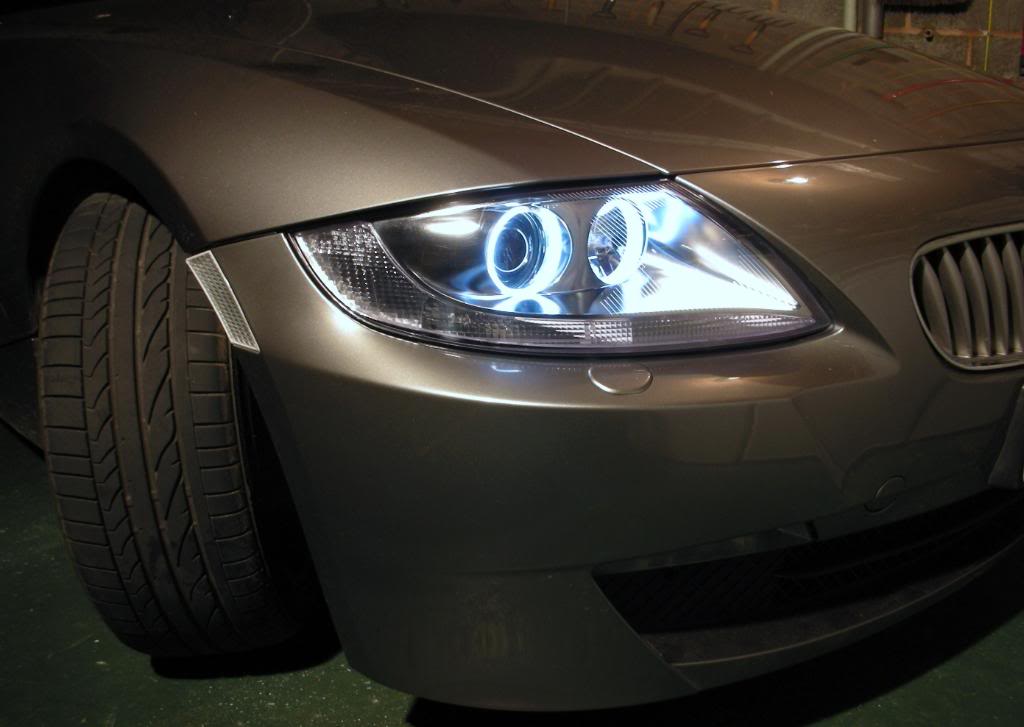
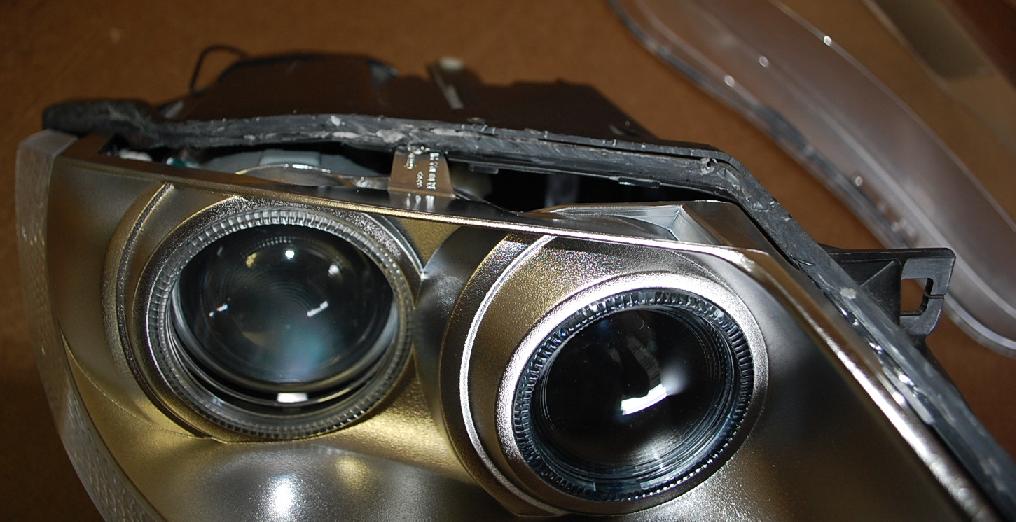
3. Originally in 2008 CJ10jeeper did his with CCFL's. I will be doing this with LED's. They are typically brighter, and more durable. He also discussed, at length, "going Clear" or "de-tango" as they refer to eliminating the amber in the turn signals. Below, his photo of his work. Inspiring!
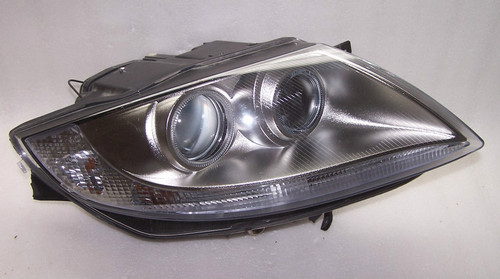
4. CJ also required 2 sets of lights, to end up with a single complete set that did not look like they had been hacked in two. He cut at the lens on one set then cut the housing on the other. Then he spent about 3-4 hours cleaning each up so the lens from one could go into the channel from the other. He also sourced parts from newer donor lights in order to assist with de-tango. In the sacrifical set the black housing is destroyed by the process. I wont be doing things that way. By about 2011 most folks on the Z4 Forum didnt use a sacrificial set as the used price just kept going up. I have found a for parts only light on Ebay and will use this to practice on but probably wont be addressing "Going Clear" as even my ebay light is pretty clear already.
5. This post will get updated as I get parts in. Probably take me 1-2 months to finish it all. partially because parts are coming in from Ireland. Could probably source something closer but they are the only ones who put together an LED "Kit" that has been tested for our cars. Otherwise you are trying to put together, SMD LED ring, Plastic Protector, wiring, relay, etc.
AE kit I ordered:
 http://www.ebay.com/itm/220947746512...84.m1497.l2649
Necessary Tools and supplies:
1. Dremel tool
2. Dremel fiber reinforced cutoff wheel pn 426. If you have the fancy saw blade just say no and stick with the fiber reinforced wheel. At speed the sawblade will bury itself in your finger before you even feel it.

DO NOT use the cute little red or black cutoff wheels (they come with the dremel kits) that you can snap in half with 2 fingers. Just a little cross torque at speed and they shatter. Dont know why they even sell them - looks like a Lawyer retirement fund to me.
3. Some Nitrile or latex gloves - when you are handling the interior components so you dont put your personal stamp (fingerprints) all over your work.
4. Shop vac - you are going to make a mess cutting these open
5. Compressed air - to blow out the headlight once its cut open
6. Drill and bits
7. Rubbing Alcohol and microfiber hand towels
8. Both Clear and Black tubes of RTV
9. Trim tape (3M
10. Razor knife
11. 10 ga Red wire - 18-24 inches
12. 14 gauge double wire 12-18 inches
13. Bullet connectors
14. Wire strippers
15. Wire cutting pliers
AUGUST 11 2012 UPDATE
Bulb removal –
Before you cut anything, pull the back cover and remove the two indicator bulbs and the HID or headlight bulb. Since none of them is cheap, find a home somewhere safe for them (not the bench you are cutting on). Then put the back cover back on and lock it down.

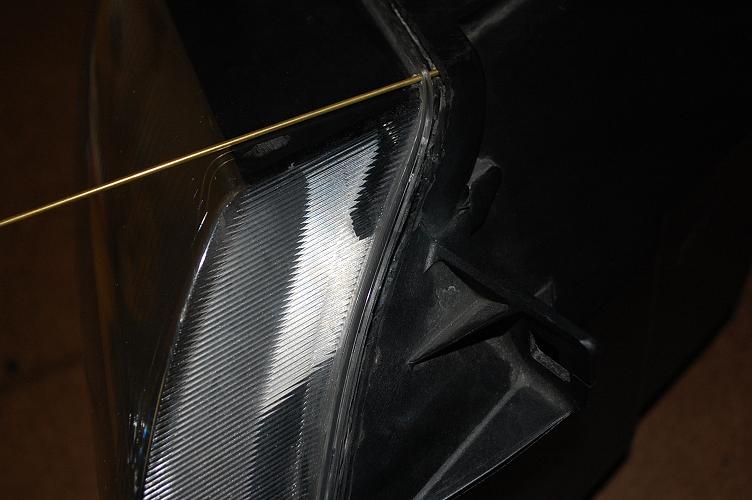
Locating – I don’t think anyone has done this previously so maybe you can disregard.
Before I cut I drilled 3 locator holes. When I reassemble I stick brass rods (like you can get from the hobby shop) in so I’m not worried about the L/R or up/down of how the lens is positioned.

Cutting
This is the squeamish part. It makes us all nervous, including me. That is why I bought a junk light on eBay; to learn and practice. After I cut that one I am very confident. I did learn something new in regards to removing the chrome light shroud, after the lens is cut off, so it was not a total waste of $75.
Cutoff wheels - Of the different cutting wheels, what I like the best is the Dremel Fiber reinforced cutoff wheels (Dremel PN 426).
The Cut - The black housing has a channel that the lens fits in to. You are going to cut through the lens, separating it from the housing. At the end of cutting, you will have a channel that has its middle filled with sealant and the portion of the lens that slotted into the channel.
So cut the black housing just behind the clear plastic lens. Take your time and allow the Dremel to do the job. I run mine at about 80% speed. LIMIT THE CUT TO 1/4” DEEP. That should cut through the lens. Do not try to cut that deep in one pass, probably about 3-4 passes, otherwise you just end doing more melting than cutting. Work 2-3inch sections at a time, and then move to the next adjacent section. I stopped about every 3rd section cut and shop vac’ed everything.
Once you have made it all around the housing use a flathead screwdriver to gently pry to see if you have cut through. If not go back and cut the required areas.
Before you remove the lens wipe it exterior and prep an out of the way spot for it. Then put on your gloves. Although if you dont have them microfiber towels and a little rubbing alcohol should remove any fingerprints you leave.
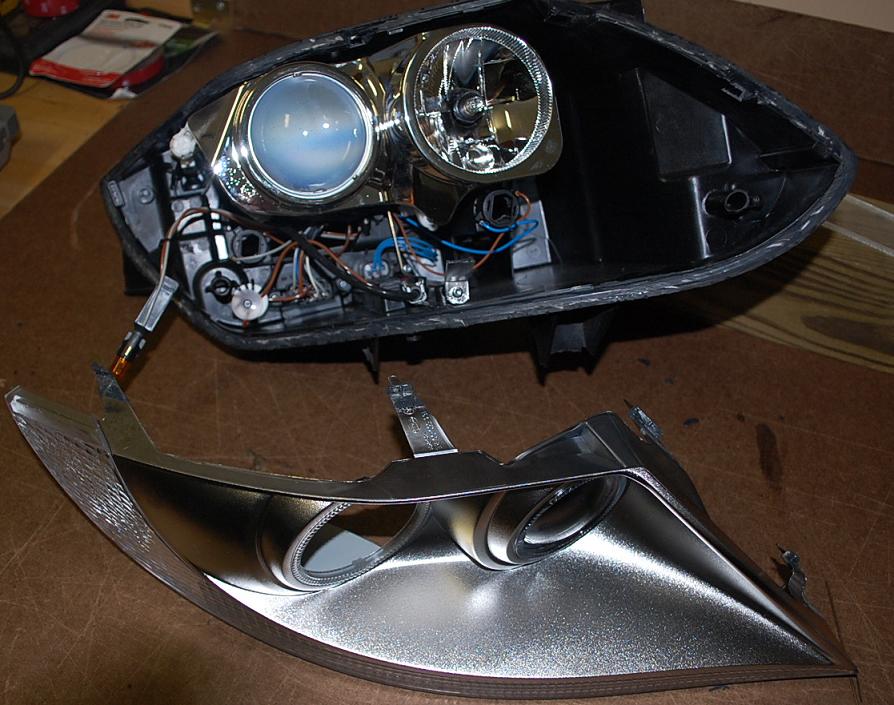
Lens is removed below
After I removed the lens and blew out the interior with compressed air I still was not happy wtih the dust I saw, so the chrome trim needs to come out. In order to remove it you need to clear out the Black Housing channel where this trim is inserted. Why, because the cut off part of lens that is still in the channel is holding it in.
First remove the two torx screws at the bottom of the trim.
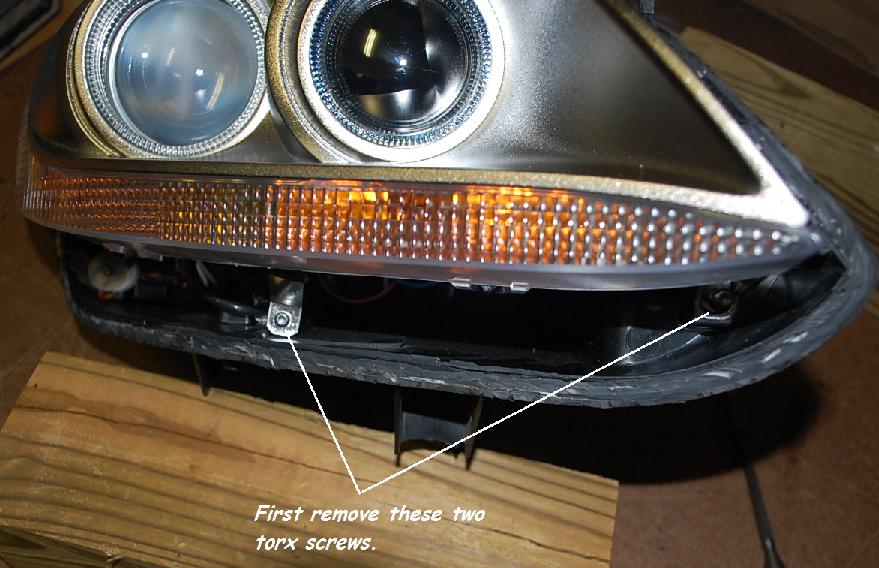
Next clear the channel at the 4 points the trim enters it. Maybe there is some small attachment for the dremel that will grind this but I used a SMALL wood chisel, mine are very sharp. if you use a chisel, BEFORE you do, BRACE the housing with wood or something solid, so the housing is not resting on any of the external housing MOUNTING tabs. THEY WILL BREAK. When ready, put the chisel where you want to cut and hit it with a deadweight or rubber hammer. Then dig the broken peiece out of the channel. A razor knife and a SMALL flathead screwdriver worked pretty well for this.

Chrome trim removed - careful when pulling this off as you have a light still attached in the lower left had corner
08/15/2012 - Angel eyes arrived today - FYI - I like a seperate wiring harness. This set came with one; but its pretty standard. You can buy just the harness from Umnumzia for $20 plus shipping. I like to leave the existing car harness untouched and I get my power straight from the battery through a triggered relay that has its own fuse. - No stupid BMW light bulb interrogation to deal with and no additional amperage on what should be an engineered wiring harness. While these Angel eyes, in total only pull 680 ma, on a 14 gage braided wire that can be a big jump. Plus, anything goes wrong with the AE's or the harness its totally seperate from the rest of the car and FUSED. Lots of folks just hook these up to grounds within the lights and tap power off the cheesy BMW AE bulb (no opinion here). I've watched cars burn to the ground in ten minutes flat from an electrical short. Little paranoia is a good thing. PLUS - I can trigger from two seperate sources, i.e. the interior lights that come on when I unlock the car and since I have an "SI," I'll trigger the other with..... my fog light switch!
First gotta do a little op check. If you remember, this kit came with a wiring harness. No instructions came with it, but its pretty simple. Kudos to "FAST M" - thats where the below photo comes from. The ONLY difference bet mine and his is the color of the trigger wires.
LATER we'll need to mod the harness to make it fit the Z4 but for now just need to see it light UP.
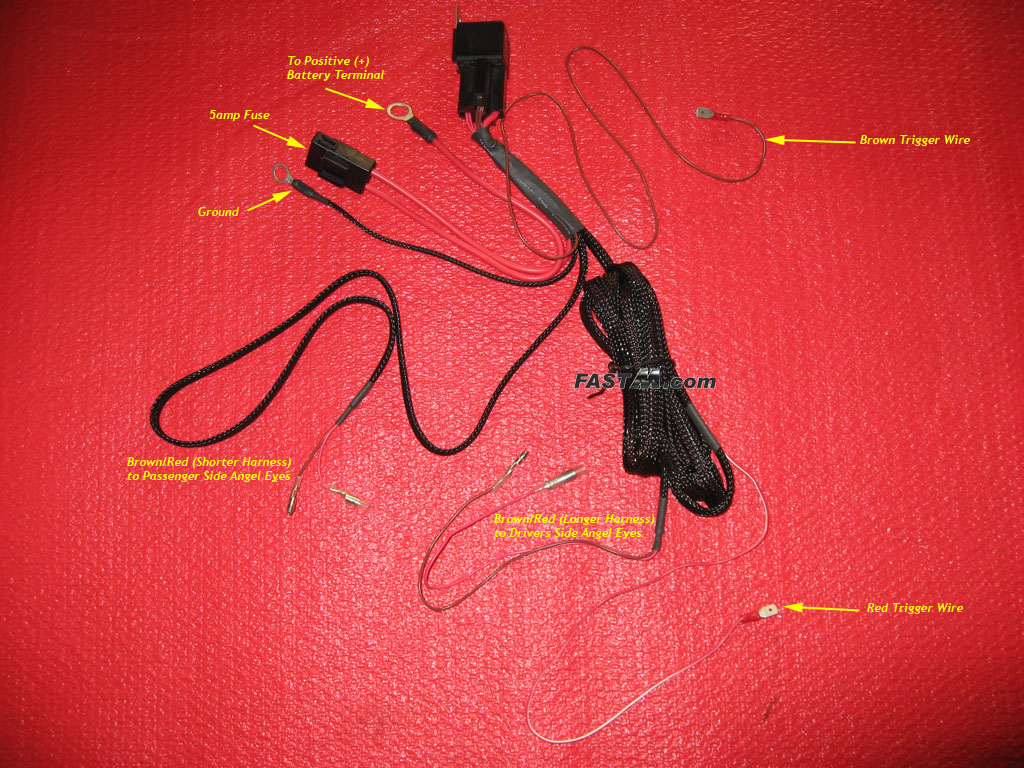
DISCONNECT the GROUND ON YOUR BATTERY - Then...
1. Big fat red wire with "loop" termination - to pos terminal @ rear center of firewall.

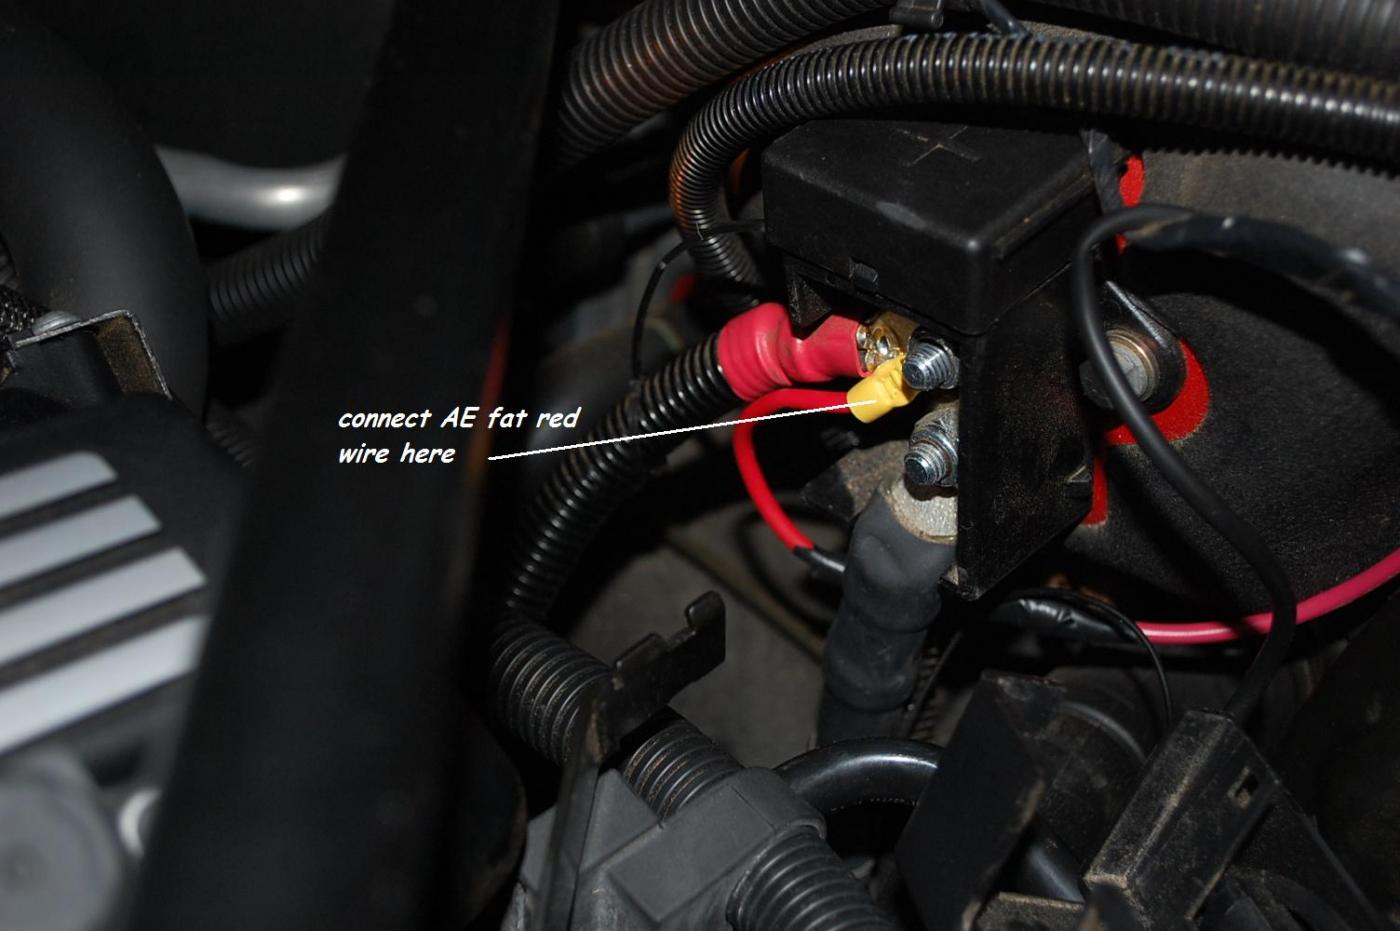
2. Single black wire with "loop" termination - connect here for good ground

3. Two sets of bullet connections - to the angel eyes.
4. That leaves a white wire and a yellow wire - these are triggers - if you touch/connect either to any 12v positive source the lights turn on.
Reconnect battery ground, Touch the trigger wire to the same source and.... we have light.

08/19/2012 - Update
So now its time to install the AE's - and button up the headlights.
1. Gotta drill two holes -
a. one in the back cover of the headlight - I like either of the two recesses in the headlight access cover.

b. Other ones in the silver/chrome lens shroud.
Careful with this so you dont scratch up the lens shroud.
2. Now its time to put the AE's in.
a. Fish the wires through
b. Clean all contact surfaces with rubbing alcohol
c. Apply 2 to 4 small strips of trim tape to back side of AE's - this is what keeps them together while RTV is drying.
d. Apply Small bead of CLEAR RTV to the CENTER of the remainder of the open AE back cover. DONT GET RTV on the trim tape

3. Now carefully (orient the gap in the AE's to same point) push the new AE's on the old AE's. NOTE - the left old AE is only secured to the shroud at the top and the bottom - so push there NOT at 90 and 270 degrees, unless you can support it from the back. Great thing about the trim tape is you dont have to wait for the RTV to dry. You can keep going
Dont stress about the fingerprints(no filthy hands though) rubbing alcohol & microfiber cloth - gently wipe they come right off

Its time to attach lens to the housing. PIC's Tommorrow
1. Bring lens under STRONG light - use microfiber cloth to clean out interior of lens. Turn lens in the light to make sure the interior is clean.
2. Clean the contact surface of the lens with rubbing alcohol and set to the side.
3. Place Housing so its stable - I use my car wash walmart 3 gallon bucket.

4. Look at contact surface of housing. If necessary clean it up with a razor knife. - Dont get to anal about this, just stuff on the edges.
5. Clean the contact surface of the Housing wtih rubbing alcohol.
6. Run a small-medium bead of BLACK RTV on the contact surface of the Housing. NOT a ton of RTV. you will be filling gaps from the exterior once lens/housing are joined. If you previously pulled the sliver/chrome lens shroud you will need to fill the gaps with RTV.

7. Then set the lens in place. If you drilled locator holes use them. If not, it pretty much goes where it should. Press down on the lens (Just hand pressure dont lean into it) and check the edges all around to see that you have a good contact. Let that set for 5 min or so then use the RTV again to fill any gaps from the outside.

8. Once you have filled all the gaps dip finger in water and smooth the bead on the outside. Tekarbon does a little more than this. He builds the RTV up on the outside of the housing and creates kind of a "T" with the RTV. I don't know if this adds anything to the strength of the seal or not. If you are going to do this Clean the exterior of the housing with rubbing alcohol first. Personally, I dont think its necessary. I know some of the Brit's didnt make the "T" and I think I would have read somewhere in the Z4Forum about lens covers coming off. But if it really worries you probably the best thing would be to take those locator holes, tap them and run a proper sized screw in them, ie a 1/8" something. Combined with the RTV - thats not coming apart.
Okay - at this point you have angel eyes installed, and the wiring should be sticking out the back of the headlight housing. Let everything sit 24 hrs so the RTV sets up completely. in the mean time wie can mod the wiring harness, and get it set in the car.
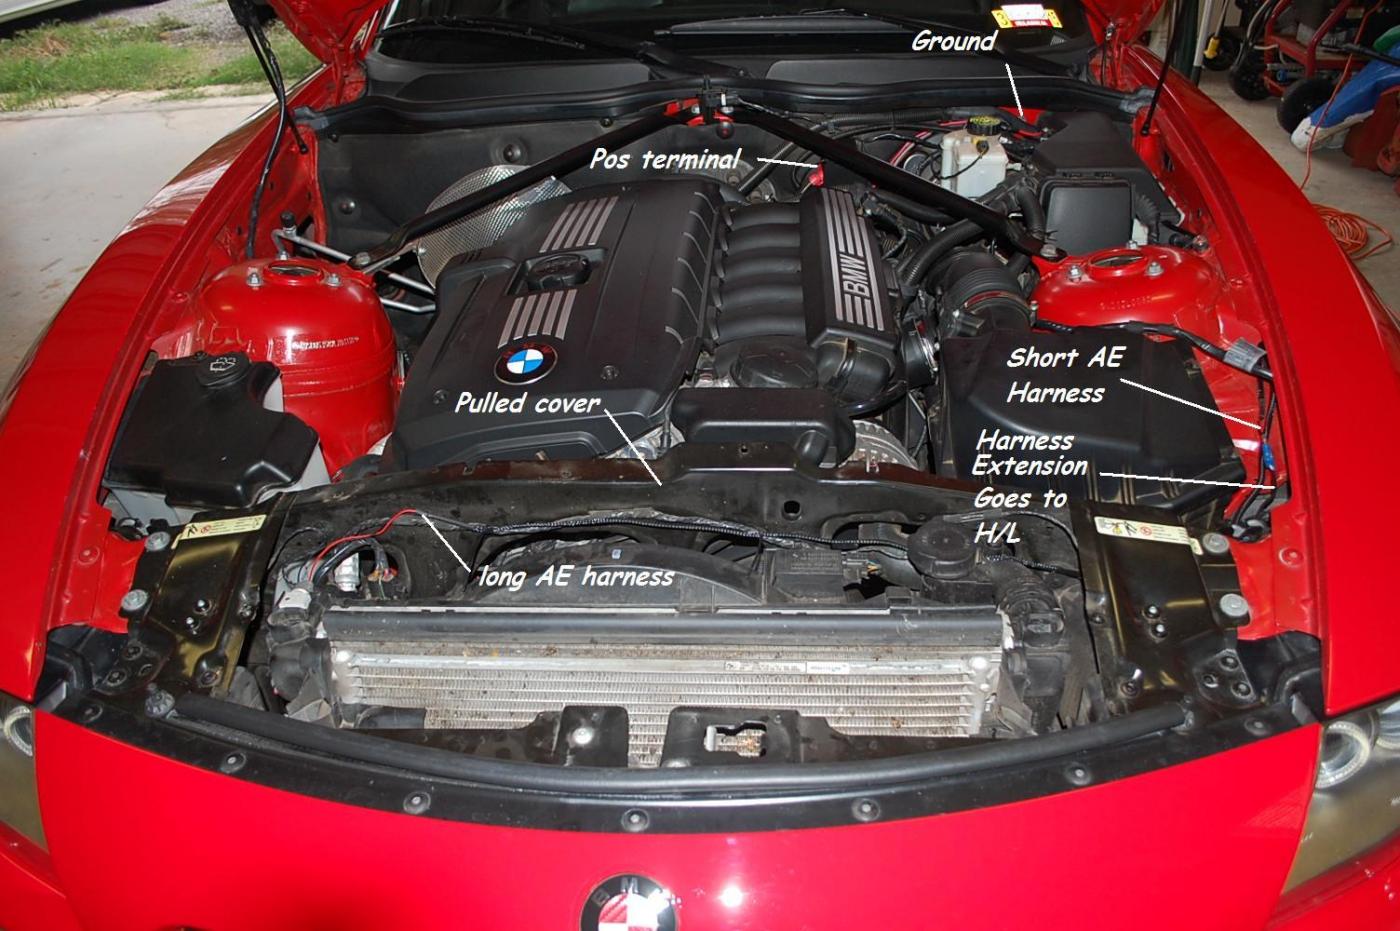
WIRING HARNESS -
DON'T attach Battery POS TERMINAL YET - remember the pic above, yeah the part about sex life and scorched fingers.
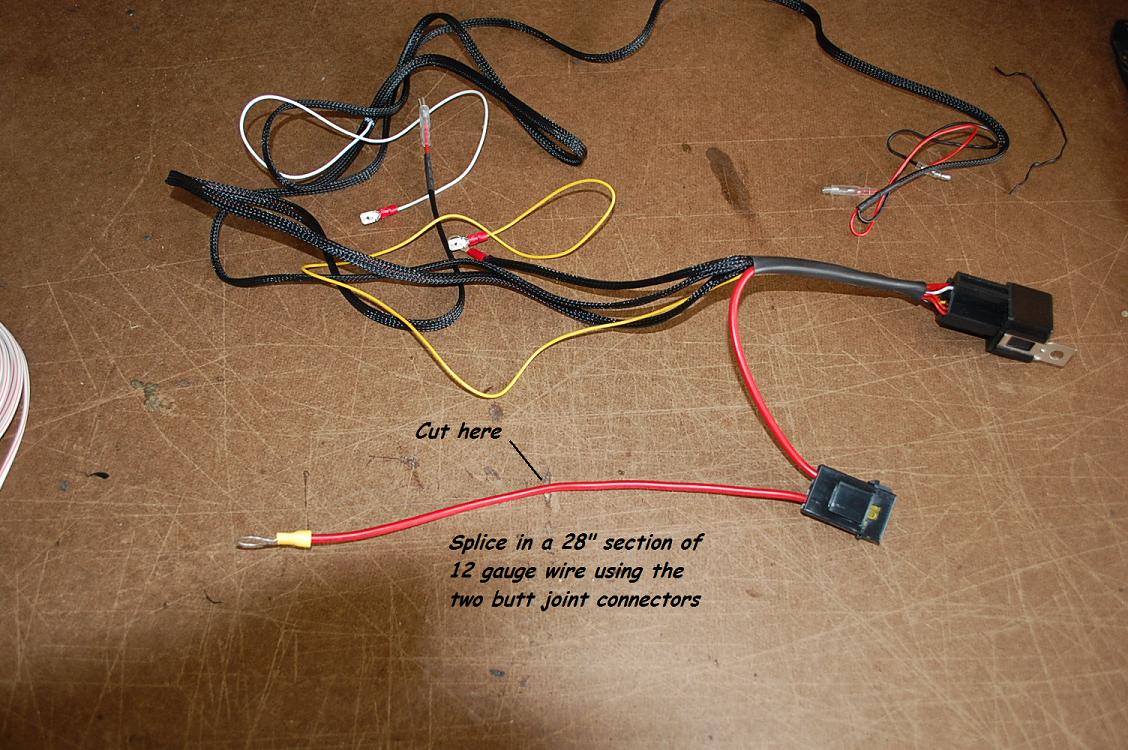
Here's what we need to mod this. We are going to do four things:
1. Extend the fat, 12 gauge wire by 28 inches .
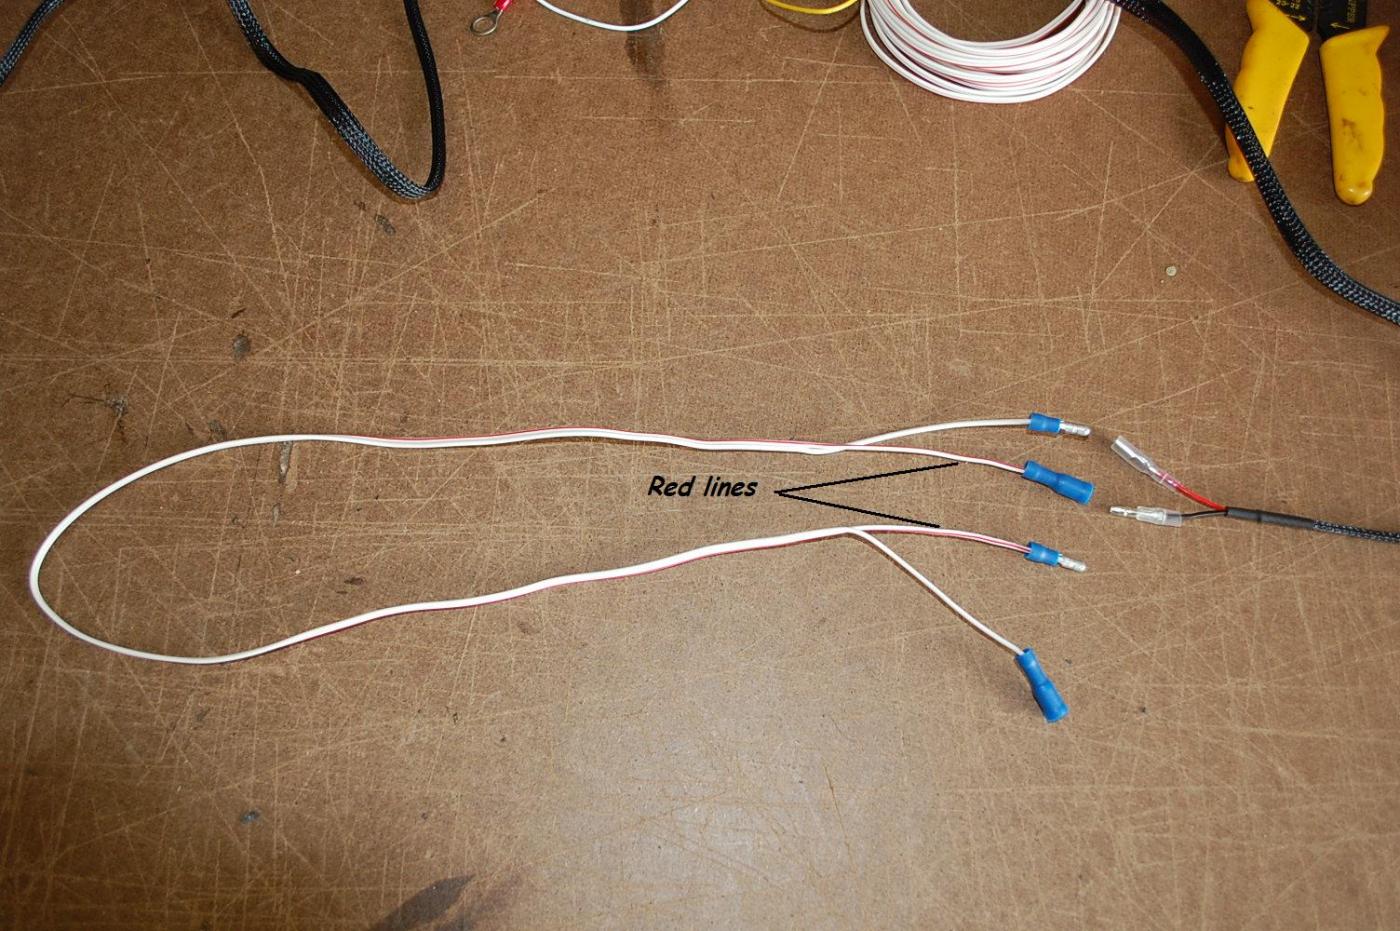
2. Make connectorized 24 inch extension for the short leg of the angel eye harness.
3. Then run the lines for the AE interior light trigger - AE's come on when you unlock your car.
4. Then run the line for the AE DRL's - AE's come on when you start your car and are always on. - YOU will need a multi-meter for this to confirm you have an Ignition switch powered positive line.

Power line mod - See pic below
Harness extension - see pic below NOTE the way the bullet connectors are attached - doesnt matter what color wire gets attached to m or F connector - Follow the picture.
1. One end of the two wires gets a male and a female connector.
2. The other end of the two wires is set up Opposite the first.
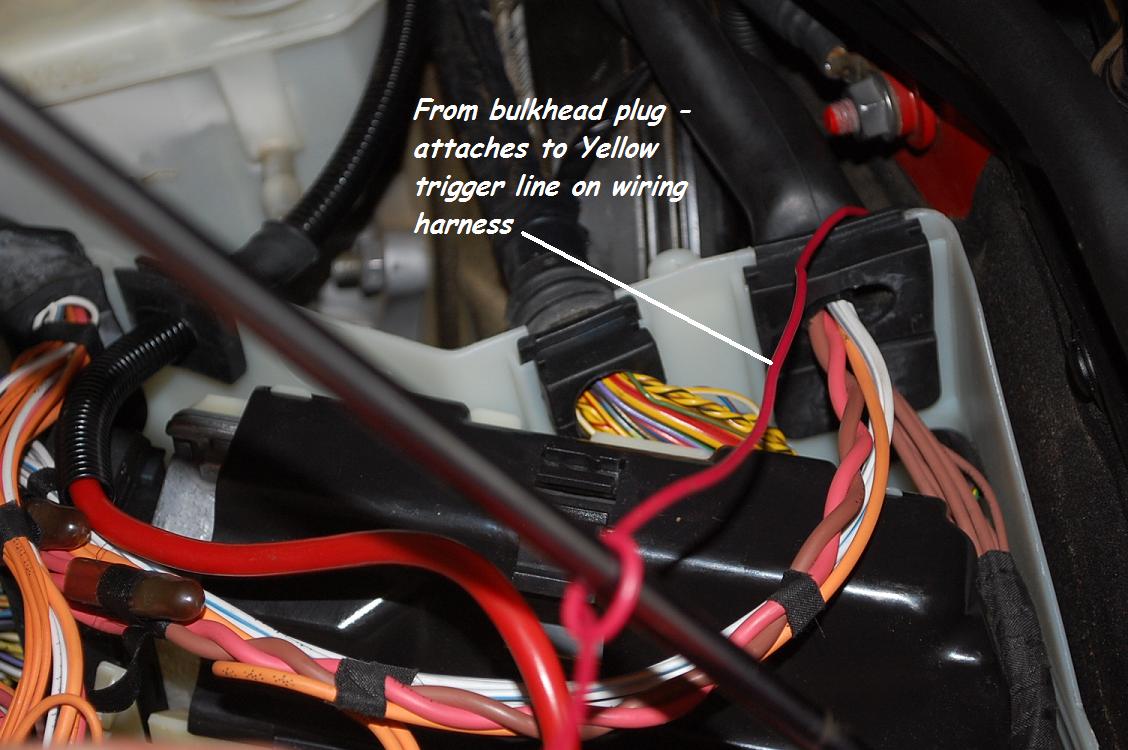
AE interior light trigger line. This was a little bit of a PITA.
1. Pull the airbag cover below the steering wheel - 5 phillips screws. You will notice the footwell light is attached to the cover. Pull the harness out of the light.
2. This will give you access to 2 bulkhead plugs. one above the other. You will used the top one. Get a flashlight and get eyes on target. BUT DONT POP IT OUT YET. If you do it will fall into the engine bay, you will spend and hour looking for it and the next time you see it will be when your cat is using it as a hockey puck.

3. Get some trim tape and some thread or string. FROM the engine bay side use the trim tape to attach the string to the plug and tie it off some where. Then go back under the steerring wheel and pop it out. YOU can now pull the plug up with your string, secure in the knowledge you are not chasing, cussing 10 cent parts across your garage.
4. Drill a small hole in the plug - you will run about 2 feet of 14-16 gauge wire through it to attach to one of the wiring harness trigger wires to the POSITIVE line of the footwell light.
5. Put the plug back in the bulkhead from the interior side. The side shown in the pic above is the side you should see from the interior as you push it back in. Just line it up on the hole and push from the center. It will snap in place. In the future you can push it out from the engine compartment.
WIRING HARNESS LAYOUT - PULL GROUND WIRE OFF OF THE BATTERY FIRST.
1. Pull the cover off of the radiator
2. Lay out the harness - short end goes to driver side H/L
3. White trigger wire is down near the driver side H/L. I trimed up it's spade connector and plugged it right into the my existing driver side fog light harness (pos line). If you dont have this or want DRL's then you need to attach it to a positive line that comes on when the ignition is turned on.
3. Attach Harness extension to Driver side H/L - route this up as you install the H/L.
4. Install Pass H/L - as you install there is just enough room for you to attach the harness to the AE wiring from the light.
5. Attach Harness POS and Ground connections.
6. Reconnect Battery Ground.
Button it up. Drive, look cool.............
Stuff I learned.
1. Cost - $63 bucks for the Sidabra24 AE's with harness -http://www.ebay.com/itm/220947746512?ssPageName=STRK:MEWAX:IT&_trksid=p398 4.m1423.l2648
2. Cost for all other stuff - RTV, wire, connectors, alcohol, etc maybe another 40-50 bucks
3. Labor - time to do it first time 6 hours - I could probably do it now in 3-4.
4. Other AE's - SuperbrightLEDS.com has some that look sweet - really smooth, like ccfls(AE80-NW81-COB), but the cover that comes seperate is too tall and looks crude. They also have another AE (AEPC80-NW54-T10) that would be suitable
http://www.superbrightleds.com/cgi-b...Faepc80x54.htm
But these are more expensive at $20 each w/o a harness. A harness is available from Umnuzia for $20.
5. Doing this the Tekarbon way - 80mm OD AE's are what works. Looking close at Tekarbons work they are attached in the same manner as what I do here - straight glue on to the OEM AE's. If you wanted to take the time it might be possible to wire up plain AEs (dont have the plastic cover) behind the OEM AE plastic covers so it looks totally OEM. 80mm would probably work for the outside but something smaller would be needed for the inside light.