With a four hour drive to VIR (more to other tracks), after four years, I finally got tired of second guessing the weather to select what tires I wanted to run.
There were two choices:
1. Trailer the car.
2. Add a hitch and trailer my tires.
I have a pickup truck, so purchasing a car hauler to tow is no big deal, but storing it is a major issue.. so I opted to install a hitch and trailer my tires and tools.
Taking the pictures from this thread (
http://www.zpost.com/forums/showthread.php?t=574966), of another hitch install I started down the road to find someone to fabricate one for me. This proved to be problematic, since each shop I talked to said they could do it easily but would not even try do to liability issues… fracking lawyers…. I even spent a couple of hours on the Curt website looking at literally a thousand 1.25” receiver hitches to see if one could be made to work… I did find one and ordered it. That was a no go do to my requirement that the receiver be hidden. I had modified the hitch a little so I now ‘owned’ it.. The issue was/is, there is around a two inch to three inch backspacing gap, from the receiver face to the vertical structure of all of the pre-manufactured hitches. That just will not work. This backspacing would leave the receiver face sticking out from the back of the car…. That’s not hidden.
So I bought a 20”x10” piece of 1/4" plate steel. That was rather expensive at $30.00. I have never done any type of metal fabrication work so I did not know where to go for the best prices…. Talking with some off road guys in the office (which I SHOULD have done before hand) they told me where to go for the really good prices on metal. I went there and picked up an identical piece for $4.75… Big difference in price. This was another ‘gotcha’ but more on that later.
Items used for fabrication:
Chop saw (not strictly needed, but it cut through the receiver tube like a hot knife through butter)
Saws-All with several metal cutting blades
Bench grinder
Rotary grinder. I purchased this at Home Depo for $29.00. Always wanted on. (This thing was a god send….)
Dremal tool
Drill bits.
Two 18” Crescent Wrench’s… (Why? You’ll see..)
Six Inch Machinist ruler
12 Inch metal ruler
18 Inch metal ruler
While this was going on, my buddy and I were trying to figure out where to get it welded. I toyed with the idea, briefly, on buying my own welder and doing it myself, but that would add $600+ to the cost, and I would not use it very often. We had to think ‘outside the box’ a little and then we remembered that the local Vocational School (VOTECH) is right up the road and they do take on projects for free if you provide the materials or at cost if they provide the materials.
So armed with the pictures, I went over and talked to the welding instructor. (If you don’t ask, you have already failed). He studied the pictures and we talked. He remarked that the hitch in the pictures was manufactured with 3/16” steel plate, not 1/4". We discussed this and he was sure that with the amount of weight I would be towing (no more than 500lbs) 3/16” would be adequate with a safety margin. This is the second ‘gotcha’ I talked about. The second supplier thought he gave me 3/16” but it really was 1/4”. I even called them to tell them that, so I could pay the difference, but it was no big deal to them. New customer for life….
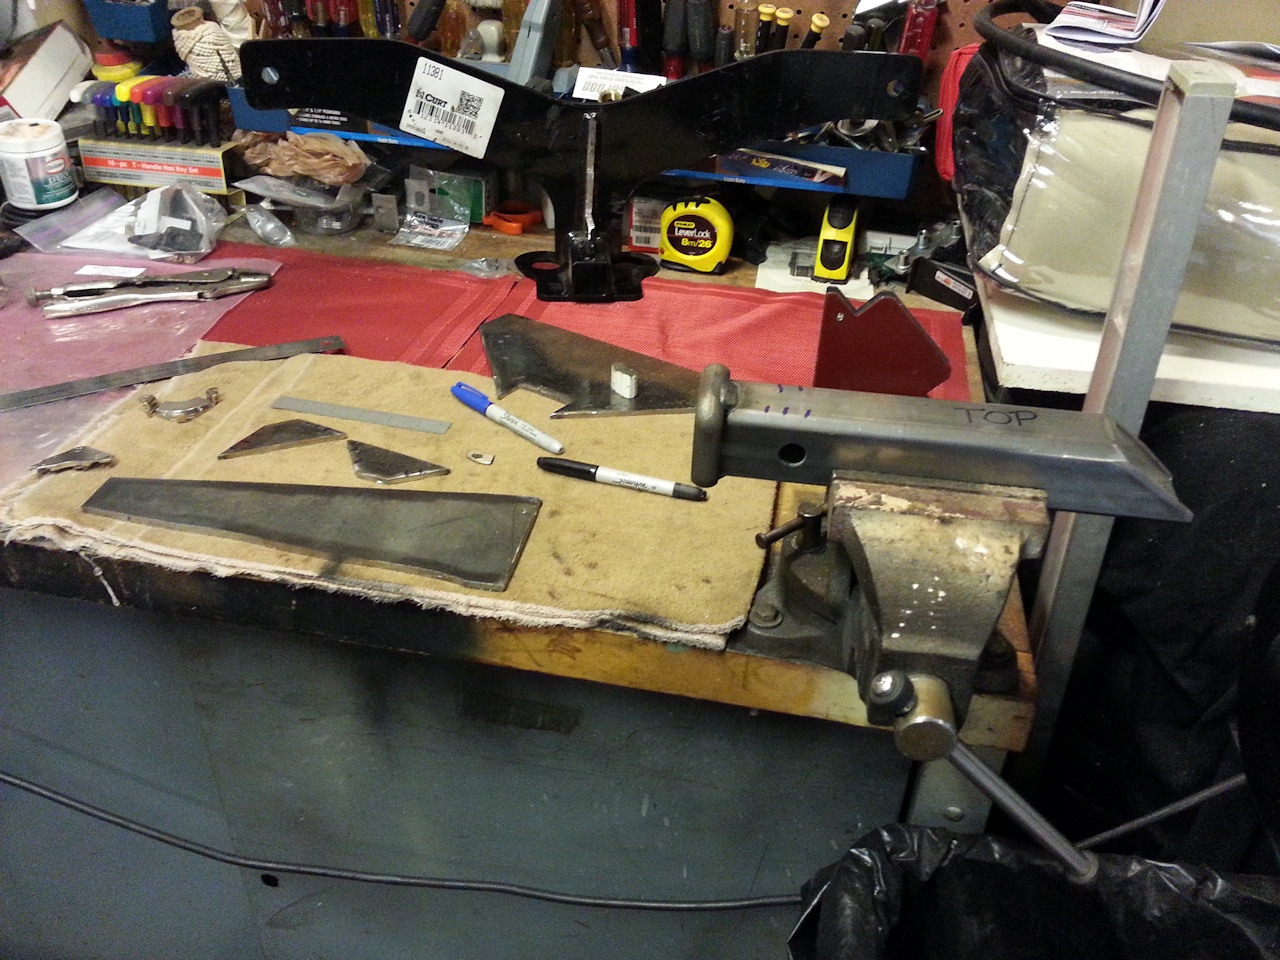
So I ordered a 1.25”x 12” receiver tube from Amazon for $15.00. I needed the 12” tube so I could cut it to the proper length I wanted. Once that came in, I put the car up on jackstands (the car needs to be level for this) and commenced to take another set of measurements (leave the bumper cover on for this).
Looking at the pictures, the fabricator mounted the rear of the hitch to the bumper structure, so I’ll do the same. There is a 45’ angled square piece of chassis structure that runs from the rear of the chassis to a position just aft of where the two pull rods (flat bars) are bolted (item 16:
http://www.realoem.com/bmw/showparts...33&hg=33&fg=30). So I measured from the inside rear bumper cover ‘grill’ horizontally to this angled structure and cut the receiver tube to length. I also had to cut out a portion of the top of the receiver tube so the tube would lay horizontal to the thrust line…. Square, not canted up or down…. I had a chop saw so I used that to make the cut.
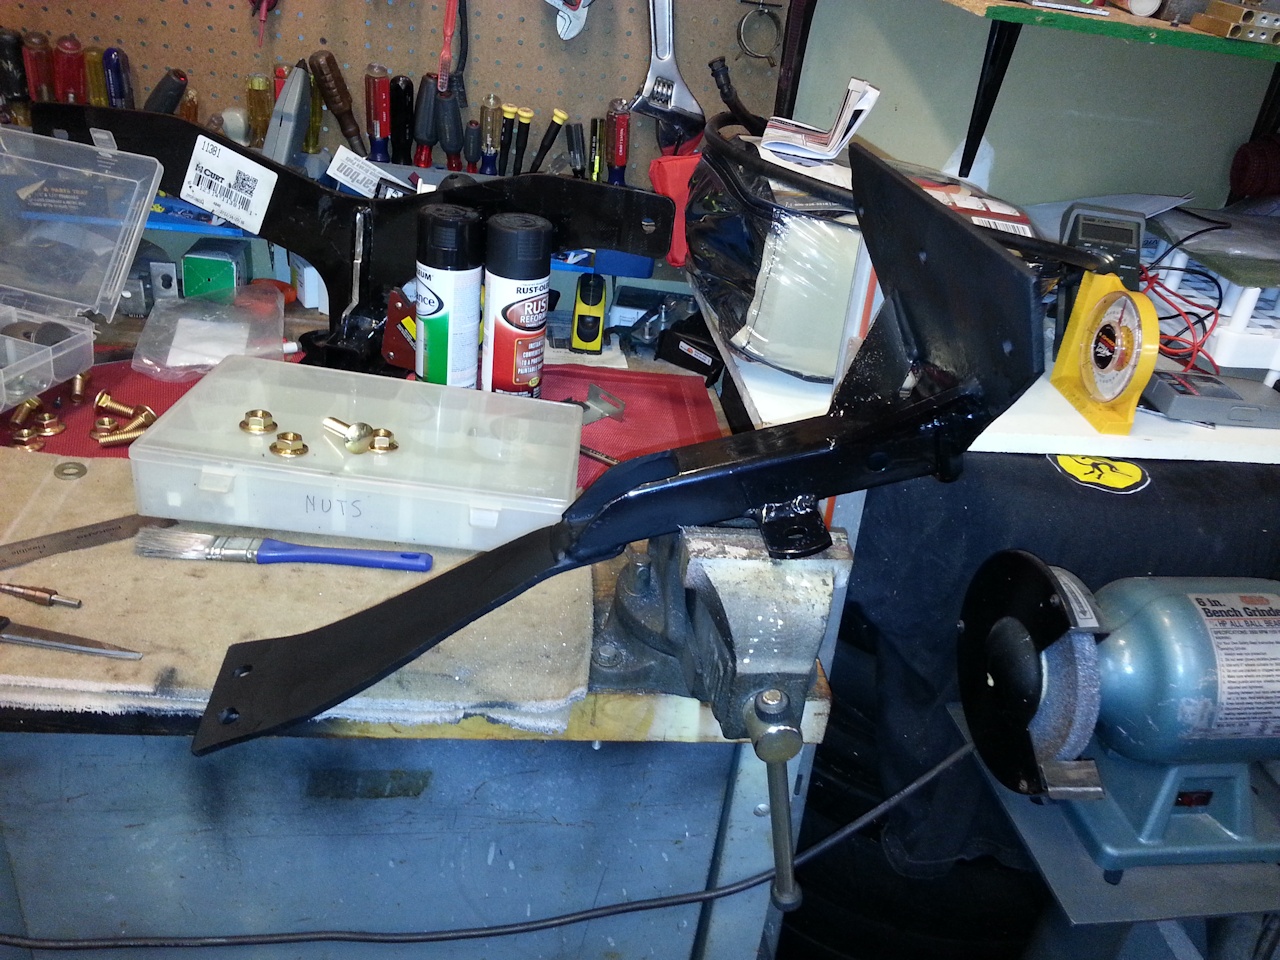
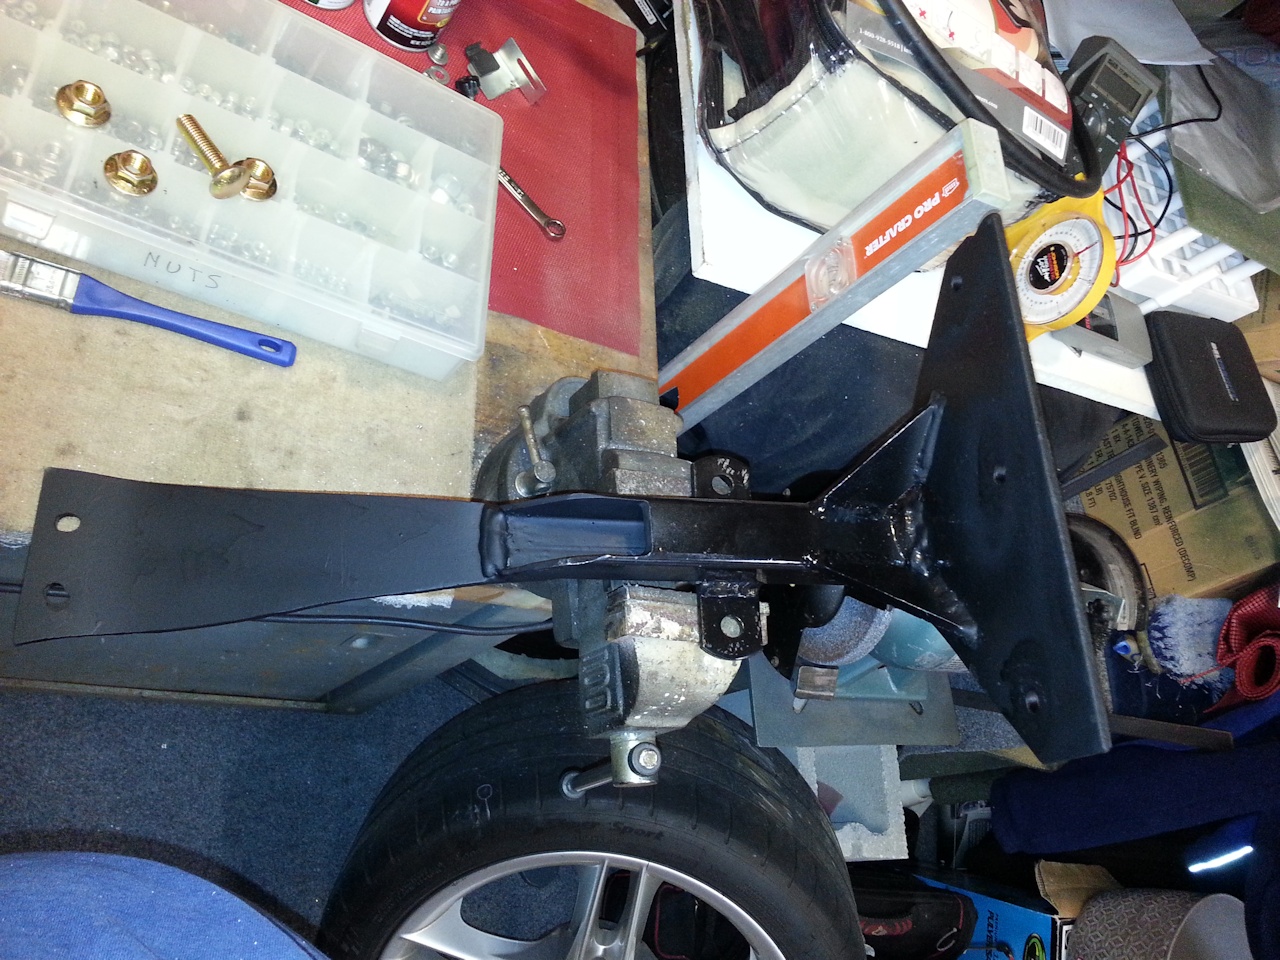
Once that was done, I used cardboard to mockup the vertical plate that would tie the receiver tube to the ‘front’ (as reference to the front of the car) of the metal bumper. I decided to have this plate notched around the receiver tube for added strength. This plate will take some of the horizontal load but mainly it was for the vertical load (tongue weight).
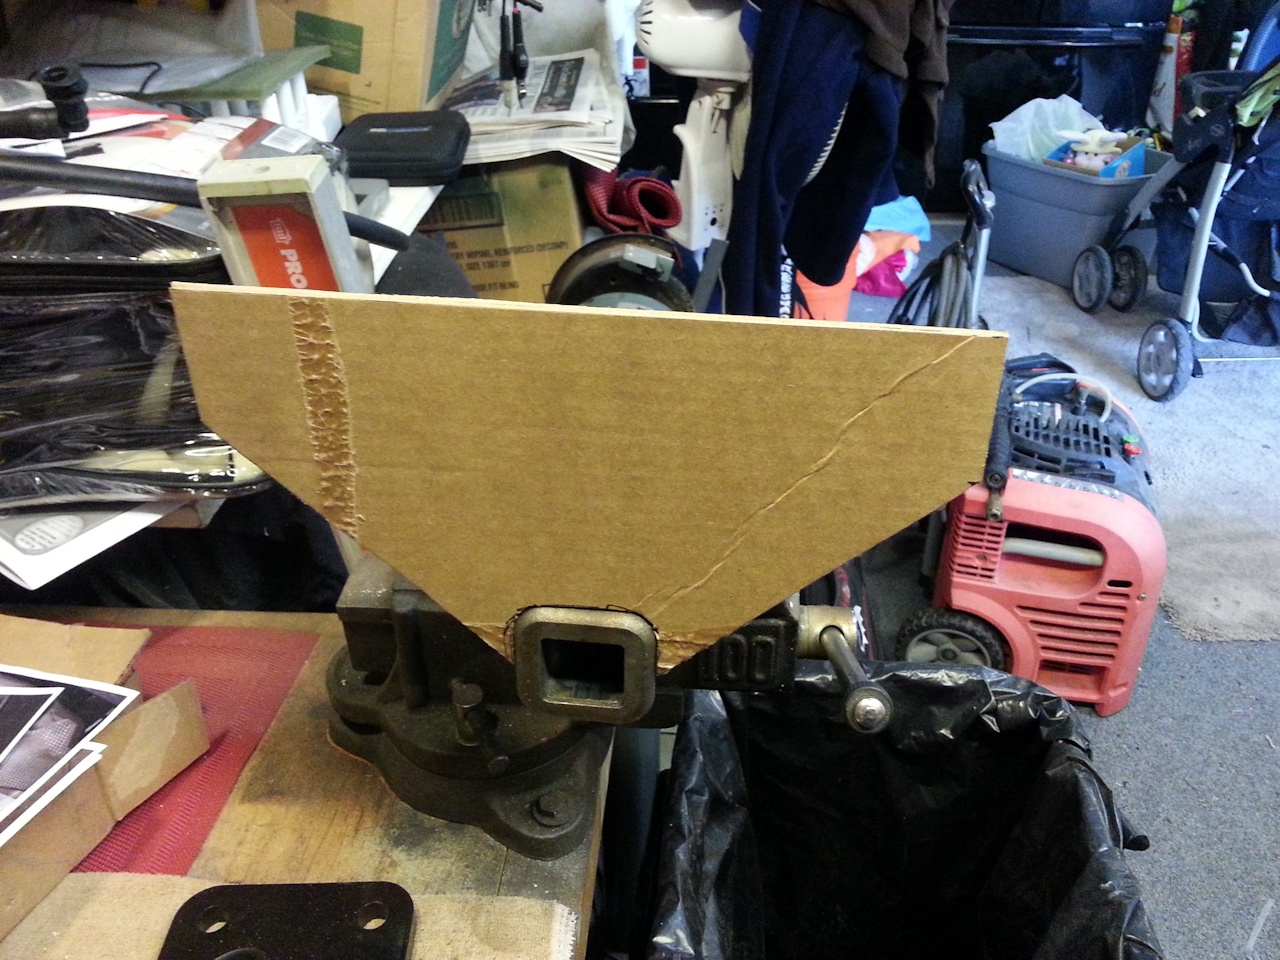

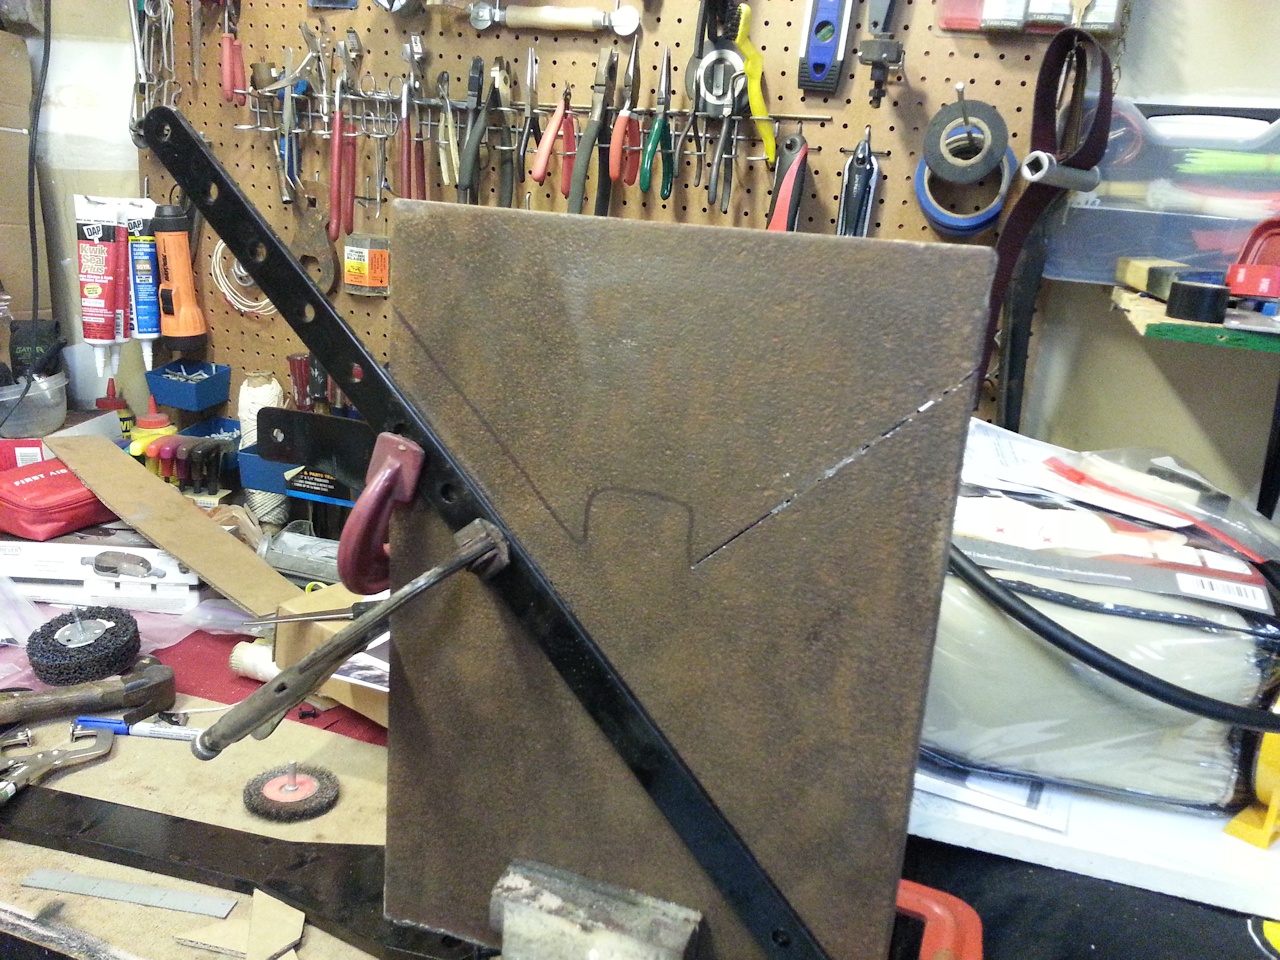
Trace out the pattern on the steel. I use a saws-all to make the cuts. To make really nice straight cuts, measure the distance between the blade and the saw guard on the saws-all. Now take something to use as a guide. Mark the offsets you just measured and clamp your guide in place. Nice straight cut, even on 1/4” plate. Make sure to place your clamps so the will not interfere with the saws-all. To cut out the receiver notch, you will need to make numerous straight (relief) cuts into the ‘U’ and then angle from one corner to the other. Then I used my bench grinder to remove any excess and burrs. I had to use the bench grinder to slowly remove just enough side metal of the ‘U’ so the plate would just fit snugly on to the face of the receiver. I am using some magnets to hold the plate in place.
Now I needed to decide if I wanted one gussets or use two gussets for strength. Two I should think. Set at 45’ angles. So I make the gussets. More magnets…

Now I have to figure out the length and shape of the rear brace. The brace will be welded to the receiver tube and attached to the car using the two pull rod bolts. The brace will lay against the chassis and the pull rods on top of that. This piece will take up most of the horizontal load. I made this piece a little longer than necessary, knowing I will cut off the excess and to take into account the bends I must make.

Now to bend the plate. This is where the two 18” Crescent wrenches come into play. I suppose to bend the plate you could just pound it with a hammer but that will take a long time and may not work. This is 1/4" plate. You need some LEVERAGE.
I put the narrow end of the plate into my vise and placed the two wrenches at 45’ angles on the plate. I wanted a 1.5” overlap of the plate to the receiver so I had to take that into account. Using both hands, one on each wrench and a foot on the bench, pull the plate into the first shape. Now I took the receiver tube and the plate and held them up in the car. Now I had to eyeball where the next bend, on the wider end will be, so it will be flat against the chassis. Do the same on the wider end. This bend was MUCH harder to do.

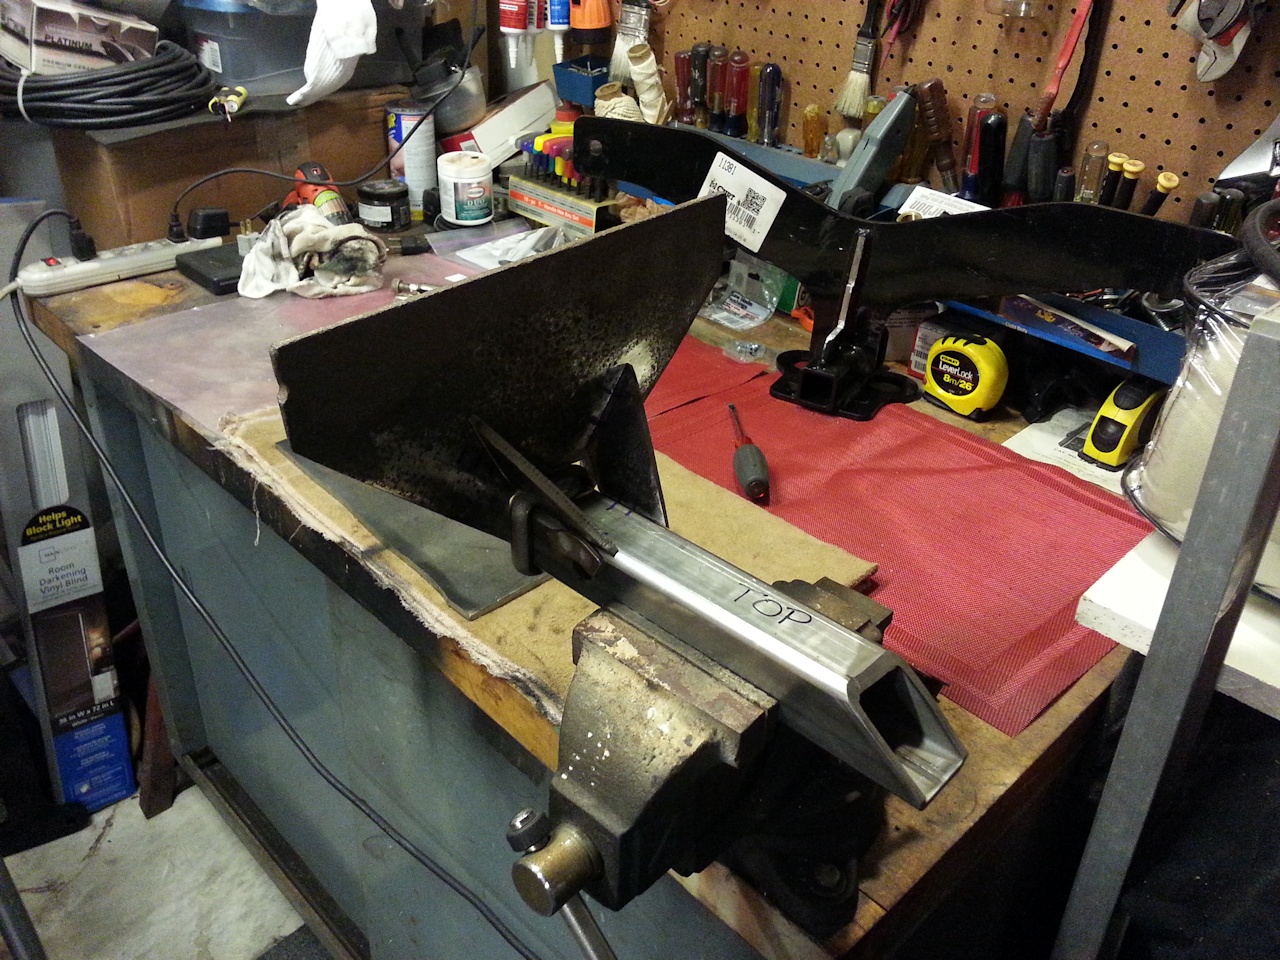
Now with all the pieces and parts manufactured and shaped, I mark all of them up using a Sharpie, so the welder would know how to put it all together. Now I take it all to VOTECH.
Three days later, the VOTECH instructor call me to have me come look at what they have done so far. They have tacked everything together, but want to make sure all is correct before final welding. Everything looks good. Burn away.
A couple of days later, they call back. It’s done… I go pick it up. I throw some paint on it.
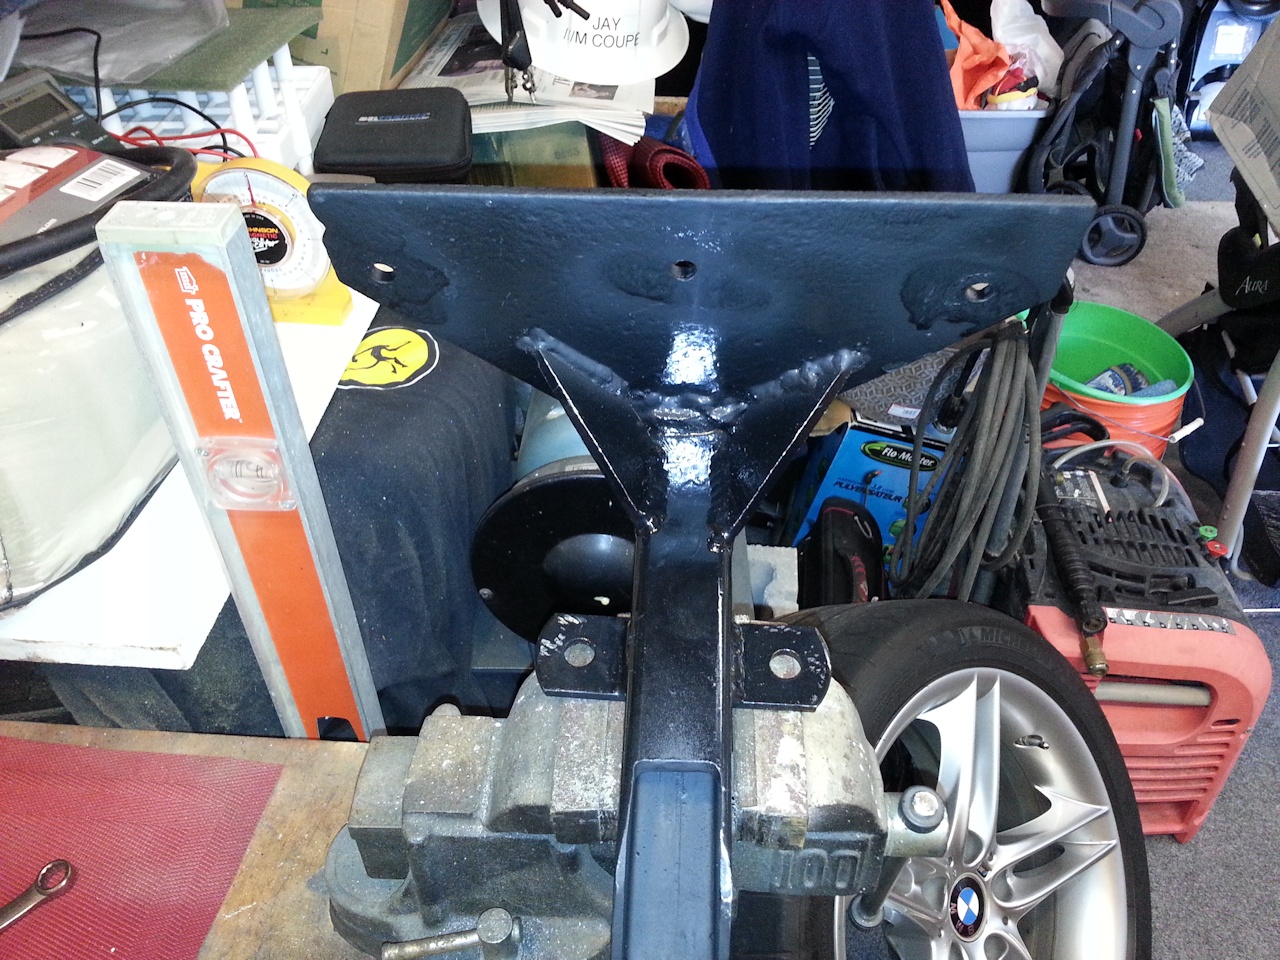
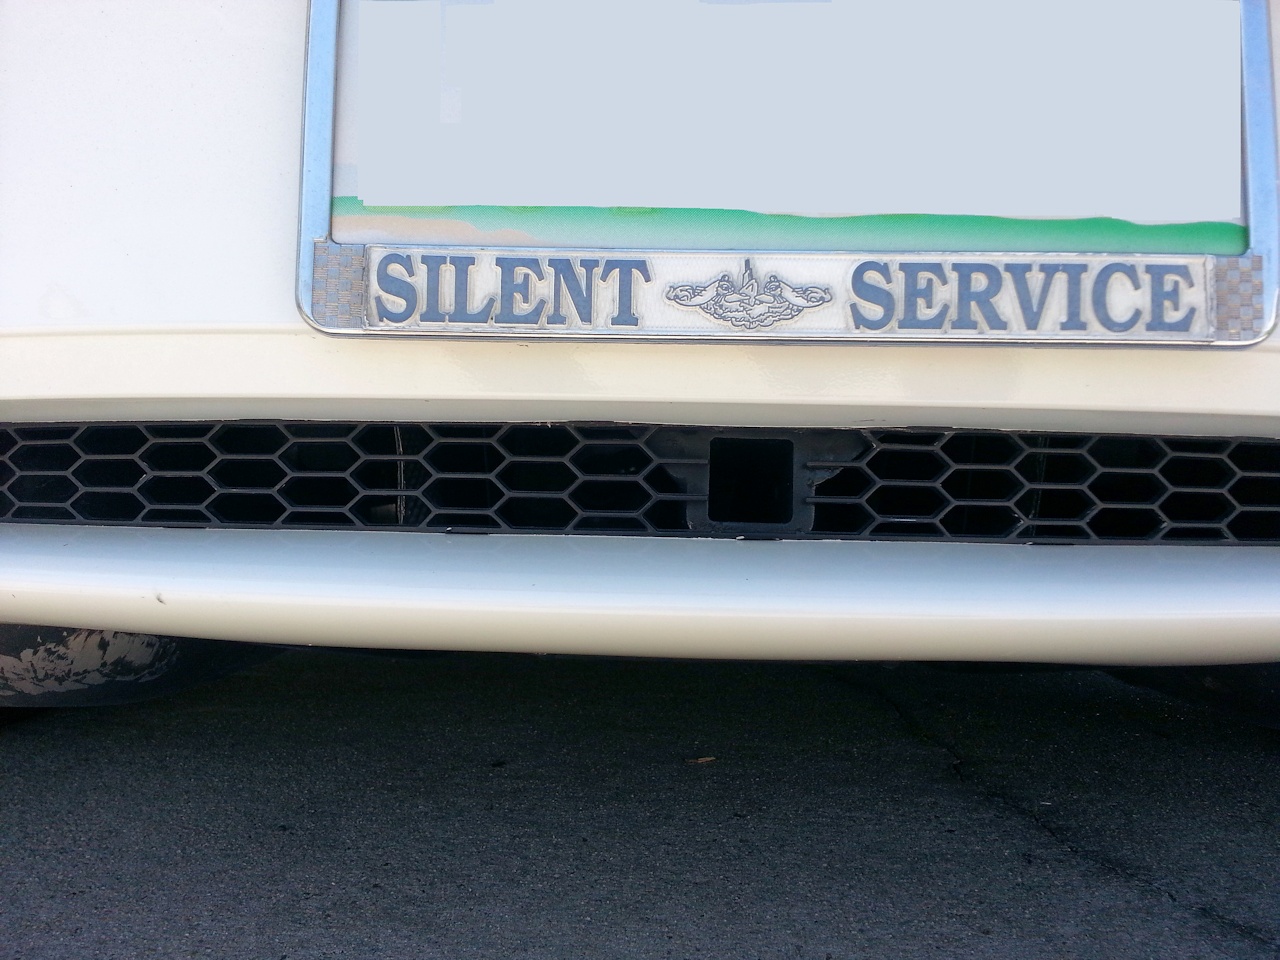
Now to start the actual install. Once I had it centered in all three axis, I used a clamp to hold the assembly in proper position. I tried some big spring clamps to do this. DON’T. The hitch fell on my head…… The stupid shall be punished...and was….
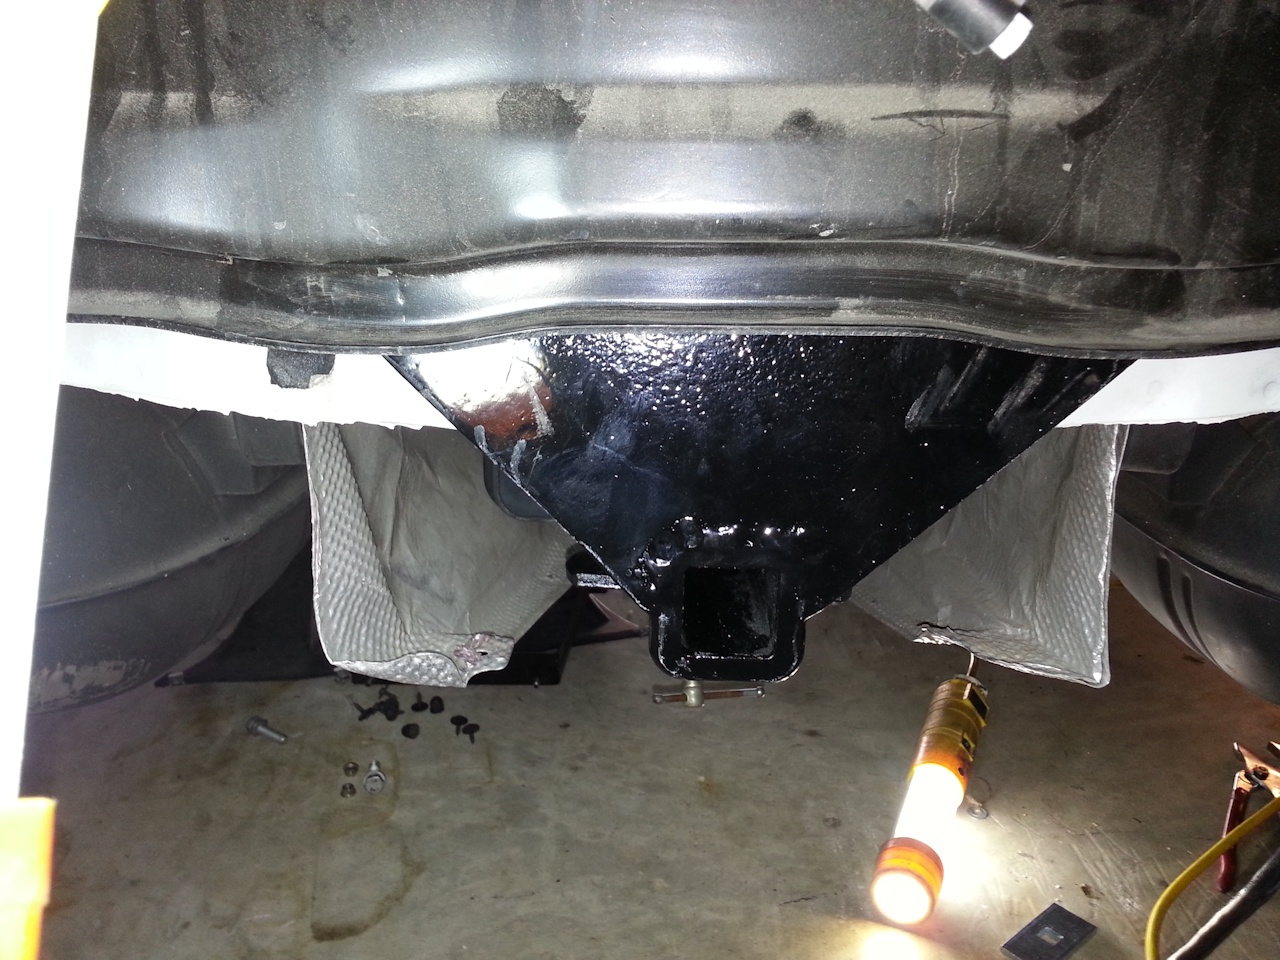
Once in place I put the bumper cover back on to make sure it was centered there properly in the small recess. Removed the bumper cover and took a measurement from the bottom of the bumper to the top of the interior of the receiver. You need this. There is always some slop when drilling holes and this will make sure you can realign correctly. This measurement will ensure you have your hitch set correctly in the vertical axis. For me, this was 3.25”.
I marked where on the bumper I needed to drill my holes. I am going to use three holes. Drilling these three holes took over three hours…. The bumper is made from is really, really hard metal. My expensive Titanium drill bits did nothing. My expensive Cobalt drill bits, again, did nothing… I even took the bumper off the car and put it in my drill press. No luck… Head scratching… Time for a beer.. a good Porter…. What did work was something I never thought would. My ‘cheapo’ set of Harbor Freight Step drills bits… go figure.
I remounted the bumper, checked the alignment of the hitch one more time and marked where the three holes I had to drill on the vertical plate using the bumper holes as a guide. Removed the hitch from the car and drilled those three holes. Now mount the hitch back into place on the bumper using grade 8.8 bolts and mindful of the vertical measurement I took above.
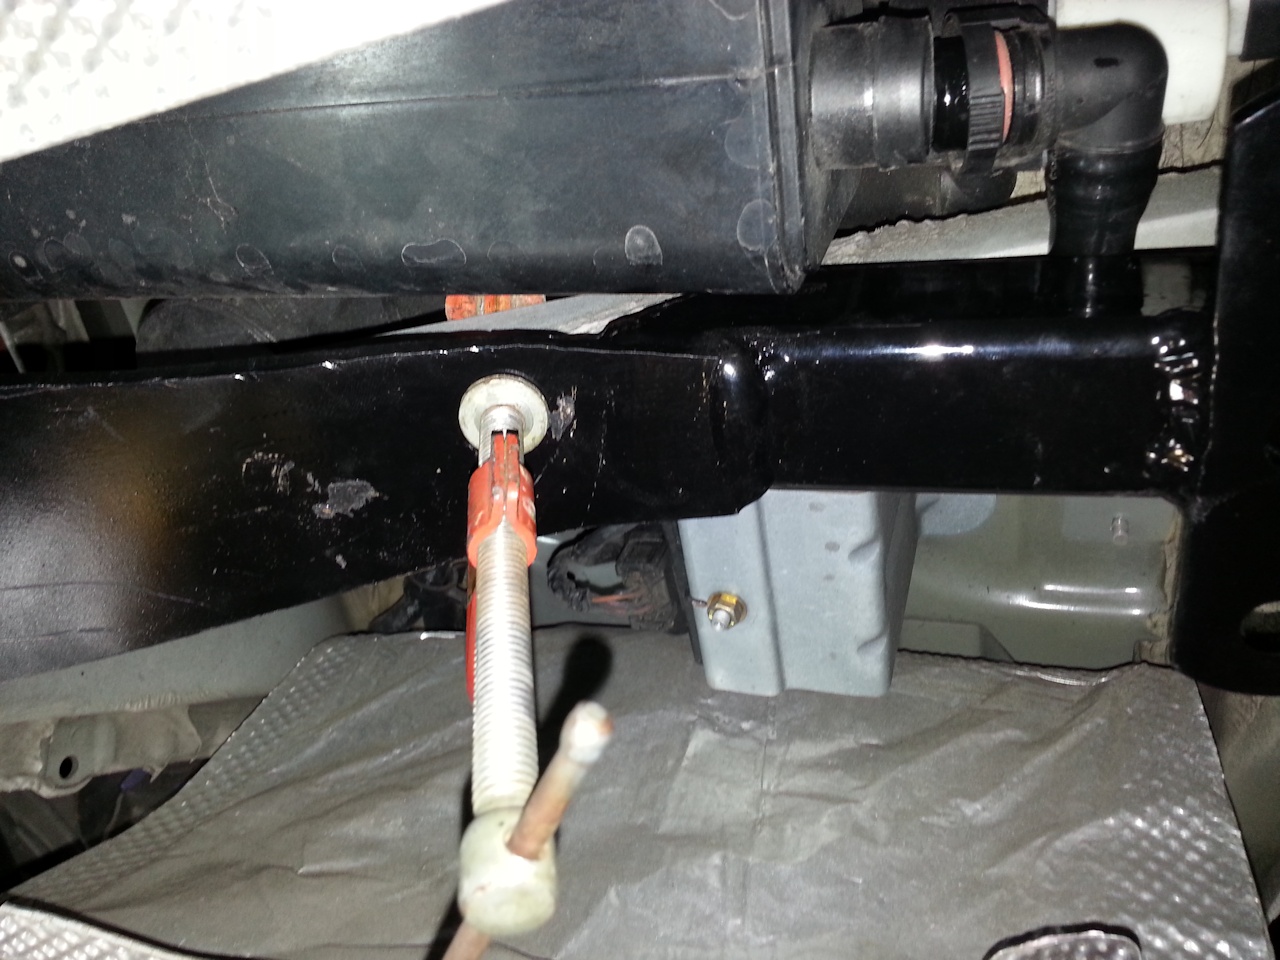
Now for marking and drilling the two holes in the forward end of the assembly on the bent/shaped thrust plate. I had already removed the pull rod bolts (these are grade 10 bolts) and I marked a line on the chassis, from left to right, aligned with the center of the holes. Now I did two more lines, front to rear, centered on each hole. Now I know approximately where the center is for each hole. Think of it is cross hairs. Now with the plate against the chassis and not the pull rods, I look at the marks I previously made and marked approximately where the center was for each hole. I took the hitch off and drilled those two holes. Reattached and bolted up. Looks good. Took it back off and sprayed some more paint, especially in and around the holes I drilled. After an hour or so of drying, mounted everything back up. Check vertical measurements. All good. Put the bumper cover back on.. Still good… centered…
I even put a floor jack under the hitch and raised the car about an inch. No deflection, creaks or groans.. this thing is SOLID.
As I have stated before, I have never performed any type of metal fabrication, so this was my first. I am sure some of the metal fabricators here would do things differently than I did. I did learn a lot and had some fun doing it.
Now I am putting my Harbor Freight trailer together. There are some issues with this. That will be my next post.