256HP and 228 ft-lbs of torque at the flywheel
Thanks to e90 pilot for posting his findings!!!!! so for all you early adopters who dont want to wait till spring when i can get my Z4 down AA for testing this map will work and get you where you want to be. with our less restrictive exhaust we may be right in the sweet spot!!!!! the 325I has the same engine as our Z 3.0I n52 so this map will work with our cars just fine!
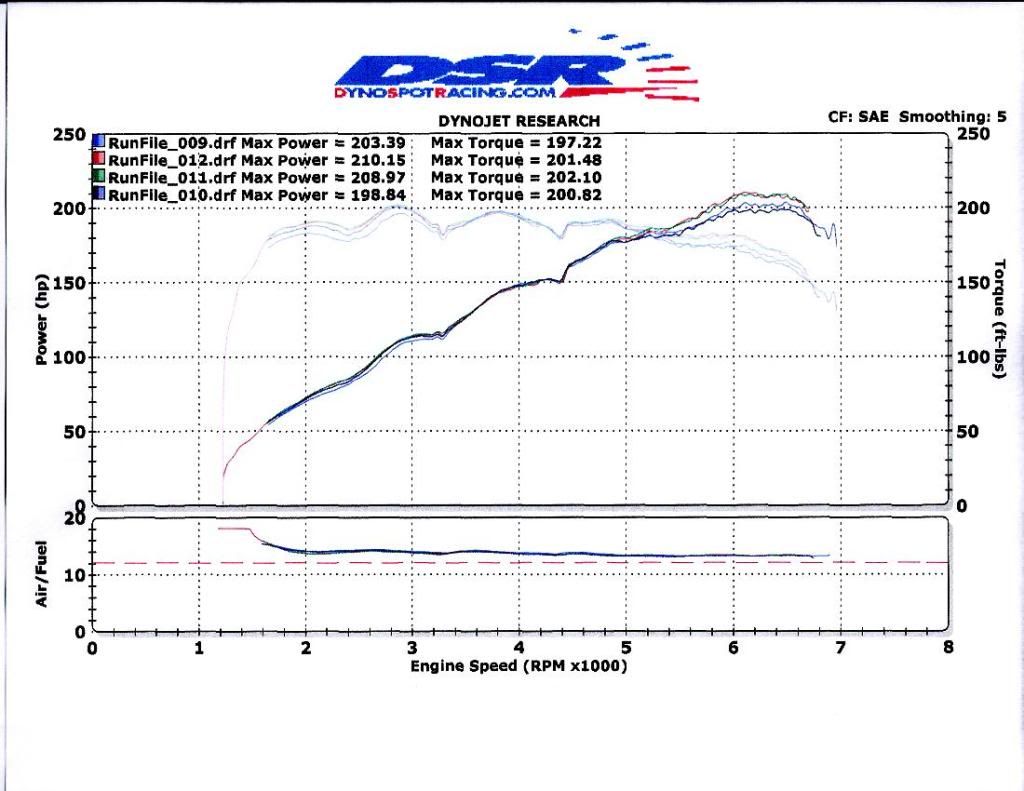
Update 3: As some of you already know, I have Active Autowerke's software installed on my 325i. Drivability issues have been completely eliminated and it no longer knocks. When I first drove it, it felt faster. I just got back from Dynospot Racing in San Jose again and the numbers confirm my initial impressions. I don't have the file yet but I do have a print out. The car makes 210 hp @6200 rpm and 202 ft-lbs tq @2750 rpm. 175 ft-lbs tq are available at 1500rpm and doesn't really drop off until 6000 rpm. Since I have the 3-stage manifold there are torque peaks at 2750 and 4000 rpm. And remember, I have 127,000 miles on my car! Considering that I think I finally have a working 3-stage manifold swap with all the kinks worked out. It would be nice to get a stock 330 on the same dyno I used to see how far off I really am.
For more information on the AA tune please visit
www.activeautowerke.com or PM Viral @ Active Autowerke username: Active Autowerke III.
So 210 HP and 187 ft-lbs of torque to the wheels on the best HP run. With an 18% drivetrain loss, that puts me at 256HP and 228 ft-lbs of torque at the flywheel which is right on the money for a 330i. Keep in mind two things: the 325i has a more restricted exhaust and I have 127,000 mi on my car. I think there is more HP in the engine. A cold air intake and exhaust will definatly help the HP numbers at the cost of torque. Those of you with the PBX might have to ditch the box. The engine software may not be compatible with it but I don't know for sure.
Hello guys!
I’ve finally got the process done
once I get the ECU back from AA the conversion will be done and I should have SI power in my I, 45 or more HP total.
cost of intake manifold $200 dollars used of an 09 X3 or (from a 2006 530i) prices range so keep shopping untill you find a price you like usually they are seen running between $200 to $300.
cost of ecu tune -TBD- working on getting a tru Z4 "SI mod" tune, this will cost me around $600 plus dyno time but must be done to achive true "SI" numbers. may be cheaper when all said and done just shooting for worst case.
their is also a more modest map out with net gains of around 15 to 20HP or so for $399
total for possible 45hp gain from stock = around $800!!!!! again price depends on ECU mainly.
OK so here it goes, not the best at making a DIY post but I hope this gives you all an idea of the process and or PITA level.
STEP 1: First things first, open your hood and study the contents of the manifold, wires connections, give it a very good look over to familiarize yourself with all the details of your original manifold so it will be easier to put back together later.
Step 2: Remove the plastic valve cover topper to reveal your metal valve cover and fuel rail, also remove your driver side cross brace (16mm deep-well socket or wrench) leading from the firewall to the driver side strut tower, then remove the BMW text cap with the silver lines running through it, this part simply pops off.

Step 3: Remove your air box and Air intake tubes leading to the throttle body, (use a flat-head screw driver to loosen the hose clamp where it connects to the throttle-body, pop the cover on the air filter housing and the whole section will be loose, now use a a small jewelry flat-head screw driver to release the tab/clip on air-flow sensor so you can disconnect the cable and remove the filter top and hose as one piece. Pull the air filter out (good time to inspect and upgrade to a K&N high-flow lifetime filter - K&N part # 33-2372, I saw 4 mpg increase on highway with this filter) – to remove the air filter box, simply lift the side closest to the engine upward toward you (toward the wheel), you will see the 2 rubber grommets near the wheel side begin to flex, pull up and out. When you replace it, make sure to line up the cold air intake with the rubber boot on the left side, near the headlight).
this starts to open up the area and you will be able to get your hands in much more easily. the throttle body will also have to come off as well there is a plug under it that will have to be unplugged before removal. (To remove the throttle body, first use a flat-head screw driver to loosen the hose clamp on the portion of hose left when you removed the air intake – once hose clamp is loose, pull hard and the small black hose coupler will come off of the throttle body. Using a 10mm socket and extension, remove the 4 10mm bolts – each bolt also has a washer, don’t loose them. Now you pull the throttle body out, a good time to clean it up if dirty) also remove the giant flex tubes with the rubber mounts that mount to the side of the intake manifold and push them off to the side and out of the way. also remove the sensor that sits atop the intake manifold at the back end of the manifold, the strut brace should be removed by now so you can get easy access to the sensor.


Step 4: now the two wires connected on top of the intake manifold above the throttle body are the ones that belong to the DISA valves on the three stage manifold, the one closest to the windshield will be mounted to the front facing DISA valve that is mounted directly above the throttle body, you should take time to mark this wire after disconnecting it as the outer DISA. the outer most wire which is the longer of the two will wrap around to be mounted on the inner DISA valve that faces the engine block, mark this one as inner DISA. (to remove them, simply press down and they will disconnect from their holders – note that they have clip style blank covers at the end of each wire that need to be removed before you attach them to the new DISA connection points)
Step 5: Now with the DISA wires marked and out of the way you must remove the plug on the left side of the throttle mounting plate (the throttle body must be removed by this time) these are connected with a squeeze style connector, you must pinch the two sides in order to release them. (Slide your fingers in from underneath – as there is more room to fit your fingers in – and squeeze both tabs and pull out) once this tube has been disconnected look below to find a plastic square with a bunch of wires running out of it, this must be unhooked and pulled off the tabs that are securing it. I used a sharp putty knife to wedge in there and pry it off as the tabs securing it do not depress, (start with the front two clips, wedge the putty kinfe in and work them loose while pulling on the box toward you, then do the same with the rear 2 clips, working it back and forth until it slides out to you.) once you have removed it from its securing post there is one more rubber mount under it that needs to be pushed toward the front of the car to be released from the tab this releases the bottom of the intake manifold.


Step 6: now this is where it gets "fun" our cars have a oil separator behind the manifold and the connecting lines must be disconnected before removal of the intake manifold. there is the upper one that is mounted directly behind the valve cover, it is wrapped in foam (use extreme caution as these can become brittle and brake easily) these also use the squeeze to unlock connectors and are a little tricky to get to, (I used a pair of extended and curved needle nose pliers to get in and squeeze the tabs to disconnect it), there is the one you can see and is fairly easy to get to and the other is a bear, it sits behind the intake manifold and is basically imposable to get to until you un-mount the manifold.

this is looking under the manifold at the oil seperator. the front elbow sensor has a wire attached that must be removed.

Step 7: disconnect the power plugs on your fuel rail and run the wire loom between the intake tubes that its snaking through so it’s no longer visible. once that done unscrew the fuel line bracket (using a Torx T-25 bit) that connects to the upper back portion of the manifold.

Step 8: The oil separator tubes have wires attached to them and those attach to a small connector in the back of the intake manifold and can be seen directly underneath the power brake booster vacuum line toward the rear of the manifold, unscrew this piece (Torx T-25 Bit – I left mine on and swapped it after removing the manifold as it was much easier to access the screws) as it will stay behind and not come with the manifold, you will have to mark the connectors with different colors or paint pens as once their disconnected their easy to confuse, marking them will insure proper replacement when attaching it all back together again.

Final Step. Disconnect the master brake booster vacuum hose connection where it splits, there’s a long section that runs through the intake manifold and a short section, it is also a squeeze to unlock clamp, once disconnected (Using a deep-well 11mm socket) remove the 7 intake manifold bolts that connect it to the cylinder head their are 3 nuts and 4 bolts all aluminum, when reinstalling use caution and be sure to look up proper torque lbs. I think it was 10 or 11 but don’t quote me on that.

once the bolts are removed and you can freely move the intake manifold around a little and you will be able to disconnect a wire that is connected to a sensor near the front bottom of the manifold (its connected to the farthest forward oil separator tube) after that we have two last hurdles, the bottom connector on the oil separator and the brake booster vacuum hose. I moved the intake manifold in such a way that I could get my hand in the bottom side under the oil separator and disconnect the tube, (I used the extended/curved needle nose pliers again to get in and squeeze the tabs to disconnect it) you guys are going to have to play with this one it was the hardest part of the whole swap, but I was new to this so you may have a better way of making it happen. once the tube is disconnected swing the rear part of the manifold out clockwise and pull toward you snaking the vacuum hose out from in between the manifold. its hard connected to a post and would require damaging the clamps to remove it otherwise and not very flexible this part is the easiest to damage and may just be easier to get a new one, their relatively cheap so don’t cry if you brake it.

by now the intake manifold should be out. and you should have something similar to this.

now get the new manifold and replace the manifold gaskets as they should always be replaced as they are only 16 dollars anyway, and put it all back together in reverse order. also just before you tighten down the manifold remember to plug in the new DISA valve wires into their correct DISA valve locations. (Make sure to route the rear DISA line behind the oil seperator line that runs along the inside of gthe manifold) the wires are correctly sized so you should not be able to mix them up, short wire goes to the outside DISA valve and the longer one snakes around and connects to the rear DISA valve.
Rear DISA valve connection.

Front DISA valve connection.

there you go, sorry if it’s confusing, I was learning as i go.

here is the finished job
